You are using an out of date browser. It may not display this or other websites correctly.
You should upgrade or use an alternative browser.
You should upgrade or use an alternative browser.
Not spraying well
- Thread starter Nochain
- Start date
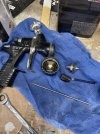
If there is a filter inside the cup get rid of it also. Paint can collect in it and clog things up.I do use a filter at the gun. Have been for years with no issues. I’ll remove it and see if that helps. Its new and its before the gun reg.
Lizer
Mad Scientist
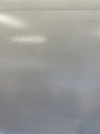
The second picture is characteristic pigment migration that can occur with this epoxy. I do agree from the picture it seems very light, but I've found that even if the gun gets too close at a spot, or you double back over a spot, you can risk pigment migration. I've never had that much though, it's only a small spot about the size of a half dollar.
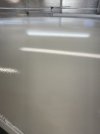
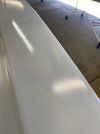
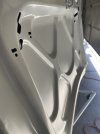
That looks like cratering to me. Or fish eye.So this is what it looks like on an area that looks fair. Notice the bubbles on the upper right pillar. If this is normal I am disappointed. Notice the coat is extremely light. I always spray light initial coat when applying epoxy. Its translucent at 1:1 and you can see through this. Those bubbles are not from a heavy coat.
I wonder if the digital regulator is causing the problem?I do use a filter at the gun. Have been for years with no issues. I’ll remove it and see if that helps. Its new and its before the gun reg.
I would remove it and the filter, then adjust the pressure at the wall with the trigger fully pulled.
Chris_Hamilton
Trying to be the best me, I can be
Really pretty normal. We all get that from time to time. The one area is probably from where you had to much overlap or got the gun too close. Remember it's alcohol in the epoxy that cause the issue. Too heavy or too close and it craters. You got to spray the first coat light, especially with white. And have proper overlap, and proper gun distance. Move quickly.So this is what it looks like on an area that looks fair. Notice the bubbles on the upper right pillar. If this is normal I am disappointed. Notice the coat is extremely light. I always spray light initial coat when applying epoxy. Its translucent at 1:1 and you can see through this. Those bubbles are not from a heavy coat.
For your first coat, cut your fluid down a touch more, be very robotic in your overlap, maintain gun distance, don't let it get too close. After the first coat you can relax a bit and spray a wetter coat. Not super wet, but wetter than your first.
Once you get the hang of it, it becomes easier.
P.S. Not exactly related but get rid of the filter at the gun. It doesn't help things.. I know you've said you've used it in the past. Doesn't matter, get rid of it, everything you spray will improve and perform better.
SOI waterborne wax and grease remover.Can I ask what you're wiping it down with before you apply the epoxy?
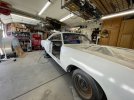
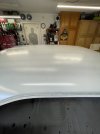
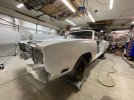
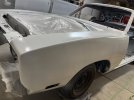
Thanks guys for your help and putting up with me on this. I removed the ball filter to the input of the gun. I am going to try for the second coat. Hopefully it will work better than the first. I sanded down the rough spots. Here are some pictures as this says more than I can type.
Attachments
MJM
Promoted Users
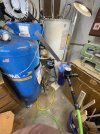
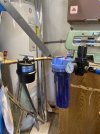
Straight out of the tank I would put in a water/oil filter separator first before going into your Motorguard. You will overwhelm your M60 real fast which will then exhaust your desiccant faster. And those M60 filters are not cheap.
Quoted for the truth. I don't care what air compressor a person owns. They all produced moisture / water. Some more than others. When I first started building my air system, I built a wall hung 3/4" - 72' of copper cooling manifold. Coupled that with a water / oil separator at the compressor tank. Then another 20' of 3/4" copper pipe to three in line separators, with desiccant filter. This did work if I purged water daily from the air compressor tank and water/oil regulators. I was still having to change desiccant beads every 3 to 4 days.
Got tired of changing desiccant beads so often, so I installed an automatic drain valve on the bottom of the air compressor tank, and added a cheap Harbor Freight Air dryer. That solved my issues for obtaining dry air. I still have to drain the oil water regulator at the tank daily.
3/4" copper cooling manifold
Wall regulators
Air dryer with bottom tank automatic drain valve.
Last edited:
Yup those are nice and I have been planning on doing that but time and money…you know. I also don’t paint very often. Was going to use an trans oil cooler set up.
But the issues I am having is not from this. It happens right out of the gate cold system. The filter is new so is the huge desiccant dryer.
I am waiting for my final dwell time to finish my second coat of epoxy with pictures… stand back and stand by.
But the issues I am having is not from this. It happens right out of the gate cold system. The filter is new so is the huge desiccant dryer.
I am waiting for my final dwell time to finish my second coat of epoxy with pictures… stand back and stand by.
MJM
Promoted Users
Money is a concern, at least it was for me. I didn't want to invest a lot in the air supply not knowing if I had what it takes to do body work and lay down paint. If I didn't have what it takes, than I had a descent system to air up the tires on my cars.
As it sits, I have $1,900 invested in my air supply.
Air compressor $950
Air dryer $350
Copper piping $300
Regulators $300.
As it sits, I have $1,900 invested in my air supply.
Air compressor $950
Air dryer $350
Copper piping $300
Regulators $300.
Lizer
Mad Scientist
It will actually save you money to put a cheap water separator in front of your motor guard. Otherwise you will ruin a filter after just a few hrs and those filters are pricey. The transmission cooler will help a lot too.Yup those are nice and I have been planning on doing that but time and money…you know. I also don’t paint very often. Was going to use an trans oil cooler set up.
But the issues I am having is not from this. It happens right out of the gate cold system. The filter is new so is the huge desiccant dryer.
I am waiting for my final dwell time to finish my second coat of epoxy with pictures… stand back and stand by.
Thanks I’ll do that asap. I can afford that lol.It will actually save you money to put a cheap water separator in front of your motor guard. Otherwise you will ruin a filter after just a few hrs and those filters are pricey. The transmission cooler will help a lot too.
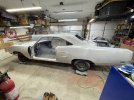
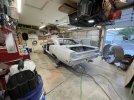
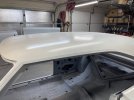
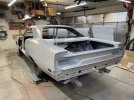
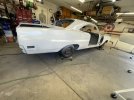
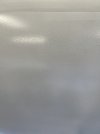
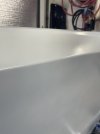
Ok here are a bunch of pictures. Second coat on. Coverage isn’t great (white over dark grey) as this stuff is pretty thin for epoxy. But what is very concerning is the bubble texture that I am getting. You guys say you have seen this before…..that’s concerning. Other texture issues can be seen. I can’t get it to laydown correctly. I’ve tried a lot of pressures and gun settings. The car is a test bed for gun and pressure settings yet the finish is rather consistent…..shitty in my opinion. Especially if I am going to use this as a sealer (which was my plan).
Attachments
-
 BF8AB86C-2BC9-4BE4-ACC6-4B843A9CE268.jpeg178.4 KB · Views: 78
 -
 0FC6E7CC-34DA-4787-BDCF-C2D25BF5948B.jpeg109 KB · Views: 77
 -
 50505081-BD2B-4388-9D14-422B394E8588.jpeg164.8 KB · Views: 86
 -
 5DE330C8-E672-4F8D-9CF2-9A1EFD32FC68.jpeg114.1 KB · Views: 78
 -
 85CF569E-3060-4151-B4E9-AF3042A6EA2E.jpeg116.9 KB · Views: 90
 -
 1F45B5F5-A2A6-42AB-B229-472A307C9882.jpeg184.8 KB · Views: 79
 -
 DF315BDA-3C31-421C-93C2-948B2E160AC9.jpeg305.5 KB · Views: 75
 -
 79D63D8E-B1D4-40F6-BE3C-24D7099BD7D4.jpeg86.2 KB · Views: 75
 -
 94371FA4-7A5A-44B0-8931-62AA485E3C85.jpeg76.9 KB · Views: 70
 -
 4B3BD844-2654-408D-86F6-54BE43A1FCFC.jpeg94.5 KB · Views: 74
The test pattern on the left is the final.
Attachments
-
 D4064607-77E4-4931-9B14-7C966603EC22.jpeg94.5 KB · Views: 66
 -
 9E3786EB-D1F7-4730-9DCC-1E73B62E415D.jpeg83.9 KB · Views: 65
 -
 C5796219-79AD-4F36-AEA6-B37A34E34A07.jpeg172.9 KB · Views: 64
 -
 07C14299-40E3-4912-8E92-C2C739BB096D.jpeg160.4 KB · Views: 64
 -
 6850D12F-FC46-4ACB-A2DC-F3826415A904.jpeg86.2 KB · Views: 71
 -
 D7554828-E4C1-4529-9590-70D936145233.jpeg178.4 KB · Views: 55
 -
 35D31D1B-4075-4476-94A0-F3C63060C5C5.jpeg95.6 KB · Views: 52
 -
 E74477C4-9602-4DD7-BEF1-A21E2436DAAA.jpeg81 KB · Views: 45
 -
 034F3D30-8E73-4B99-BEE6-DCC70B34114B.jpeg71.6 KB · Views: 80