Dressing Welds with All Metal and Epoxy Primer

Well, under certain circumstances a dissimilar metal is protective:

https://en.wikipedia.org/wiki/Galvanic_anode

As far as dissimilar metals in auto body repair, theoretically all would be well until the coating got chipped or scratched enough to allow moisture and contaminants into the repair. It doesn't take much of that to act essentially as an electrolyte for a hidden, unwanted battery made from the repair materials that consumes the metals.
 
+1 for the guy who said use a copper busbar to back your weld. If I get porosity in my own welds it's usually either A) I was too lazy to properly prep & clean or B) The weld puddle pulled air from behind the seam.

You can use weld flux to back your welds, purge the back of your weld seam with a second flow meter from your shielding gas tank, or back the seam with a piece of copper. I like the copper because it also draws heat out of the weld and reduces warpage.
 
Outlaw said:
DATEC;n83378 said:
If in fact it was an aluminum anything touching steel it would be a disaster. I will never use any of the marketed crap.


I am going to remove all the metal to metal aluminum filled filler and go with just epoxy, but, out of curosity, why is aluminum touching steel a disiaster?
Lots of difference in opinion here. Personally I haven't had any issues with using USC all metal, which I've only used as an initial coat only where I wanted something tougher & had a little more thickness of filler needed than a near perfect application would.. The fiberglass resin is tougher than polyester.
As far as dissimilar metal problems, I have seen this in beach area door & window stuff for instance. But not all aluminum over steel is bad;;;;;;; such as aluminumized exhaust pipe, which has held out pretty damn good for me.
I can definitely see where the aluminum dust filler would be bad if salt got to it in those northern parts of the country.
 
Copper pads are simply a crutch for either improper welding technique or poor preparation/fitting. With steel there is no need to backgas a weld. If you were welding stainless yes then you want to back gas or coat the backside with flux but steel no. Backup pads with a mig weld actually make the weld harder as the heat is drawn out quicker and will actually cause more shrinkage (at the weld) than if you didn't use one. Taking the time to fit panels tightly will go a long way to eliminate issues that would cause someone to use a copper backup pad.
 
I am with you on the copper being a crutch. I weld all the time all types of methods, and when I get holes or porosity, its always my error. I go back, fix that error whatever it may be, and move on. One more thing, when doing welds lke this people generally weld too damn cold. Turn it up a notch or four and spend less time on the trigger.

Also, if migging the seam, and its a dirty seam like the rear roof seam on a 53-56 F100, use some filler rod to introduce more deoxidizers into the seam. Make sure to always use ER70S-6 wire, that gets you the most silicon and manganese in the puddle to assist is deoxidizing the puddle.

Dont leave holes in a panel hoping epoxy will solve your issues. Weld it right out of the gate, youll have less issues down the road.
 
When working with modern materials, an occasional pinhole due to porosity is practically inevitable. In particular, technicians working within the constraints of preserving existing corrosion protection like galvannealed steel will encounter vaporized zinc blowing some tiny holes in the steel.

I suppose that restoration techs see such things as an unforgivable flaw, but for techs in the trenches, it's just another day. If epoxy gets put into the voids instead of filler, the job will be far ahead of 99% of shops out there, and will be well protected against corrosion.
 
Chris_Hamilton;n83397 said:
Copper pads are simply a crutch for either improper welding technique or poor preparation/fitting. With steel there is no need to backgas a weld. If you were welding stainless yes then you want to back gas or coat the backside with flux but steel no. Backup pads with a mig weld actually make the weld harder as the heat is drawn out quicker and will actually cause more shrinkage (at the weld) than if you didn't use one. Taking the time to fit panels tightly will go a long way to eliminate issues that would cause someone to use a copper backup pad.

well, it takes time for people to learn and I would much rather suggest that someone uses that "crutch" if they are overheating while developing their technique. I have found mig welding with .035 flux core wire, its a jab of weld, then hit it again when you see the color leave thru your helmet, otherwise it gets too hot and melts needing even more weld to fill what just melted away. People have called me nuts for even using .035, but it was not the first time and frankly, it does not bother a guy that calls himself an idiot. You find what works for you and use it. Just like some people cannot take a gun out of Chip Fooses hand and lay down a perfect paint job. Adapt and adjust to you, your machine, your talent.
 
We all have to start somewhere, I know I did, but you are missing my point. Do it the proper way and don't develop bad habits that you may not be able to kick. If you are burning through the correct thign to do is figure out why. If you simply put a backing pad behind something you won't know why you are burning through in the first place. That's how you learn. Secret to Mig welding sheetmetal....first .035 flux core is never going to give you a nice weld. .023-.030 solid with 75/25 argon/co2 is what you want. Panel fit is everything. If you are butt welding 2 panels together get the fit as tight as possible. Fit it like it's a TIG weld. bevel the edges 45 degrees and turn up the heat, like Marty said. You'll be surprised how easy it'll weld like that.
 
Thats why we are here, to get better. I am better at some things than others, and will not use a crutch because thats not where I want to end up. My failings are general knowledge of the products use, and the application of such. I read and practice daily, always striving to be a better more knowledgeable painter. When it comes to welding and metalfinishing, I am still learning that too. I will use a piece of copper, but only as a save my butt type of thing. I reach for those save my butt methods less and less because I try not to rely on them, welding a panel has become easier for me over the years, even one with lots of rust.
 
chevman said:
Lincoln published their suggestions on this subject.
.023-.025 is preferred for thin gauge metal. I have heard of some guys who prefer .030 but I would advise a novice to go with .023
 
Chris_Hamilton;n83417 said:
We all have to start somewhere, I know I did, but you are missing my point. Do it the proper way and don't develop bad habits that you may not be able to kick. If you are burning through the correct thign to do is figure out why. If you simply put a backing pad behind something you won't know why you are burning through in the first place. That's how you learn. Secret to Mig welding sheetmetal....first .035 flux core is never going to give you a nice weld. .023-.030 solid with 75/25 argon/co2 is what you want. Panel fit is everything. If you are butt welding 2 panels together get the fit as tight as possible. Fit it like it's a TIG weld. bevel the edges 45 degrees and turn up the heat, like Marty said. You'll be surprised how easy it'll weld like that.


There is not much material on sheet metal to get a 45 degree bevel. And no matter how hard I try, getting perfect fitment is always going to leave some areas where I dont have a tight fit. Im working on it, but honestly, Im in a learning curve. Im retired, never had any experience or training with metal work until I just jumped in several years ago.
 
When I weld sheet metal, I go by the table on the inside of the welder by selecting wire guage and metal thickness. If you turn up the heat, does that mean higher than the recommended setting? What about the feed rate, do you up that as well?
 
The table inside your welder is generally for full pass welds, and typically with sheet metal you are welding one weld dot at a time or a limited pass. Higher heat setting is required to get full penetration welds and the "heat realized" is controlled by amount of time on the trigger pull. As far as feed rate, I set up machine first to get your full penetration weld and adjust feed rate faster (if needed) to prevent any blowout. If there's a higher amount of heat and not enough filler going in for said amount, the weld is going to melt something in it's way, hence a blowout. So yes, add more feed speed here.

As far as other comments I'd have to agree. Porosity in your welds is a weld problem, fix it in the weld stage. If it's that bad grind it out and re-weld. Yes we are here to learn and share methods with others, but continuing to perform a weld operation incorrectly gives you a bad weld subject to failure. Relying on a bandaid of fiberglass filler or all-metal over welds is not the correct way to get better at welding, it only makes you more likely to perform sub-standard work in the future. So for whatever process you use, if you're not getting the expected results, fix the issue at that stage. I highly recommend using test coupons to set up your welder's heat settings, feed speed, and also OPERATOR TECHNIQUE. Working on your good panels on your project car is not the time to find out these parameters. Then if you run into any issue on the car, you can eliminate/limit some of the trouble areas and better figure out what is happening..

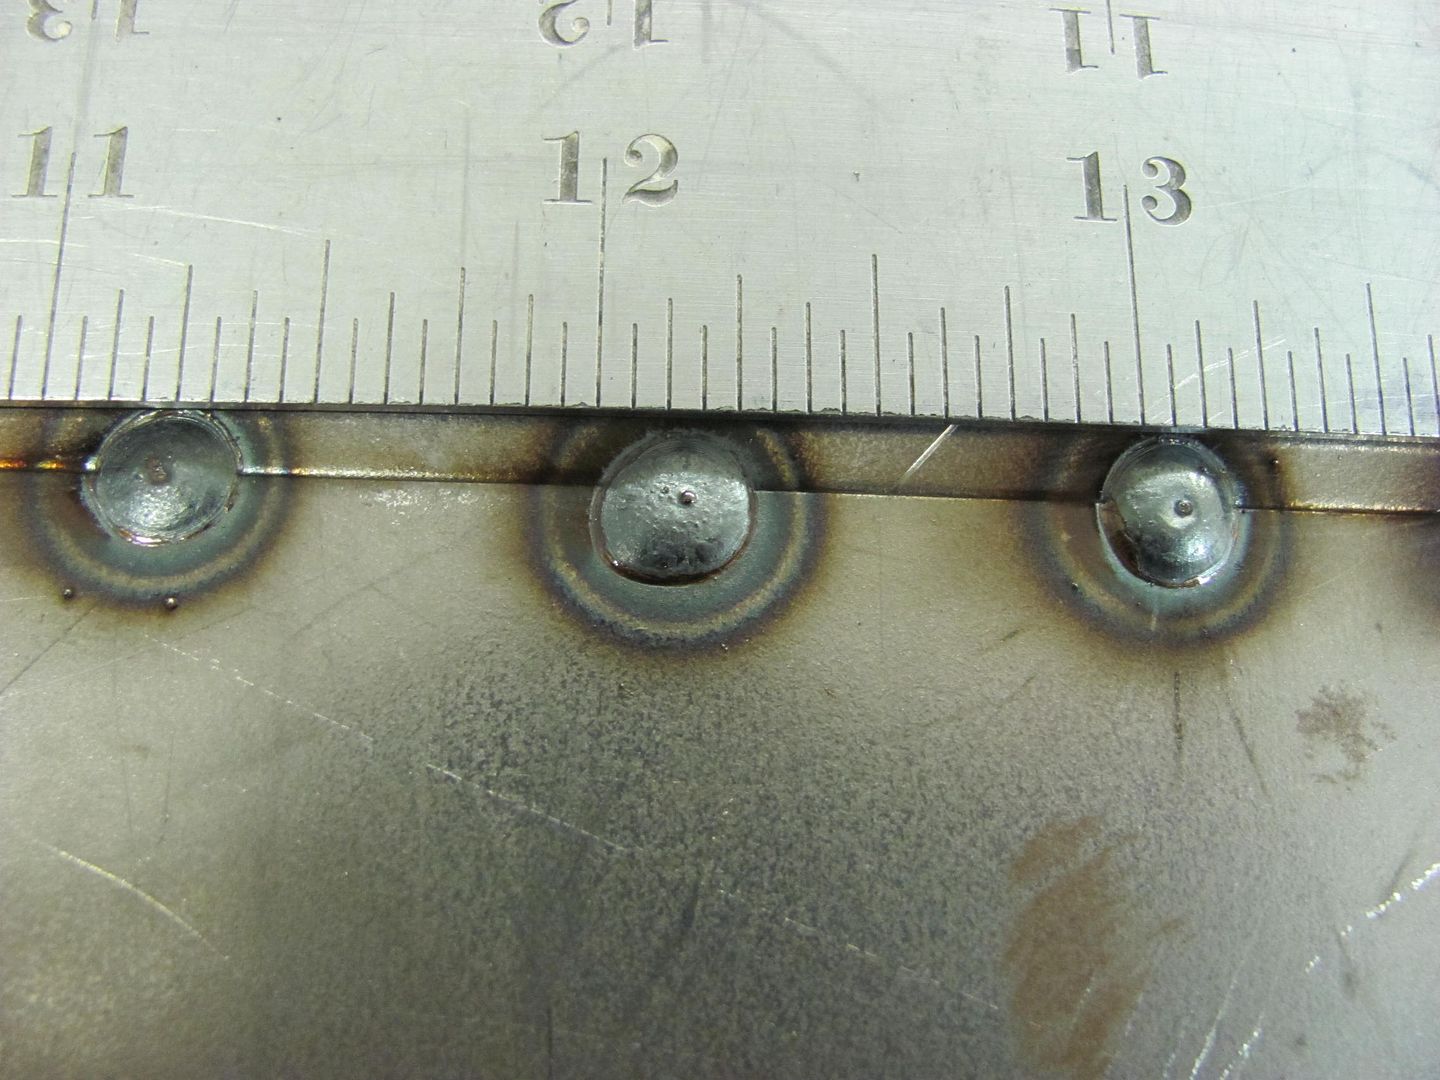
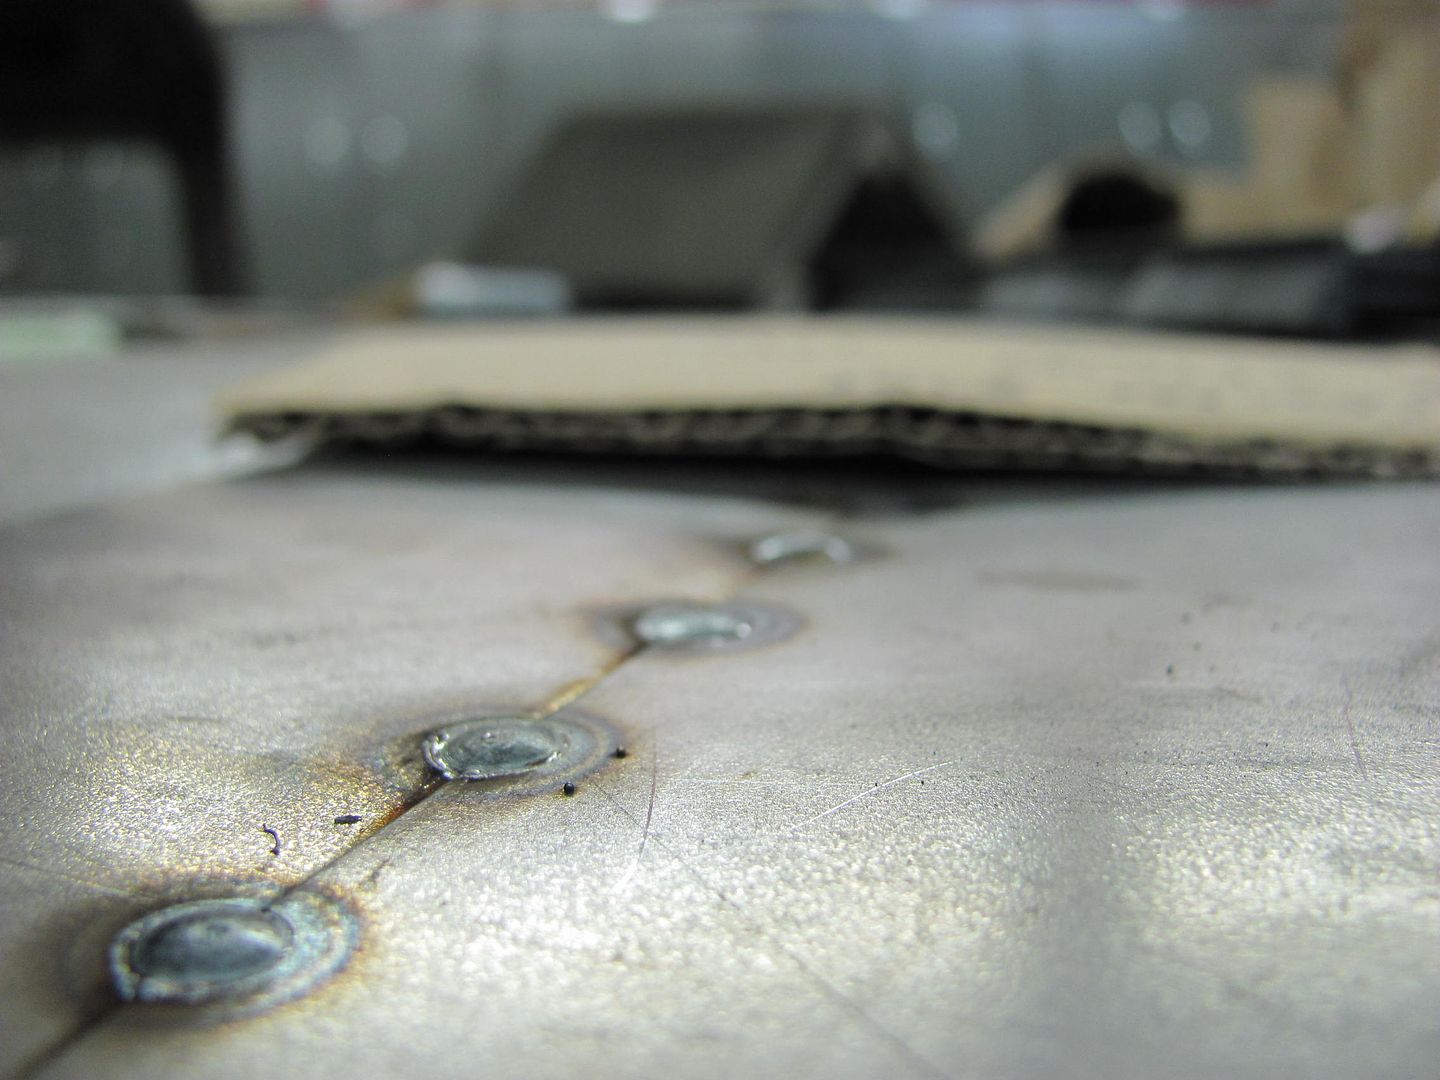
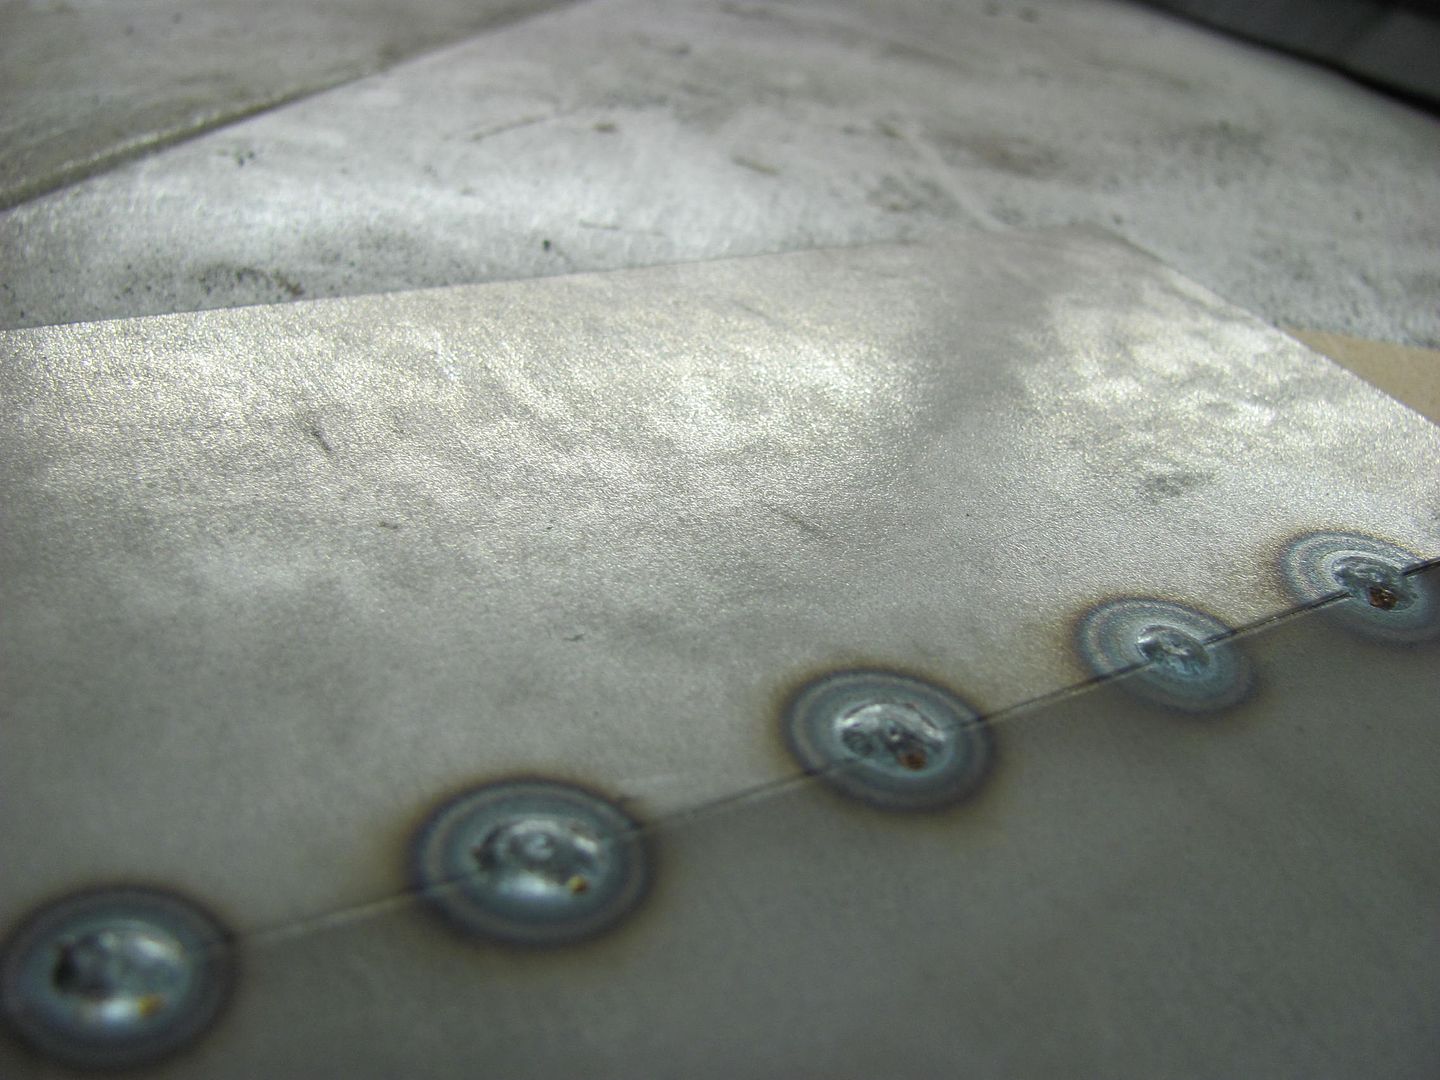
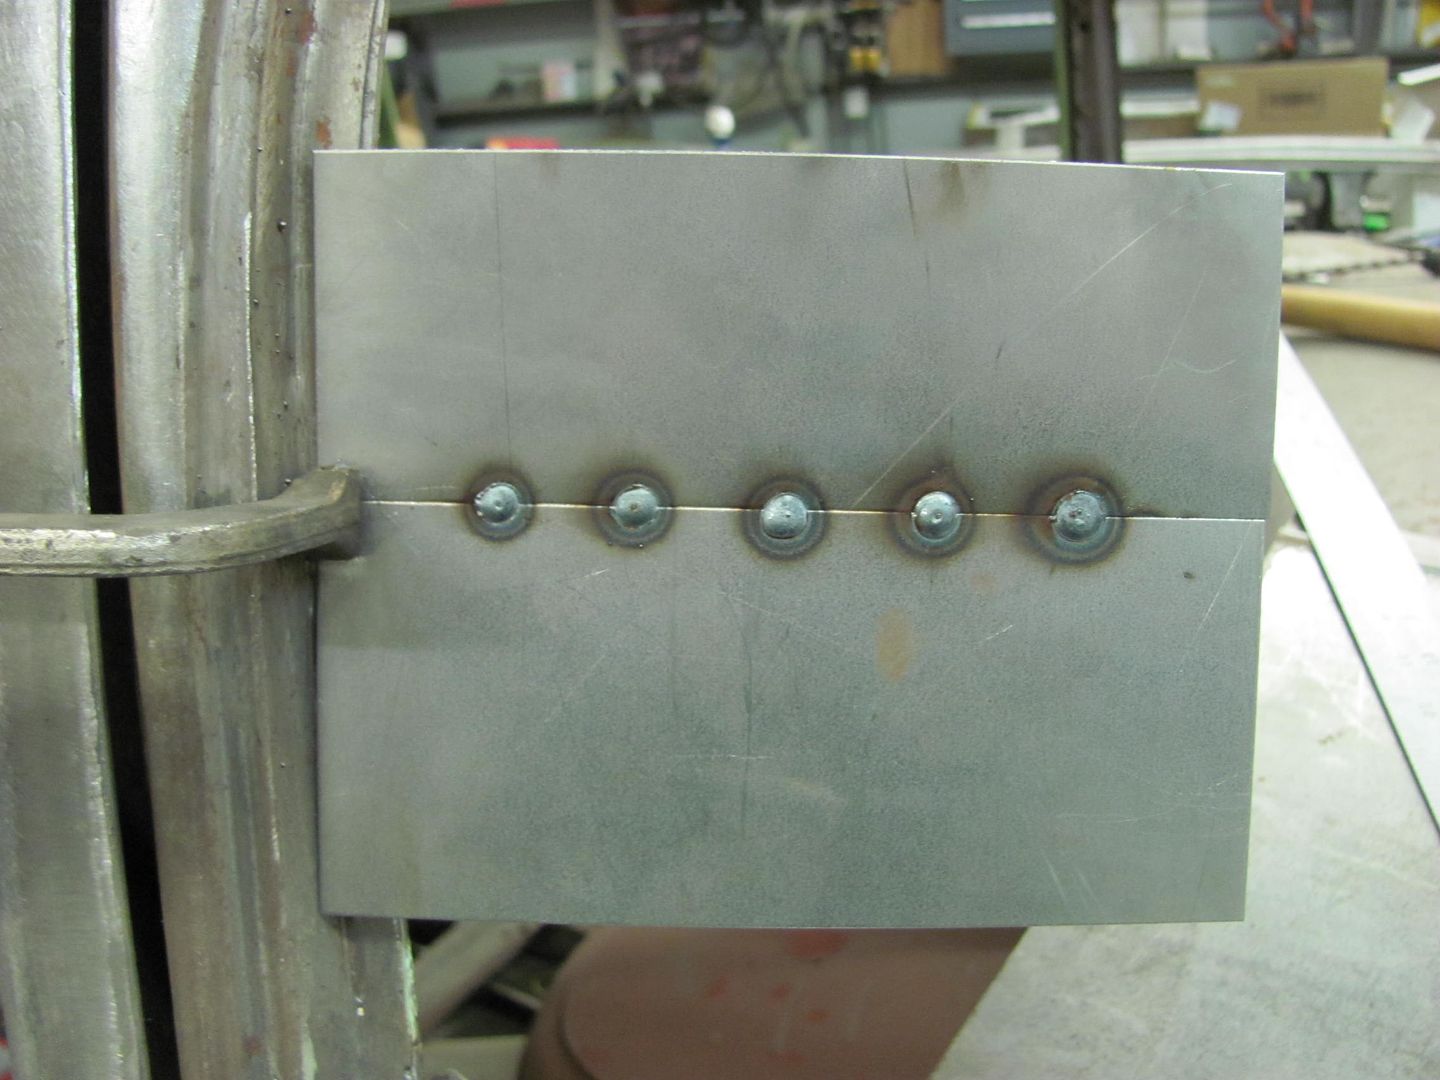
Back to Marty's comment of controlling the heat with the trigger, I did a test weld about a year or so ago using .035 wire, and dialed in the settings for 3/16 thick steel (per the settings chart in the machine) bumped up the feed speed slightly, and ran some test welds in 19 gauge steel... The trigger pulls here are all of about 1/2 seconds or less. Note the test panel is clamped in free air to simulate butt welding on your car's panels. Note there are absolutely ZERO blowouts.


Picture648.jpg


Front side....


Picture645.jpg


Picture646.jpg


Rear side....


Picture647.jpg


Now this experiment is less about telling you to use setting XYZ on your machine and more about showing you that higher heat settings can be used to provide a full penetration weld, and can also be controlled by technique (minimal amount of trigger pull) It helps to get your welder problems figured out with a little bit of practice / experimentation, it will make you better at figuring out any issues that do pop up, and help to eliminate those crutches.....including fiberglass filler over welds. So practice to see what your machine is capable of, and fine tune your TECHNIQUE in the process. You'll start to see your efforts pay off in the results.
 
MP&C said:
The table inside your welder is generally for full pass welds, and typically with sheet metal you are welding one weld dot at a time or a limited pass. Higher heat setting is required to get full penetration welds and the "heat realized" is controlled by amount of time on the trigger pull. As far as feed rate, I set up machine first to get your full penetration weld and adjust feed rate faster (if needed) to prevent any blowout. If there's a higher amount of heat and not enough filler going in for said amount, the weld is going to melt something in it's way, hence a blowout. So yes, add more feed speed here.

As far as other comments I'd have to agree. Porosity in your welds is a weld problem, fix it in the weld stage. If it's that bad grind it out and re-weld. Yes we are here to learn and share methods with others, but continuing to perform a weld operation incorrectly gives you a bad weld subject to failure. Relying on a bandaid of fiberglass filler or all-metal over welds is not the correct way to get better at welding, it only makes you more likely to perform sub-standard work in the future. So for whatever process you use, if you're not getting the expected results, fix the issue at that stage. I highly recommend using test coupons to set up your welder's heat settings, feed speed, and also OPERATOR TECHNIQUE. Working on your good panels on your project car is not the time to find out these parameters. Then if you run into any issue on the car, you can eliminate/limit some of the trouble areas and better figure out what is happening..

Back to Marty's comment of controlling the heat with the trigger, I did a test weld about a year or so ago using .035 wire, and dialed in the settings for 3/16 thick steel (per the settings chart in the machine) bumped up the feed speed slightly, and ran some test welds in 19 gauge steel... The trigger pulls here are all of about 1/2 seconds or less. Note the test panel is clamped in free air to simulate butt welding on your car's panels. Note there are absolutely ZERO blowouts.


Picture648.jpg


Front side....


Picture645.jpg


Picture646.jpg


Rear side....


Picture647.jpg


Now this experiment is less about telling you to use setting XYZ on your machine and more about showing you that higher heat settings can be used to provide a full penetration weld, and can also be controlled by technique (minimal amount of trigger pull) It helps to get your welder problems figured out with a little bit of practice / experimentation, it will make you better at figuring out any issues that do pop up, and help to eliminate those crutches.....including fiberglass filler over welds. So practice to see what your machine is capable of, and fine tune your TECHNIQUE in the process. You'll start to see your efforts pay off in the results.
I have done a similar test once, I was manufacturing bulldozers at the time. Welded 18 ga with the machine set at where I normally weld 1 inch plate, 300 amps or something like that, .045 flux core and the IPM was flyin. I was able to successfully weld it, grind any highs, and planish it, and the big key here was trigger time. I hit that trigger with some superhuman speed, and it worked. All for a ten dollar bet. Now, with the knowledge that It can be done.

By the way, the highs were not that high, little grinding was needed.
 
I've tig welded aluminum sheet good enough that if it was a tank, a pressure test would have been pretty much a waste of time.


But on 20 ga 80's gm sheetmetal I'm still struggling to be as good as I'd like . Been working with both mig & tig. Working on the vehicle is definitely much harder than on a table , particularly with tig. The 80's gm sheetmetal also has galvanizing , which definitely helps to re wirebrush between 1st set of tacks.

Being able to see has been a large part of my problem. A helmet magnifying lens definitely helps, as does a stronger light nearby , but this sometimes overly hot high humidity fla weather makes it near imposible to not have fogging between the 2 lenses. Sometimes had to just stop at night, & start again another day.

Fittment splicing into a vehicle with all the compound curves & multiple angled cuts is definitely one of the hardest parts. The perfectly tig gapped areas definitely go pretty easy compared to not so great fit areas.

On a recent fender splice, I left what should have been 3/8" extra past a lower body line when splicing 2 same model fenders together. Good thing I did because that extra 3/8" turned out to be almost zero extra, had to rebend the body line on donor part. When doing splice in jobs, leaving extra material on the 2nd side of a weird cut to have to trim in place during tacking process has saved me a few times.

Also for some of these projects, I've tacked with mig while holding with 1 hand, then cleaned up & finished off with tig where a 2nd person to hold things would have been a help with tig. ​
 
I did some experimenting turning up the heat. I really liked what I saw. I have pretty much always been able to get welds that compare to the illustrations posted by MP&C when I am doing a butt joint. But only when I have perfect fitment. Good point about how important perfect fitment is. I learned two things to improve my welding from this post. I liked using higher heat and feed rates than recommended table settings. Holding the trigger 1/2 second proved to be a bit of a challenge as I have never done that before, even on spot welds (butt welding sheet metal). I probably was closer to 1.5 on the trigger pull, but at the recommended settings. For me, 1/2 second is as fast as I can pull and release the trigger. At least thats what it feels like. Its a littile difficult to measure.

My issues with welding are:

1. When I grind off too much weld and try to correct a pinhole

2. Areas where I have poor fitment.

3. Welding a factory seam shut where there are wider than desired gaps and a filler rod results in a seam on both sides of a filler rod laid in the seam.


#3 is where I have most of the problems, but also not real high on how often I do it. I think removing the seam might be a better choice than filling it. With the thicker weld in that area, I still have to deal with the possibility of "ghosting". I wont know that until I have completed the project.
 
Back
Top