1965 Buick Special Convertible

First I saw this post, you like Rusty seem to make small work out of this major project, nice job!

In 1979, my wife had a 78 Trans-am, had a supper offer from Jacksonville FL for the TA, so drove it there and guy bought it on site, saw a buick, just like this but baby blue on the corner for $300, bought it to get home and dump, ended up driving that car for a year, it was so nice.
 
Bob Hollinshead;1613 said:
Mopars better built???? At least that GM car has a frame, there aren't many 65 mopar convertibles left to restore-with unibody construction they were rotting away a lot sooner than the GM's of that era.

Yeah I suppose you could have rigged up a way to hook the seats to the frame and drove around on that. :) My comments were directed mainly at the quality of things like the dash, gauges, interior components. Like I stated previously I am a fan of the classic GM cars and have nothing against them - it is just an observation.
 
Bondoking;1585 said:
GM's suck :cool: .. Yeah you heard us... They suck, for all you bowtie boyz :p

hey comon, dont you guys remember the quality built into such classics as the Vega, the Monza & my favorite, the Citation!

I'm currently cursing GM for the 90K lifter rattle in my 02 5.7L van thats a nightmare to change if I do it or pay about a grand to someone else. I already had the pleasure of changing the intake manifold gasket for a H2O leak, so yeah, they suck!
 
edp;1651 said:
hey comon, dont you guys remember the quality built into such classics as the Vega, the Monza & my favorite, the Citation!

I'm currently cursing GM for the 90K lifter rattle in my 02 5.7L van thats a nightmare to change if I do it or pay about a grand to someone else. I already had the pleasure of changing the intake manifold gasket for a H2O leak, so yeah, they suck!
I hear you.
I bought a brand new Vega GT in 1971. It was the last new car I ever bought. Paying top dollar to watch your car crumble makes no sense to me. Now I buy a clean used car that's had a couple of years to crumble for someone else.

Only had one small crumble on my Mopar. The evaporator on our PT Cruiser developed a leak and they wanted $1,500 to replace it so I decided to di it myself. Took ten days and $600 -- $250 for parts and $350 for the rental car.

Followed five easy steps:

Step 1: Open the front doors. The interior should look like Picture 1.
038.jpg


Step 2: Carefully remove everything in front of the seats.

Step 3: When everything is out of the way, remove the evaporator so the interior looks like Picture 2.
036.jpg


Step 4: Replace the evaporator.

Step 5: Using the parts removed in Step 2, make the interior look like Picture 1 again.
 
in my quest to make the datsun project as comfortable as possible a driver I decided to retro fit AC, no small task as I've found out. In my research I ran across a guy replacing an evaporator in a 02 Ford Focus (my wifes car - so it caught my eye), it was the same nightmare as yours, completely remove the entire dash assembly & front seats, huge job - nothing like one would expect if not used to working on newer cars like these. Congrats on getting it done, I decided if the evap fails in her car I'm selling it!
 
I need some help from BOB or one of you GM guys.
My doors line up fine with the rubber bumpers on but when I install the striker post I cannot get it to adjust far enough in to keep the door aligned. The post does not adjust far enough inward to keep the door shut.
Any suggestions?
 
What he means by second click is this.. when you shut a door, you know how it will latch but not be all the way in and secured.. but it has latched per say.. when you put rubbers on you almost have to slam the door to get the door to latch all the way, otherwise they stay on the first "click" and will never align properly..

I have also had issue's with door rubbers on these old cars, I talked to Bob about it a few years ago and he told me of the company he used with good success.. Worst case scenario, I have had to cut them down to fit.. Pain in the rear, but if you want it dead on, its the only trick I know of..

Some guys will tell you in after the car sets for a while the rubbers will compress and you can adjust em in, but I have not see that from my experience yet.. Im sure its true and they have to give some that is just common sense, but it may not be enough..

Hope that was some help bro.. Bob will reply im sure... and he will be able to give you the best insight
 
Thought it was time for an update on this project.
After many hours of troubleshooting wiring problems, installing the exhaust system, rebuilding the carb, etc. I got the engine to start without much effort.
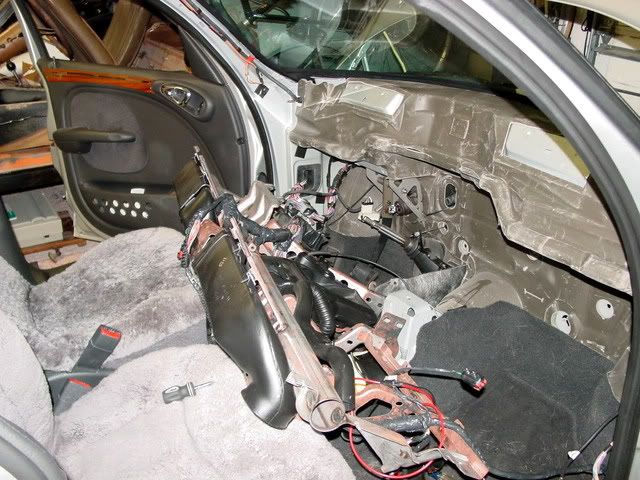
Of course that showed me some problems with the gauges and instrument wiring. Someone had cut the ignition plug off the wiring harness, spliced wires into a homemade turn signal system (see picture), the headlight switch was bad, ignition switch was bad, turn signal switch destroyed, etc. etc.
LeftInterior.jpg


Once I had this mess straightened out I went to work on the tail lights only to find the power lead had been cut in the middle of the harness and taped off. Fixed that only to find that one of the lead wires was cut off at the connector plug and on the story goes.
Installed the hydraulics for the convertible top. (yes, I spilled some fluid. :oops: )
ConvertibleTopPump.jpg


Then installed the top frame work:
ConvertibleTopOld.jpg


You can see its pretty rough and the old weatherstripping is shot:
ConvertibleTopCorrosion.jpg


Cleaned out the old tack strip material:
ConvertibleTopTackStripOld.jpg


I am sure someone is wondering why I didn't clean and paint it off the car so I'll explain. Nothing on the car was complete or working when I got it and I felt it safer to leave as much intact as possible until reassembly so that I could "figure out" what it was supposed to do.
This is my first convertible so no past experience to draw from.

Sanded, cleaned and painted:
ConvertibleTopFramePainted.jpg

ConvertibleTopFramePainted1.jpg


Everything on this car needs work so it is a constant waiting game for new parts. Still need a steering wheel and rear bumper for the car so if you can help please let me know.

I'll try to post some pictures of the Convertible top installation once I get the new parts in.
 
Hoping someone can give me some help.
I began tearing down one of the bucket seats to install the new foam and covers when I ran into a problem. The seats are not correct for the car. Apparently someone added these bucket seats and I am having trouble finding any information on them.
There is a tag on the seat bottom springs:
BucketSeatTag.jpg

I am wondering if the 2 8 78 on the second line is a date?

There are numbers on the foam pads:
BucketSeatBottomFoamJ-245.jpg

BucketSeatBackFoamJ-246.jpg


There is another number on the back:
P1010032.jpg

897

Anyone have some suggestions?
Thanks in advance!

I have googled these numbers, tried searching the usual supply houses (OPG, Parts Place, Year One, etc.) but have had no success in finding any information on the seats.
 
I see a headrest in the seatback, I don't think GM used headrests on the bucket seats untill 68 or maybe 69. Post up some pics of the seat cover pattern and I might be able to figure it out. I have some 66 GTO seats stored in my basement and they do not have headrests.
Is there a button on the back for flipping the seatback forward or is it a side lever?
 
That looks like a 68,69,70ish GM seat from the front but the back is throwing me off. Try to find some interior pics of Buick Riviera, pontiac catalina and similar cars of that era and I bet you'll figure it out. I'll look around if I have time.
 
Found some more info: GM used metal seat backs untill 1967, after 67 they were made out of plastic. In 69 they switched the back release from a side lever to a button on the seatback.
 
I have been searching and looking at bucket seats all day. The closest I've come is a 70 or 71 but still nothing exactly like the one I have. The back is really throwing me a curve since I have not found another like it.
Sent the foam pictures to a supplier to see if they can ID it by the numbers.
I really appreciate your helping with this.
 
Okay, I searched the seat covers and back for numbers and I found a number on the plastic seat back: FORD D8BB 6661632 AWC
Also found this number 3486 CMP
Since the D8BB is on the tag as well I guess its safe to assume these were built for a Ford. Tried looking for similar Ford seats but still no luck.
 
Maybe the owner should purchase some correct, rebuildable seats, or at least some GM ones where the make and model are known. At some point you have to make it not just your problem, but his, too. It is his car, after all.
 
Back
Top