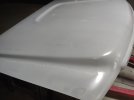
Outline your procedure for those panels. How many coats? How long between coats? How long before clear? What you posted could also happen if you sprayed additional coats of clear over clear you already sprayed. If it goes out of the re-coat window, for a specific amount of time, it will lift the previous coats. IDK if that is what I'm seeing, but it can happen. Again. Read the TDS of the products you are using. Follow them to the "T". Do not deviate from what the TDS says about, mixing, number of coats, flash off time and recoat time.
Thanks Chris, on the specific panels in the pictures above I think I did 3 coats of base, I think I had probably 98% coverage, but I like to do another coat just in case. Underneath is urethane 2k primer. The basecoat (Matrix Edge EPB) was mixed 1:1 per the Matrix data sheet with 1% of MH-006 Slow Premium Hardener. All coats had 10 min of flash time before next coat per data sheet. I was using TCI Products Slow Universal Reducer UR620 75F+.
Temp was 80F and 70% relative humidity if I remember correctly in my paint booth. A storm had come close by but it never rained, and the clouds and wind help cool things down a lot so I knew I had to take the opportunity to spray with the booth at 80F instead of 120F.
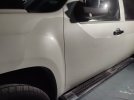
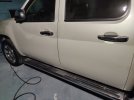
After base I waited another 10 min and sprayed the MPB-500 color blender mixed 1:1 with the same TCI Products reducer and 5% of the MH-006 activator. Now this may have been an issue since the MPB data sheet says to use MX-57, but looking at the Matrix website MX-57 does not exist, so I am not sure if the color blender/wet bed/clear base/intercoat clear should be activated/hardened. It also says: "*NOTE: MX-57 must be used to catalyze entire basecoat film when applied in multi-layer applications (Example: OEM Tri-coat or multi-color)" This would seem like it would apply to my situation so that was the reason I didn't just leave out the MH-006 hardener/activator. I did 2 medium coats of the MPB-500 everywhere all the way up to my foam tape line, and then I had a little left over and didn't want to waste it and sprayed it some more and I think that's what got me as it immediately happened after that.
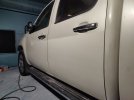
I gave it another 10 min then sprayed the midcoat pearl (Matrix EPBM) with the same TCI (75F+) slow reducer 1:1 with 1% of the MH-006 hardener/activator. I sprayed 3 coats of the pearl with 10 min between each and then one final light coat at a farther distance and lower pressure because I think that is what you are supposed to do on your last coat to prevent mottling even though I have never had an issue at all with stipes or mottling in my pearl and mettalic. It appears though I made a bad error here and didn't realize how close to the foam tape edge I was spraying the coats though.
After the last dust coat of midcoat pearl, I waited 30 min, and sprayed down DI-20 Glamour Clear Coat mixed 2:1 with DI-06 (Slow) activator. I wanted to use the SPI Euro Clear but the paint store only had normal speed activator for the clear and the Distinctive Image (DI) clear coat was the only one they had that had a slow activator which I was concerned with getting the slowest I could get to prevent dry spray and also that I was spraying in 90F+. I sprayed 3 wet coats of the clear, although the DI website says spray 2 not sure if that's just a recommendation or what but I still had some left over after 2 so I did a 3rd coat.
I think my biggest issue here is that I keep overdoing it and spraying too much, but one thing I can't figure out is blending metallics. Whever you see a video or someone talking about it I always seem to still have some questions. In my case I sprayed the color blender everywhere so I guess that would make it a "wet bed" and not a "color blender", but from my understanding is the wet bed purpose is just to provide extra solvent and material for the metallic flakes to dissolve and flow into so they can orient correctly and not just spray out completely flat. What I have never been able to understand is to me it would seem like it would be 100% impossible to spray midcoat peral/metallic and everytime you sprayed it and every condition you sprayed it, the flakes would somehow dissolve and float around in the solvent and magically adjust themselves to the same exact orientation as the previous paint on the panel, but not sure maybe this is happening?
I understand that you need room (I would guess at least a foot or so in my case) in order to properly blend which would mean you would spray your basecoat to cover just the primer or area you are repairing, then carry your midcoat out a couple inches past the basecoat, then do the next midcoat a couple inches past that, and all while at the same time maybe increasing your spray distance/decreasing pressure each coat. So like I was saying above I had successfully painted the tailgate, had wrinkling in 2 spots about 6in in diameter, then spot sprayed without color blender and got mottling where you could see the different reflection in the metallics, although dead on it looked fine. I then re did the spots but used Speedokote "Color Blender" after my basecoat and before the midcoat pearl in the whole area and blend area and it came out 100% perfect and I was amazed how good it worked. So in the case above maybe I should have used the Speedokote color blender since maybe the Matrix color blender is intended for a different purpose?
All the different terminology and inconsistent labeling and vocabulary across the manufactures can get really confusing, but I believe there is only 2 "blending agents". The first being what I used and its called Color Blender/Intercoat Clear/Blending Additive/etc. and from what I understand it is basically just basecoat without the color pigment. The other product is clear coat blender and it usually is an aerosol and sometimes called "Melting In Agent" and is only used after you have sprayed your base and mid and to blend the clear coat edges and also maybe primer edges that you just sprayed and don't want to have to wet sand to feather-in so you don't get a halo effect or line showing through the basecoat from the primer edge. The melting in agent would have to be used right after you spray in all cases as it appears to just be similar to a slow, slow reducer but in a sprayable can that gives you some extra time to try to get hard edges to flow and melt in some, I am not sure if it could help metallic flakes since by the time you spray it you already have your base and mid and clear coat down and I wouldn't think it could penetrate down below the clear coat to help re-dissolve and flow out some of the metal flakes?
So as long as I can keep my external variables under control (weather, hot temperature, bugs, being OCD and spraying too much and overdoing it, getting the paint store to give me the correct paint that matches, etc.) I think everything is going ok and I seem to have my basic process down. But with this blending metallic thing, I think I am missing some technique. I understand there are more detailed blending strategies and reverse blending and so on, but in my case I am trying to spot paint in areas where I messed something up, so I am spot painting areas that have just been painted within days so they aren't fully cured and I am using the exact same pain to spot paint over them. So color matching shouldn't be an issue at all here. So all I need to do here is get my spot painted area metallic flake orientation to match the existing/surrounding paint.