You are using an out of date browser. It may not display this or other websites correctly.
You should upgrade or use an alternative browser.
You should upgrade or use an alternative browser.
Newbie with questions
- Thread starter jzhinton
- Start date
Lizer
Mad Scientist
When I painted a camper I set up two scaffolds on the end and stepped onto the second one as I moved across. Painting the sides I had two scaffolds set up on the sides and sprayed sections as far as my horizontal reach would allow, while keeping a wet edge. The camper owner on the ground would leap frog the scaffolds while I was spraying so I could keep moving along the side.
I'mgoing to have to make do with 1 and 2 ladders, wish me luck.When I painted a camper I set up two scaffolds on the end and stepped onto the second one as I moved across. Painting the sides I had two scaffolds set up on the sides and sprayed sections as far as my horizontal reach would allow, while keeping a wet edge. The camper owner on the ground would leap frog the scaffolds while I was spraying so I could keep moving along the side.
New question:
when spraying SPI black epoxy and keeping a wet edge - how long will the edge remain "wet"
I ask becasue my plan is to have one ladder on each side of a section of scaffold 6'6" wide. Since I will be scrambling up and down ladders and scaffolding to cover the 8'4" across the back and 8" of wrap around corners I worry about maintaining a wet edge. I also thought it would be best to spray the wrap around corners for a few feet on each side. Then spray the back to meet the corners, rinse and repeat untill I get to the bottom. I am hoping that this will work but wanted some input.
Treeslayer
Mike
jzhinton, just an observation here because you sound like me. dont get in such a hurry worried about going fast. you will make mistakes and possibly fall off that ladder. you wont get it done like that. and i hate to read about you getting a broken leg sir. i know i some times get in too big a hurry.
Lizer
Mad Scientist
Like Don already said, your wet edge isn’t so critical for epoxy.
The epoxy has a longer flash period so even a couple minutes and you can still maintain a wet edge.
Now I will say with the black it’s a lot more difficult. Because when you spray back over something it’s easy to get dry spray along the edges that’s much more apparent than the gray. But you are going to be sanding the epoxy anyway so it’s irrelevant.
Your wet edge is going to become more critical with your base and clear because your base flashes very quickly and dry spray on your clear will be noticeable (but repairable).
When I sprayed a camper I planned my moves out ahead of time, and then I actually rehearsed them with my empty gun and hose in hand, to make sure I was going to be able to make the reaches and stretches, and climbs up and down, and the guy on the ground leap frogged the scaffolding. Sometimes the rehearsal revealed the something wasn’t going to work so we had to change it.
Anyways, once you do a dry run rehearsal, stick to that plan and you’re ready to go live. Just don’t get in a rush and get flustered. The epoxy is repairable. The clear is repairable. The base is most difficult to repair and there’s a good probability you are going to get tiger striping or mottling of your clear. Read up well on techniques to spray these to avoid that. I’d recommend a drop coat on WET base to prevent those two issues.
This is exactly why Iam trying to get a feel for how long I need to be able to get back to a wet edge before it'sno longer wet. I too planned to doa dry run but knowing how long I have before I need to get back to the wet edge would help me in my dry run.Your wet edge is going to become more critical with your base and clear because your base flashes very quickly and dry spray on your clear will be noticeable (but repairable).
When I sprayed a camper I planned my moves out ahead of time, and then I actually rehearsed them with my empty gun and hose in hand, to make sure I was going to be able to make the reaches and stretches, and climbs up and down, and the guy on the ground leap frogged the scaffolding. Sometimes the rehearsal revealed the something wasn’t going to work so we had to change it.
Anyways, once you do a dry run rehearsal, stick to that plan and you’re ready to go live. Just don’t get in a rush and get flustered. The epoxy is repairable. The clear is repairable. The base is most difficult to repair and there’s a good probability you are going to get tiger striping or mottling of your clear. Read up well on techniques to spray these to avoid that. I’d recommend a drop coat on WET base to prevent those two issues.
Lizer
Mad Scientist
I think you should get an old hood or some kind of fairly large panel from a junk yard first to do some practice spraying on it. Really. Lean it up against a tree or something so you have a vertical surface. This will tell you a lot about how long you have and what your pattern looks like.
You could just end up with some major catastrophes if you make your first time be on the actual panel. I did a practice panel and I still had a bad experience on the first car I ever did solo 8 years ago.
You could just end up with some major catastrophes if you make your first time be on the actual panel. I did a practice panel and I still had a bad experience on the first car I ever did solo 8 years ago.
I would if I could and I wished I could. I have a very small window to do the actual painting. Remember I am in a private park now. I did get a large sign that I will shoot on just before priming.I think you should get an old hood or some kind of fairly large panel from a junk yard first to do some practice spraying on it. Really. Lean it up against a tree or something so you have a vertical surface. This will tell you a lot about how long you have and what your pattern looks like.
You could just end up with some major catastrophes if you make your first time be on the actual panel. I did a practice panel and I still had a bad experience on the first car I ever did solo 8 years ago.
Yes, I was thinking along the same lines with the retarder.You should get some urethane retarder. You’re gonna need it along with very slow reducer…
Making my primer/CC order. I'll be painting about160 sq ft of surface. Is what I'm ordering adequate to do the job?
will be using Nason as BC
-----------------------------------------------ORDER---------------
primer and activator 1:1 assuming 3 coats + sealer coat
6620-1 Black Epoxy (gallon)
6700-1 Epoxy Activator - Gallon
#885-4 Slow Urethane Reducer Quart will quart be enough for sealer mix???
#710-1 Solvent Based W&G Remover
CC 1:1 3 coats
4000-1 Universal Clear (gallon) 165.20
4004-4 Very Slow Activator (gallon) 54.87
-----------------------------------------------------------------------
Another issue is there are no compressors available for rental to support the HTE gun I bought,soI returned it it and ordered an LVLP gun from Eastwood so I can use a lower CFM compressor which I can get. The above products recommends 1.4 tip but my gun is 1.3 -any issues with that?
approx. how much product mixed will I need for 50 sqft of paintable surface area.
also TDS recommends:
You may basecoat over Epoxy Primer reduced as a sealer from 2-48 hours without sanding.
- again what is best practice on 2-48 hrs?? why 2 to 48? Is there a sweet spot forhow long to wait?
I will be using Nason as BC
Paint will be Nason locally
will
#710-1 Solvent Based W&G Remover - Gallon 42.85
to use on Nason before CC????
Eastwood Concours LT100 HVLP Spray Paint Gun
determine clear coat needs - forum suggests Universal CC -agree??
Universal Clear 1:1 Mix
Product Numbers:
4000-1 Universal Clear (gallon) 165.20
4000-4 Universal Clear (quart) 52.41
Which Reducer will I need as I can't find info on temperature range by reducer?
4003-4 Slow Activator (quart) 54.87
4004-4 Very Slow Activator (quart) 54.87
do you have this in gallons? price/gal??
Would it be advisable for me to order a quart of Urethane Retarder? Urethane Retarder may be added at 1-3oz per mixed quart of clear.
#925-4 Polyurethane Retarder Quart Not for sale in California 38.14
Lizer
Mad Scientist
Some of these questions you’re asking people have already answered so I don’t understand what you’re trying to get by repeating them.
A quart of slow reducer will be enough for sealer.
1 gallon kit of epoxy and clear are more than enough.
For the surface area that you are spraying at a time (50 sq foot), mix up 26 oz of product and spray your first coat. You won’t use all of it. See how much of it you used to determine how much you need to continually mix up. Whatever is leftover can be used for the second coat + whatever additional volume you need to mix, if required.
For your epoxy primer sealer—since it is outside the 2-48 hr guideline needs to be modified for you because it will be curing faster from the UV. Also because your basecoat is outside, your clear needs to go on the same day for the same reason. Therefore I would spray sealer on Day 1 later in the afternoon if you have plenty of heat in your days.
On the morning of day 2 once all the dew is evaporated, spray your basecoat. This is going to take a while with all the different taping and masking you need to do, which is why Chris indicated you have a very difficult project.
Then you need to get clear on everything within the same day otherwise you will risk adhesion issues to your basecoat. The fact that you are using a cheap basecoat is not doing you any favors. You will want to add a capful of clearcoat activator to your basecoat which will make it more robust, enhance adhesion with the clearcoat and will not give you lifting problems were you to sand through the clear.
it’s recommend to use the slowest activator you can and I would normally use very slow in your case, but since you are outside you might end up with a little more trash in very slow vs slow.
Will it be over 80 degrees when you’re spraying? If so, retarder is immensely helpful. Add from 1-3 oz per quart. I usually start between 1-2 oz and see how it’s going and will aSS more if needed. Even if not that warm it might help just to keep your wet edge wet longer.
For a camper I’d be inclined to use a lower solids production clear just based on cost (assuming it’s cheaper than Universal clear).
Well I finally figured out how many sq ft of surface I am painting and wanted tobe sure what was said earlier still applies. Sorry for the repetitiveness but I am new at this and would be unhappy not having enough product on hand after ordering it.Some of these questions you’re asking people have already answered so I don’t understand what you’re trying to get by repeating them.
Thanks! I had no idea how much to mix up but with its long pot life (primer) I needed a starting point.A quart of slow reducer will be enough for sealer.
1 gallon kit of epoxy and clear are more than enough.
For the surface area that you are spraying at a time (50 sq foot), mix up 26 oz of product and spray your first coat. You won’t use all of it. See how much of it you used to determine how much you need to continually mix up. Whatever is leftover can be used for the second coat + whatever additional volume you need to mix, if required.
I won'tbe entirely outside as I plan to enclose the endcap in a PVC/plastic coverto keep debris and bugs out.For your epoxy primer sealer—since it is outside the 2-48 hr guideline needs to be modified for you because it will be curing faster from the UV. Also because your basecoat is outside, your clear needs to go on the same day for the same reason. Therefore I would spray sealer on Day 1 later in the afternoon if you have plenty of heat in your days.
I have eliminated one color and will use three instead of four. Nason tech line said I had to wait 1 hour before masking on new paint.On the morning of day 2 once all the dew is evaporated, spray your basecoat. This is going to take a while with all the different taping and masking you need to do, which is why Chris indicated you have a very difficult project.
This could be a very valuable tip - thanks!Then you need to get clear on everything within the same day otherwise you will risk adhesion issues to your basecoat. The fact that you are using a cheap basecoat is not doing you any favors. You will want to add a capful of clearcoat activator to your basecoat which will make it more robust, enhance adhesion with the clearcoat and will not give you lifting problems were you to sand through the clear.
Yes the 10day forcast still has us in the low nineties soI thought I'd need retarder.it’s recommend to use the slowest activator you can and I would normally use very slow in your case, but since you are outside you might end up with a little more trash in very slow vs slow.
Will it be over 80 degrees when you’re spraying? If so, retarder is immensely helpful. Add from 1-3 oz per quart. I usually start between 1-2 oz and see how it’s going and will aSS more if needed. Even if not that warm it might help just to keep your wet edge wet longer.
Again thanks for your insight and wisdom.For a camper I’d be inclined to use a lower solids production clear just based on cost (assuming it’s cheaper than Universal clear).
I'm still mulling that over. These pictures show a before and after idea that I am now considering with 3 colors. Where I eliminate the graphics and some stripes. Still a mental work in progress until I order the paint.Too keep it simple could you not just use 2 colours? Tan colour around the tail lights and black the rest?
Attachments
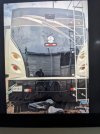
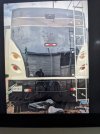
Thanks, most likely the one I will do.I think the simpler iteration is just fine, personally.