S
ssanto
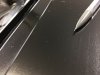
I'm finding many little bumps/bubbles after laying down SPI black epoxy primer (see pictures). It is mainly happening on horizontal surfaces. Almost never happens on vertical surfaces. I'm not sure what the problem is or how to cure it. I figure I'd post as much information as I can here to hopefully find a solution. I apologize in advance for all the detail. I tend to be verbose ")
Here is my setup...
- 60 gallon Husky compressor
- 3 ft rubber hose connected to 20' of black pipe
- Black pipes runs up and down the wall next to my compressor
- On the final vertical leg of the pipe, I have a T that that connects my Kobalt regulator and water separator
- 50' of harbor freight air hose
- I can shoot air through my blower nozzle against a flat piece of metal and not see any water blowing out
... I've been running this setup for about 10 years while doing random projects on and off in the garage. Not used daily or anything like that.
Here is how I prep the panel...
- blow off with compressed air
- spray W&G remover with spray bottle
- wipe with a clean lint-free towel
- blow panel dry with compressed air
- (maybe repeat process if the towel I used to wipe it came out too dirty)
- mix paint
- tack cloth right before shooting
- garage and metal are on the colder side.... 62-65 degrees. Which is right at the lower limit of the tech sheet. But I figured this would just cause longer curing time which I'm OK with since I'm doing about one panel a week.
Here is how I prepped the paint...
- 22 month old batch of SPI primer (both parts)
- the paint was split into four 1-qt cans and I'm nearing the end of using up the 2nd can
- stir the can with a paint stick being sure to get everything that has settled onto the bottom mixed up into the paint
- pour a bit of paint into a small paper cup with a line on it
- pour a bit of activator into a second cup with a line on it (same height as the first cup)
- mix them together in one cup with a small paint stick
- (this is my "small batch" process to avoid cleaning cups)
- let induce for 30 minutes
- go and prep the panel while waiting
- after induction, stir again
- pour through filter cone (not sure what size) into paint cup
Here is my paint gun...
- 10 year old HF gun
- the outside is not that clean... paint runs and such on it
- the inside is also not that clean... when I fully disassemble it, I can see a coating of black inside the cavity where the paint comes through (like looking inside through where you remove the tip). I've tried cleaning in there but it doesn't seem to get spotless
- I am NOT using one of those filter/strainers that go under the cup
- 50 psi on the gun regulator with the trigger pressed
- using the standard tip which is 1.4
- new DevilBiss Whirlwind in-line air filter on the gun
Here is how I paint...
- gun is adjusted so that I don't get any runs
- I still get some orange peel
- I've shot a bunch of epoxy before and I can lay it on thick without getting any runs
- I try to go light on my first coat but I end up having a mix of places with nice full coverage and some spots that you can tell that it went too light on
Here is when I see the bubbles...
- after the first coat, mainly in the places that got full and thick coverage
- the bubbles are mostly on horizontal panels, I hardly see any on vertical panels
- I'm just over-coating filler and places where I sanded through to bare metal and giving a fresh cover over the old epoxy primer that I shot a couple years ago
- when the paint is still tacky, I can rub them down with my thumb. they appear to be filled with air/gas... nothing comes out of them and there isn't a "grit" or something hard inside of them
Here is where I am in my restoration process...
- doing metal and filler work
- I'm spot priming over those areas as I complete them
- once all the filler work is done, the car will get SPI high build primer
- the garage is dusty
Here is what I've tried so far...
- the first time this happened, I had my filter/dryer right on my compressor and not after the black pipe. And when I did the "blow air onto glass" test, I got water coming out of it. Since then I've added more black pipe to condense the water and put the filter/dryer at the end of it. Now I get no water, but the problem remains.
- the first time this happened, I did a very thorough cleaning and blow-out of the garage. I am confident at that time that I wasn't kicking up dust. This time I didn't clean thoroughly (other than the decklid I painted). But the bumps showed up right after I got done spraying the panel and I was away from sources of dust when I painted so I don't think these bumps are caused by stuff falling from above.
Here is what I think could be the problem...
- insufficient filter/dryer ($40 Kobalt setup)
- old air hoses
- not-perfectly-clean paint gun
- issue with the 22 month old SPI primer/activator that has been opened/closed probably 12 times
- poor atomization or something with the HF gun
- lack of filter/strainer in the gun (but the cup was clean and I strained the paint as I poured it into the cup)
Other notes...
- I've got a new (never used) DevilBiss Plus gun. I bought it for basecoat and clearcoat. I was hoping to do all the primer work with the HF gun. I may shoot some of the epoxy with the new gun next to see if that solves it.
- I don't really mind the bumps in the epoxy. It is getting sanded anyway. My main concern is that the problem keeps coming back and affects my BC/CC.
If you've made it this far, I owe you a big thanks!
Looking forward to your thoughts...
Attachments
Last edited by a moderator: