Block sanding ?

rustover

Member
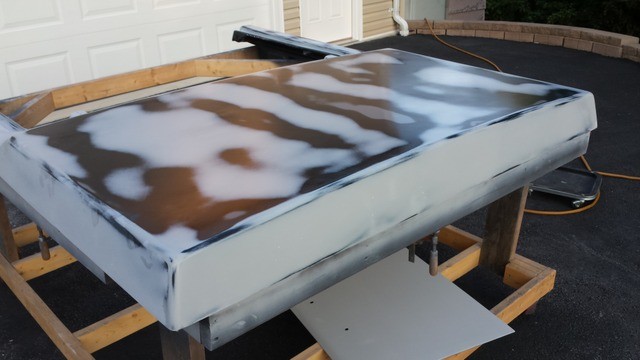
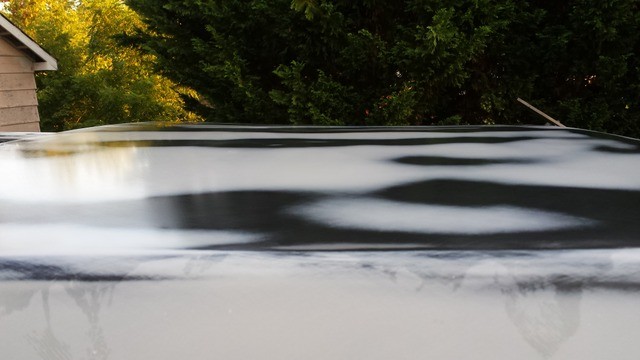
So I have my poly over spi epoxy and I'm block sanding. I started off my using my da on the large areas with 80 grit. It dried to a dark grey and when I cut it, it was light grey and was like a built in guide coat. Once I cut the skin off of it I guide coated it and begin blocking with 120 grit. I was able to cut down all of the guide coat back down to the poly, but in the mean time I broke through several places to the epoxy underneath. In one very small spot I even broke down to the factory grey primer.

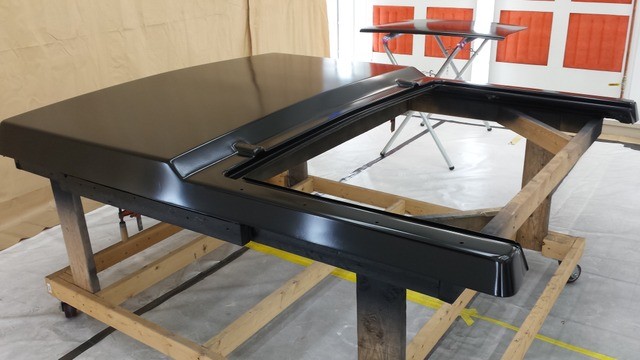
I thought I would know where to stop, but know I'm not sure. It feels really good, the only difference I can feel is the 120 grit scratch. Its more pronounced over the epoxy than the poly. Ive still got some guide coat over spray to clean up. I'm almost thinking I could probably do two more coats of epoxy, block with 320, wetsand with 600 and the seal and paint.

I've got about 6 hours in getting this thing in 120 grit. This stuff sure is a lot of work.


What do you guys think / suggest? Thanks.
 
I would spray 2-coats of epoxy, the first coat may soak in a little and it may be hard to look at, but give it a little while between coats, when you apply the second coat you should be able to look at it and see how straight it is, this is one of the things I really like about using black epoxy, you can see everything in it.
 
I have a similar issue but actually broke thru to bare metal in a few small places. I have to spray these spots with epoxy before I can spray more 2k primer, correct? What are the consequences of you have a few small bare metal spots that get over looked and sprayed with 2K primer instead of epoxy primer?


You nailed it rustover, its a lot of work.
 
Outlaw I would definitely want epoxy on the bare metal spots especially on a high dollar restoration. Collision shops probably do the 2k over bare metal alot. Just not sure how long it would hold up.
 
Its a personal 56 ford truck restoration for myself, actually one of three and this one is just for practice for the next two. The last one being my last attempt from what I learn on the first two. The area in question is only the firewall and just some very small areas where I think I might have had some sandthru to bare metal. Its really hard to tell between bare metal and rage gold in some of the edges on the firewall. I probably have 20 hours or more on this firewall just practicing for the rest of the cab. Wont make that mistake on the rest of the cab or the interior. That 20 hours does not count all the holes that were welded shut. Thanks!
 
Block Sanding is a good place to add another question to this thread. Does anyone have any experience in using the stick it blocks verses the hook it blocks? I really like the hard stick it blocks, but I think the hook it blocks would be nice when you do not want to change paper and need a different grit. I also read on one of the forums the new 3M stick it blocks have better glue on the velcro than the durablock stickits.

One really big concern for me, can you get as good a job with the velcro hook it blocks as you can with the stick it blocks? Im wondering if the softer surface on the velcro blocks is going to be as flat as a hard surface (stick it).
 
rustover;n76083 said:
. . . Collision shops probably do the 2k over bare metal alot. Just not sure how long it would hold up.

There are DTM (Direct To Metal) 2k primers that can be used in such situations.

Everyone has their own way of doing things and there are many good ways to get to the same result.
I mainly restore older cars so my steps will differ from some.
Here's how I go about getting the car ready for paint:
1. Strip to bare metal.
2. Prep metal with 80 grit on a DA to give good scratch for the epoxy.
3. Wash the car with soap and water then rinse with clean water.
4. Blow dry with compressed air, paying attention to seams and pockets. Let dry. (In Arizona it doesn't take very long. LOL)
5. Mix epoxy 1:1 and let induce.
6. Wearing gloves (I like Raven), I wipe with solvent based W&G remover, making sure to wipe it off the panel before it dries with a clean shop towel. Let dry.
7. Blow car off with air hose and then shoot two wet coats of epoxy and let cure overnight.
8. Using at least a 9" block on larger panels and 120-150 grit paper, I lightly block sand the epoxy. This will reveal lows and highs.
9. Do hammer & dolly work, follow with filler work, blocking filler with 80 grit until its right, then skim and sand with 180 into the surrounding epoxy.
10. Shoot another coat of straight epoxy to seal, wait about 30 minutes to an hour, then shoot 3 coats of 2k primer. Let this set for a least a day if you can.
11. Guide coat and block sand with 180-220 grit.

Usually doing it this way eliminates any metal showing through when block sanding the 2k.
 
Thanks 68. The areas I may have hit bare metal are stock edges where the block slightly rubbed up against where I had done some minor filler work close to a ridge. I like your steps.
 
Looks to me you could have a problem with your blocking? You have a pattern to what appears to be your high and low spots.Everyone has given great advise,after doing as suggested maybe use a longer bock and change angles of sanding.Just a thought.
 
That 'glass part could easily be made in a wavy pattern like that, I don't necessarily think that rustover has a blocking problem.
 
[QUOTE='68 Coronet R/T;n76088]

There are DTM (Direct To Metal) 2k primers that can be used in such situations.

Everyone has their own way of doing things and there are many good ways to get to the same result.
I mainly restore older cars so my steps will differ from some.
Here's how I go about getting the car ready for paint:
1. Strip to bare metal.
2. Prep metal with 80 grit on a DA to give good scratch for the epoxy.
3. Wash the car with soap and water then rinse with clean water.
4. Blow dry with compressed air, paying attention to seams and pockets. Let dry. (In Arizona it doesn't take very long. LOL)
5. Mix epoxy 1:1 and let induce.
6. Wearing gloves (I like Raven), I wipe with solvent based W&G remover, making sure to wipe it off the panel before it dries with a clean shop towel. Let dry.
7. Blow car off with air hose and then shoot two wet coats of epoxy and let cure overnight.
8. Using at least a 9" block on larger panels and 120-150 grit paper, I lightly block sand the epoxy. This will reveal lows and highs.
9. Do hammer & dolly work, follow with filler work, blocking filler with 80 grit until its right, then skim and sand with 180 into the surrounding epoxy.
10. Shoot another coat of straight epoxy to seal, wait about 30 minutes to an hour, then shoot 3 coats of 2k primer. Let this set for a least a day if you can.
11. Guide coat and block sand with 180-220 grit.

Usually doing it this way eliminates any metal showing through when block sanding the 2k.

[/QUOTE]

That's a great write up. I will hold onto it for reference. Good to know on those DTM primers, I can see where that would save a lot of time.

As far as the blocking goes, I'm using a durablock, I think its a 30 inch block. The panel does have a bow in it and its been a learning curve using this long block trying to hold it and let the block do the work. After looking at it I did block it in the direction of the bow from front to back. I may need to re-guide coat it and block it from left to right now. When blocking the direction of the bow it cut down to the high areas quick and I had to pay attention that the block had the right contact to the panel.

Looking back at it now I may should have only blocked it from left to right. This is where the block sits flat without putting pressure on it.

I think it would be easier if it was perfectly flat. lol.
 
I am not a fan of the Durablocks. I like their round one and the teardrop for working in tight areas but their larger blocks lose flatness very quickly.
The blocks I use have wooden handles that run the length of the block (9" and 16") and you can clamp the paper on or use PSA paper.
Two things to remember on block sanding. 1. Don't press too hard on the block. You want just enough pressure to get good contact. If the paper quits cutting, change it rather than pushing harder on the block. 2. Sand at about a 45 degree angle, especially when sanding rounded areas. Reverse the direction of your approach regularly. This applies even when using an inline sander.
 
[QUOTE='68 Coronet R/T;n76097]I am not a fan of the Durablocks. I like their round one and the teardrop for working in tight areas but their larger blocks lose flatness very quickly.
The blocks I use have wooden handles that run the length of the block (9" and 16") and you can clamp the paper on or use PSA paper.
Two things to remember on block sanding. 1. Don't press too hard on the block. You want just enough pressure to get good contact. If the paper quits cutting, change it rather than pushing harder on the block. 2. Sand at about a 45 degree angle, especially when sanding rounded areas. Reverse the direction of your approach regularly. This applies even when using an inline sander.
[/QUOTE]


Thanks. I've heard that about the Durablocks. I need to look into getting a few other types to have on hand. I sanded on the cover again tonight and decided to keep guide coating and blocking until I had the slick sand to a minimum of mils. I started of blocking from left to right across the top, then went from the front to the rear. I finally broke threw just a little to the raw glass in the middle and that's where I stopped. I have the cover all sanded in 120 grit right now. I'm going to work on the door to it next I have some fiberglass repairs to do on it and then I will spray two coats of poly primer. I hoping I have enough poly because I'm thinking I will put two more coats of poly on the top of the cover and then start blocking with 180.

I don't think this thing is the best to learn on. Its a rough mold. The bow in it feels like a gigantic hump in the middle. Its probably far better right now than it ever has been.


Thanks for the help guys.
 
So I decided to go ahead and put two more coats of slick sand down. The first round of blocking in the pics above was with 120 grit. This time I started with 180. I have the sides blocked out in 180 and there are a few places that you can see a trace of the black epoxy underneath. On the other side there is a few small spots that I did barley break into the epoxy. I'm a little worried about mil thickness, but with the epoxy showing through in a few spots I'm not sure I should be? I still need to block out the top of it and that is where I'm anxious to see how it does.

I'm also trying to figure out what is my next step from this point. I don't have any turbo primer on hand right now, just epoxy. I'm thinking I would spray two coats of epoxy as Chad suggested, block with 320, then I can go to 400 and 600, then epoxy sealer and bc/cc? What do you guys think. Thanks, Russ


If you shoot two coats of epoxy and then block with 320 till its flat (no shine), you should be fine wet sanding with 600. Just be sure to get all the 320 scratches out, prep and paint.
 
[QUOTE='68 Coronet R/T;n76341]If you shoot two coats of epoxy and then block with 320 till its flat (no shine), you should be fine wet sanding with 600. Just be sure to get all the 320 scratches out, prep and paint.[/QUOTE]


Thanks 68Coronet. I think this is what I will do. I would like to use black epoxy, I would be fine blocking for the 320 grit, but I guess I would need to get me some cheap white paint for a guide coat for the 600.
 
rustover;n76347 said:
Thanks 68Coronet. I think this is what I will do. I would like to use black epoxy, I would be fine blocking for the 320 grit, but I guess I would need to get me some cheap white paint for a guide coat for the 600.

You can use cheep sandable grey primer, I would use that for a guide coat before paint.
 
Back
Top