1960 IMPALA CONVERTIBLE BIG PROJECT

This weekends update
My buddy came over Friday and helped me.
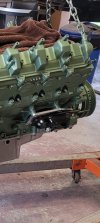
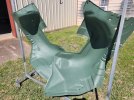
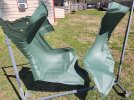
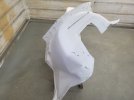
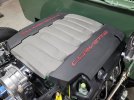
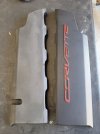
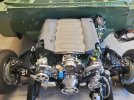
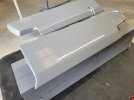
Reminder I've never done a fuel injection swap , I've always been a carb guy, so this stuff is all foreign to me. But 5yrs ago I got a phone call from a guy I didn't know, asking me my opinion of tilt columns. We ended up becoming good friends and I offered my shop to help paint his car, which had this exact motor swap. When I saw his engine I knew I wanted one. This was in 2019. So, he knows exactly what needs to be done to get it on the road. So he came over and helped me install the wiring harness I got from swaptimeusa.com. after him going over the harness with me, I learned that the entire thing is literally plug into sensors and done. We installed the harness in about an hour. Still need to tuck some wires here and there. And do something with the engine covers. The computer is mounted under the dash. I also finished up the brake lines to the master cylinder. After that I started body working the wheel wells. I had to do some patch work on them. Then I had them powdercoated. The powdercoat job was $100 for both wheel wells. To me that is totally worth it, it would take me 2 days to prep them for epoxy. So I'm bodyworking over powdercoat then I will paint them. No pictures of those yet.

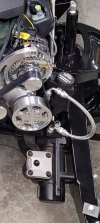
Also debating on what to do with power steering lines. I really wish the return on the reservoir could be clocked in another direction....
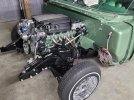
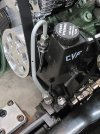
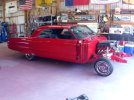
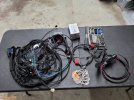
 

Attachments

  • 20240210_201604.jpg
    20240210_201604.jpg
    224.8 KB · Views: 86
  • 20240210_133301.jpg
    20240210_133301.jpg
    183.9 KB · Views: 65
  • 20190726_180340.jpg
    20190726_180340.jpg
    155.6 KB · Views: 63
  • 20240108_152753.jpg
    20240108_152753.jpg
    215.9 KB · Views: 65
Looks great. I am a little surprised you didn’t have to pull the TCM out of the transmission and send it for programming but these 6L80 swaps are more common since I did mine over 10 years ago.

Don
 
Looks great. I am a little surprised you didn’t have to pull the TCM out of the transmission and send it for programming but these 6L80 swaps are more common since I did mine over 10 years ago.

Don
Hopefully I don't have issues. I sent him a video of the car and told him what I needed. I did send him the computer for him to do whatever he does, he makes the harnesses from scratch. He provided the gas pedal, o2 sensors and fan controls. Price was cheaper than any big company.
 
How about snuggling a hard line around the back of the reservoir, then transition to a flex line under it, then to a 90 into the box? Just an idea.
 
Yes it's a 3/8 hardline I made as a mock up, out of some old fuel line. Debating on making one out of some stainless tubing I have.

The engine is on stock rubber mounts , that bolt up to sliding motor Mounts on the engine block. So the whole drive train can be moved forward or backwards. They are made by a company called dirty dingo.
 

Attachments

  • Screenshot_20221007-213239_Gallery.jpg
    Screenshot_20221007-213239_Gallery.jpg
    120 KB · Views: 63
Hopefully I don't have issues. I sent him a video of the car and told him what I needed. I did send him the computer for him to do whatever he does, he makes the harnesses from scratch. He provided the gas pedal, o2 sensors and fan controls. Price was cheaper than any big company.
Just so you know, there is another computer inside the 6L80 transmission which controls the transmission. I have had to remove them and send them for programming. Maybe it’s no longer necessary depending on the tune.

Here’s instructions on how it is removed.

Don
 
Are you thinking it's a bad idea because of torque moving the engine. It just dawned on me
I think replacing the hard-line with flexible would be best. Maybe a loop or to in the hard-line tube would be beneficial, and if it were made of a material that is soft and less likely to fatigue and crack. If it fails it surely will be a PITA mess. Not to mention the regret.
 
I do have a braided line. I just don't like it the alternator hits the fitting if I try to go on the back side of the pump.
 

Attachments

  • Screenshot_20240211_183325_Gallery.jpg
    Screenshot_20240211_183325_Gallery.jpg
    110.3 KB · Views: 65
Another option would be to run a remote reservoir for the pump. It would give you more room to run the lines.
 
Been 2 weeks. Was out the box last weekend but I've been chippin away. I end up ditching the hardline and went witg a braided jic hose and just a rubber hose and clamp on the return. I'm over it. Worked on the wheel wells yesterday. All I did was scuff the undersides in 180 and went straight to raptor
 

Attachments

  • 20240225_111501.jpg
    20240225_111501.jpg
    282.5 KB · Views: 38
  • 20240225_111456.jpg
    20240225_111456.jpg
    316.4 KB · Views: 40
On the top sides, I hit them in 180 as well and went straight to 2k. Then today I hit them 400 wet. They aren't perfect, but these things are super awkward to sand so I focused on the big areas that are most visible. Tomorrow I'll seal and paint the top sides

Considering these things were whooped, rusted, pitted and dented. I think they have came a decent way from how they were.
 

Attachments

  • 20240225_165425.jpg
    20240225_165425.jpg
    99.4 KB · Views: 38
  • 20240225_165429.jpg
    20240225_165429.jpg
    122.3 KB · Views: 37
On to the radiator support...this thing was also pitted and rusted out where the battery tray went...I had it blasted and powdercoated....then I committed the ultimate sin ..I used duraglass to fill holes lol. The powercoat finish was pitted due to the condition of the metal. So . I opted to go ahead and raptor that too. It would have taken alot of 2k high build to get it up to par to paint. So I raptor the most of it and I'm going to paint and clear the top area that is mostly visible. Well see how it looks. The problem is just about any part that I've found. Is in the same or worse condition missed some areas with the raptor because it was getting dark and I did it outside. Just going to dust some basecoat over it to bring it uniform
 

Attachments

  • 20240225_111517.jpg
    20240225_111517.jpg
    284.8 KB · Views: 40
  • 20240225_165433.jpg
    20240225_165433.jpg
    149.8 KB · Views: 40
Last edited:
I started another topic on these pieces. Jim C offered me some advice and it's working out great. I didn't want these covers to say corvette. So I sanded them down. I used DA with 60 80 and 180 grit then 6 coats of epoxy. Im going to paint these green to match and see how they look. If I don't like I could repaint black or whatever.
 

Attachments

  • 20240210_172659.jpg
    20240210_172659.jpg
    166.7 KB · Views: 42
  • 20240225_114912.jpg
    20240225_114912.jpg
    251.2 KB · Views: 44
  • 20240225_120856.jpg
    20240225_120856.jpg
    193.4 KB · Views: 43
  • 20240225_170943.jpg
    20240225_170943.jpg
    116.1 KB · Views: 44
You might want to push the window on the epoxy before you block it down and paint. More time to cure, lot of material there.
 
Back
Top