Universal clear texture

Dave C.

Promoted Users
I painted my truck over three years ago with a pearl base and top coated with universal clear. Applied four coats of clear and cut with 800, 1000, 1200, 1500, 2000 and rubbed with wool and foam pads for a smooth finish. Truck spent two winters outside storage in NY snow, driven during the good weather months. Two years ago I gave it a good polishing to remove some swirl marks n hazy spots. Last year it was covered and stored inside, non heated. This year I noticed that the hood has a texture which is a little rough.

Three years ago I painted a camaro with spi black urethane and four coats universal clear. Same cut and polish procedure. Car went to owners garage and just returned to shop for assembly. Was sitting in an unheated barn before moving into shop. I just looked at it, and the finish has a fine texture all over it. It is very uniform, not spotty or in a couple areas. Any idea as to what is going on? Just painted another camaro with same paint and process. Owner is worried his car is going to do the same. Is it possibly the freezing doing something? Is there a way to prevent this from happening?

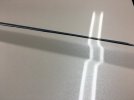
Attached is a photo of the truck. The first camaro done in black is much rougher.
 

Attachments

  • F2931F51-8A3A-4542-B30B-2454D625995E.jpeg
    F2931F51-8A3A-4542-B30B-2454D625995E.jpeg
    97 KB · Views: 469
Die back. Trapped solvents. Over time they have evaporated out . Look at your procedure when painting. If you rush the steps you can trap solvents which will lead to what you are seeing. If you apply products improperly it will happen as well. Pounding on 2K Urethane primer is one of the main culprits. I will add that if you are trying to do any painting in too cold temperatures what you are seeing will happen as well. I add that because I see you are from Buffalo.


This is from the SPI Tech Manual. It is in every copy of the Tech Manual and you can also find the Tech Manual on the SPI home page. If you follow this on your next job you will not have issues.

The Perfect Paint Job​


March 2013

Our goal is to accomplish a paint job that has a strong foundation, maximum gloss and will last for many years. This type of painting is not practical for the everyday production body shop but it will serve you when you do your next restoration or a street rod job. We are going with the assumption that the metal or fiberglass has been stripped of all paint.
All bare metals and aluminum should have 80 grit DA scratches.

Bare metal is always best cleaned with #700-1 Waterborne Wax and Grease Remover then let it set 30-60 minutes before applying the epoxy!

After first reading our Epoxy Tech Sheet mix enough #6600 series epoxy to spray two wet coats over the entire car. Spray one wet coat and let flash about 30 minutes then apply a second wet coat. Let the epoxy set overnight then apply body filler, fiberglass filler or glazing putty over the epoxy. It is not necessary to sand the epoxy before applying the fillers (within the first 7 days of spraying epoxy) as they will bite into the epoxy and feather great. When you have finished sanding all of the bodywork you are likely to have some bare metal spots from sanding. Spray one wet coat of epoxy over all filler spots and over any bare metal spots. Now let the vehicle set overnight.

The next day you can start spraying the 2K Primer over the epoxy. Once again, it is not necessary to scuff or sand the epoxy before applying primer. The most important thing to remember at this point is spray one wet coat of primer and let it set for 10 minutes before applying the second coat. Follow this procedure between coats of 2K Primer. This step when abused messes up more paint finishes than anything else!

When all of the primer blocking and any necessary primer repairs are finished it’s always best to use the epoxy as a sealer. Mix up enough epoxy to go around the car with one wet coat and adding a double shot glass of SPI #885 Urethane Reducer per quart. Let the epoxy set for 30 minutes. Stir one more time and strain. Spray one full wet coat of epoxy over the entire car. The epoxy should set for 2 hours before spraying basecoat or the next option is let it set over night and wet sand the epoxy with 400-800 then spray the base.

Next to rushing the 2K Primer rushing the basecoat is the second cause for the final gloss and depth of a paint job to look bad. It’s very important to use the slowest urethane reducer in your basecoat that you can get away with regardless of outside temperature. Just allow enough extra time for the basecoat to flash off and dry. The difference between a very slow grade and medium grade reducer will show up in the final gloss. The slower grade reducer also has better solvency and will give you far better adhesion. Spray the first coat and let it totally dry before spraying the second coat. It’s best to wait 30-45 minutes between coats of base.

If your basecoat isn’t perfect:
After two coats of base the vehicle should set overnight then do any minor wet sanding with 800-1500 grit sandpaper to remove any orange peel or trash. Apply the next two coats with 45 minutes of flash time in between coats. Some colors will require additional coats. If this is the case, again, wait 45 minutes between coats.

Let the basecoat set overnight.
A word of caution: There are 2-4 basecoats types that cannot be sanded or you will lose adhesion so avoid those basecoats. Check with your basecoat manufacturer.

Applying Clear:
The following day tack off the vehicle then apply a wet coat of SPI Universal Clear and let the first coat of clear set 30 minutes.
Spray the second wet coat of clear and let it set 30 minutes. Let the clear set for 30 minutes before applying each additional coat as well.

Then proceed with normal wet sanding and buffing when you are ready.

Layering multiple coats of clear over multiple days:
From two days to two weeks after the job has been completed, wet sand the clear with 400-800 grit sandpaper to block out any orange peel or dirt. After wet sanding let the car set in sun for a day before remasking and degreasing then apply a wet coat of clear. Let the clear flash 30 minutes. Apply a second coat of clear, then 30 minutes later apply a third coat of clear.
Let the vehicle set two or three days in the sun to help to get all of the solvents out and settle the paint job. If any wet sanding is required before buffing sand with 1500 grit sandpaper then set the vehicle in sun for two to three hours. Bring the car back into the shop and allow it cool to room temperature then buff.

If you follow these directions you will have a durable long lasting paint job with maximum depth and gloss over a solid foundation.
Never wax a paint job applied this way for at least 90 days. This also depends on the amount of sunlight the car has been exposed to in the meantime so feel free to call for advice.
 
Last edited:
There are so many things that contribute to a result like that, but basically how we avoid contraction of the finish like that boils down to two basic things: Heat and time. Heat and time not just at the end, but with every time material is sprayed. In cooler climates like we have in the northern parts of the US, plenty of supplemental heat is necessary to produce a quality job. Not just heat during the initial cure, but 24/7 heat above 65°, imo. And that is surface temps, not air temps. In the dead of winter we can run lots of heat and have air temps over 70°, but the rocker panels will still be ~60°. The products will work okay with less heat, but we have to remember that in a typical restoration type job, there's just lots more material than in the average repair job. This is true for all refinish materials and isn't unique to SPI. In fact, SPI has less trouble than many others because it has more good solids and less solvent on average. But every product still need lots of time to dry if an excellent result is to be achieved.
 
Just to be clear to anyone reading this. The issue is on the User end not the Product end. High quality products will not overcome flaws in handling, or application or technique. This is not a dig against the OP just making it clear. When used as intended, applied correctly, and allowed to cure correctly SPI products perform bar none. Any product if PPG, Glasurit. Sikkens, etc. etc., if applied incorrectly, in too cold an environment, proper flsh and cure time not observed etc. etc. will do the exact same thing.
 
I agree with Chris and crash above. Not enough heat and/or time will cause what you are seeing. The reason the black looks worse is black dries twice as slow as other colors, and needs more time between coats, and before clearing. Rushing any step along the way will cause problems sooner or later.
 
Thanks for the replies. I did paint these vehicles prior to building my booth and also having heat lamps. Currently I apply base, let sit overnight and apply the clear the next day. I used to use fast to medium reducers, but now use slow and wait a minimum of 30-40 minutes before coats as I’ve dealt with solvent pop before. I just can’t believe the surface changed so much after cutting and polishing the car for over three weeks. Just one more reason I love baking my projects in the booth now.
 
Back
Top