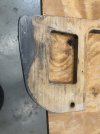
For my Jag XJ6c, I'm at the finish stage now and not sure how to proceed. May need a grain filler first, I keep seeing "primer" mentioned but for a clear topcoat on wood? Any suggestions for a topcoat? I've used a good bit of Waterlox but I just realized it's for interior use. Car will see enough UV to disqualify. I know I could get the high build glossy finish I'd like with SPI UV clear but not sure if this is the right choice for wood. It's a Santos rosewood veneer on an original plywood dash. Any help would be appreciated.
You are using an out of date browser. It may not display this or other websites correctly.
You should upgrade or use an alternative browser.
You should upgrade or use an alternative browser.
Re-veneering and finishing a wood dashboard
- Thread starter Slofut
- Start date

DavidL
Promoted Users
User 64Riz here has a build thread for his Riviera and in one of his updates he showed how he finished the veneer he used. He said he used alcohol dye then varnish and then topped it all with 3 coats of universal clear. Then wet sanded with 800 then did 3 more coats of universal clear and finished it off with a light sand and buff.
Here is a link to the posts where he shows what he did:
Here is a link to the posts where he shows what he did:
1964 Buick Riviera
This is one beautiful car. I'm sure it's even more impressive in person.
www.spiuserforum.com
I would not put any automotive clear over varnish. What would be the point? SPI clears will build as much and as fast as varnish and will be far more durable. Plus I'd be concerned about adhesion or lifting.
I did the bed wood for my 51 Ford F1 using cocobolo veneer, very similar to Santos Rosewood. I filled the grain with 2 part clear exterior grade (with UV protection) epoxy, sanded smooth, 3 coats SPI Universal, wet sand, 3 more coats, cut and buff.
I did the bed wood for my 51 Ford F1 using cocobolo veneer, very similar to Santos Rosewood. I filled the grain with 2 part clear exterior grade (with UV protection) epoxy, sanded smooth, 3 coats SPI Universal, wet sand, 3 more coats, cut and buff.
Jim C
Oldtimer
i havent done much with that particular species so not sure how the grain is in it. if its a very open grain like oak, teak, mahogany, etc then you can grain fill it with something from a company called aquacoat. they have a clear pore and grain filler. like most grain fillers, its a paste that you can rub into the wood using a rag or work it with a bondo squeegee. you do a couple coats then lightly sand smooth. from that point you can just topcoat with universal clear. universal or automotive clear is fantastic for wood. remember its a poly and used on wood every day. if the wood is not super grainy and i suspect its not like most other rosewoods i have seen. in this case you can just use layers of universal clear to fill the light grain pores. super heavy open grain like oak you would need to use the paste mentioned above or clear epoxy like avanti mentioned. also like mentioned, do not go over varnish. really no point to doing this. another thing i will throw out there concerning wood finishes.....there is no better sanding sealer for wood on this planet than spi intercoat clear. a coat or two then lightly sand smooth and topcoat as usual. its super fast and sands powdery. if the grain is light then you can do this method as well under the universal.
64Rivi
Promoted Users
I probably should have elaborated on the varnish a bit more in my Rivi thread so let me do so now. ")
Not all woods have it but, certain ones have a complex grain that can be multidimensional when finished correctly. It's a term called Chatoyance (flame mahogany, burl walnut and figured maples are good examples). It's a French word meaning "cat's eye" and pretty much sums up the effect. It will give you a shimmer or almost 3D effect when you move the wood around in natural light. Keep in mind that not all woods can produce this effect.
You may be able to see some of it with just a general clear coat finish but in order to really make the grain pop, you have to use a penetrating oil to make it dance. Linseed oil would be the go-to but I opted for Varnish because the effect was greater than the samples I made with the boiled linseed oil and I wasn't comfortable using straight oil under the clear (varnish is a mixture of oils and resins). I used Old Master Tung Oil Varnish.
To be clear; the varnish is not used as a finish but a penetrating oil. You don't want to build a traditional varnish film as you would if you were finishing the wood with varnish. Instead, you simply want to wet the wood to get the oil in the fibers and then wipe the finish off after sitting for a few minutes. You also don't want to let it sit and saturate the wood since you are using veneer. Unless you are using paper-backed veneer, using too much oil can cause it to seep through and plasticize your adhesive film....and potentially delaminate the veneer.
Instead of just rubbing the varnishing with a rag, I did it with with fine grit paper to create a swarf (oil mixed with the sanded wood dust) to create a bit of a natural filler for the pores instead of using a pore filler. Again, I did so because pore fillers (not the clear ones) use pigments which can bleed into the wood fibers and muddle the grain.
The key to this method when using a clear top-coat is to wipe the surface of excess oil and do not let it build. I kept wiping over a few hour period since oil will continue to bleed out slightly over time. The other import point I made in that thread is that the veneer was allowed to cure for a week. That allowed sufficient time for the oil to "dry" before top-coating.
Again; the varnish was just part of the finish process for a final effect. Hope that helps.
Your dash look a lot like a true rosewood--"East Indian". It's nice that the figure is balanced on the glovebox door and relatively symmetric. Someone with a good eye did that who served an apprenticeship. This wood looks well done in not high gloss finish. The figure of the wood is the stand-out not the applied finish overwhelming it with gloss brilliance and depth in many smaller spaces like car interiors and airplane cockpits . Satin or such is a good contrast to other high gloss painted finishes--dash, door jams its. My goal is for surface flatness and smoothness to augment the figure.
Crystallac "Crab Coat" or any other similar "water-based products" rated for exterior use--Mohawk, Behlen's, General Finishes on the retail side-- many others brands. I don't use any solvent based varnishes, traditional lacquers or polyurethanes ever now and don't regret making that changes several years ago on fine wood finishing. Same with stains--now water based aniline dyes. Speed and the overwhelming ease of correcting problems as you finish things with multiple steps with these products is a plus--especially coloring and blending.
I always put about the same amount of finish build on the back side of anything--even if it is plywood. Same amount of water or solvent going in on all sides. It's cheap insurance when your car is sealed up with the windows up and doors shut in the hot sun. Your thin veneer may be glued with fish, hide or other animal glues. These glues remain more flexible over time but whatever finish you choose--solvent or "water based"--very light spray coats first--don't slather it on or flood it until you get a couple of dried coats built on.
Rosewood veneer should be filled with a compatible grain filler--lots of brands there to achieve smoothness. Water based are easy to tint and pull back if you don't like it. Such veneer is nice and figurative--but has to be cut real thin to remain stable. There is hardly anything left to sand or to remove imperfections from. I always cut my own veneers and "book match" my sheets for symmetry in use. I shoot for 3/32" thick (about the upper limit for veneer being useful) not 1/32". Some is very thin today--1/64" and less.
Worn Out Welder
Promoted Users
I was impressed with Crystallac as a grain filler for red or white oak.
Pumice has been used for many years as a pore filler….I don’t know if it merits looking into it.
I absolutely believe the equal coats on all surfaces…humidity taught me a labor intensive lesson in that regard.
Pumice has been used for many years as a pore filler….I don’t know if it merits looking into it.
I absolutely believe the equal coats on all surfaces…humidity taught me a labor intensive lesson in that regard.
Thank you much for elaborating Riv, that explains a lot. I'll bet that's one fine Rivera you have.I probably should have elaborated on the varnish a bit more in my Rivi thread so let me do so now.
Not all woods have it but, certain ones have a complex grain that can be multidimensional when finished correctly. It's a term called Chatoyance (flame mahogany, burl walnut and figured maples are good examples). It's a French word meaning "cat's eye" and pretty much sums up the effect. It will give you a shimmer or almost 3D effect when you move the wood around in natural light. Keep in mind that not all woods can produce this effect.
You may be able to see some of it with just a general clear coat finish but in order to really make the grain pop, you have to use a penetrating oil to make it dance. Linseed oil would be the go-to but I opted for Varnish because the effect was greater than the samples I made with the boiled linseed oil and I wasn't comfortable using straight oil under the clear (varnish is a mixture of oils and resins). I used Old Master Tung Oil Varnish.
To be clear; the varnish is not used as a finish but a penetrating oil. You don't want to build a traditional varnish film as you would if you were finishing the wood with varnish. Instead, you simply want to wet the wood to get the oil in the fibers and then wipe the finish off after sitting for a few minutes. You also don't want to let it sit and saturate the wood since you are using veneer. Unless you are using paper-backed veneer, using too much oil can cause it to seep through and plasticize your adhesive film....and potentially delaminate the veneer.
Instead of just rubbing the varnishing with a rag, I did it with with fine grit paper to create a swarf (oil mixed with the sanded wood dust) to create a bit of a natural filler for the pores instead of using a pore filler. Again, I did so because pore fillers (not the clear ones) use pigments which can bleed into the wood fibers and muddle the grain.
The key to this method when using a clear top-coat is to wipe the surface of excess oil and do not let it build. I kept wiping over a few hour period since oil will continue to bleed out slightly over time. The other import point I made in that thread is that the veneer was allowed to cure for a week. That allowed sufficient time for the oil to "dry" before top-coating.
Again; the varnish was just part of the finish process for a final effect. Hope that helps.
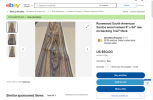
DAT, this is the rosewood I used...Your dash look a lot like a true rosewood--"East Indian". It's nice that the figure is balanced on the glovebox door and relatively symmetric. Someone with a good eye did that who served an apprenticeship. This wood looks well done in not high gloss finish. The figure of the wood is the stand-out not the applied finish overwhelming it with gloss brilliance and depth in many smaller spaces like car interiors and airplane cockpits . Satin or such is a good contrast to other high gloss painted finishes--dash, door jams its. My goal is for surface flatness and smoothness to augment the figure.
Crystallac "Crab Coat" or any other similar "water-based products" rated for exterior use--Mohawk, Behlen's, General Finishes on the retail side-- many others brands. I don't use any solvent based varnishes, traditional lacquers or polyurethanes ever now and don't regret making that changes several years ago on fine wood finishing. Same with stains--now water based aniline dyes. Speed and the overwhelming ease of correcting problems as you finish things with multiple steps with these products is a plus--especially coloring and blending.
I always put about the same amount of finish build on the back side of anything--even if it is plywood. Same amount of water or solvent going in on all sides. It's cheap insurance when your car is sealed up with the windows up and doors shut in the hot sun. Your thin veneer may be glued with fish, hide or other animal glues. These glues remain more flexible over time but whatever finish you choose--solvent or "water based"--very light spray coats first--don't slather it on or flood it until you get a couple of dried coats built on.
Rosewood veneer should be filled with a compatible grain filler--lots of brands there to achieve smoothness. Water based are easy to tint and pull back if you don't like it. Such veneer is nice and figurative--but has to be cut real thin to remain stable. There is hardly anything left to sand or to remove imperfections from. I always cut my own veneers and "book match" my sheets for symmetry in use. I shoot for 3/32" thick (about the upper limit for veneer being useful) not 1/32". Some is very thin today--1/64" and less.
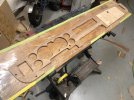
Removing the original veneer (looked similar to this) also took a layer of plywood so I had to glue up a layer of lauan veneer first to make up the thickness, then I did the south american rosewood. The Luan took two tries, had to strip it back off because I didn't used enough glue. Certainly a learning curve here. I used Better Bond Express veneer glue.
Attachments
Last edited:
Welder and DAT, so would Crab Coat then be good for filler and topcoat with one product? Honestly I'd love to be able to use SPI Intercoat clear as a sanding filler and UV Clear, as I already have both and I know how to spray them. Interesting that the back of this dash wasn't finished at the factory, bare wood. There are a couple job numbers hand written on there that I'd like to preserve so I'm going to clean and scuff with gray scotchbrite and put a couple coats of topcoat to balance it.
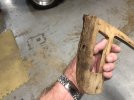
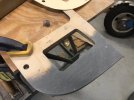
Pics... End had some rot from storage in the shop the last 20yrs. Repairs with gorilla glue and P17.
I just tried some varnish on a spare piece of veneer and it didn't seem to make much difference as for clairvoyance. I'm thinking just a filler and topcoat? I'm saying that this particular piece of veneer doesn't have much chatoyance I think. Crude attempt at humor...
I just tried some varnish on a spare piece of veneer and it didn't seem to make much difference as for clairvoyance
. I'm thinking just a filler and topcoat? I'm saying that this particular piece of veneer doesn't have much chatoyance I think. Crude attempt at humor...Attachments
Last edited:
Jim C
Oldtimer
while i do agree here and all this is true about the oil, this is of course comparing to a water based finish. oil will always give a nicer look because it soaks into the wood vs water which sits on top. however solvent finishes like intercoat and universal soak into the wood the same as oil does and will give the same look while being a stronger and more durable finish. i love a regular oil finish when i want a very natural feeling and looking wood. my kitchen cabinets are all oiled teak. its a great look and super easy to maintain but if i want to actually put a slick finish on wood then a 2k poly is the way to go. nothing water or oil can compare to the durability.I probably should have elaborated on the varnish a bit more in my Rivi thread so let me do so now.
Not all woods have it but, certain ones have a complex grain that can be multidimensional when finished correctly. It's a term called Chatoyance (flame mahogany, burl walnut and figured maples are good examples). It's a French word meaning "cat's eye" and pretty much sums up the effect. It will give you a shimmer or almost 3D effect when you move the wood around in natural light. Keep in mind that not all woods can produce this effect.
You may be able to see some of it with just a general clear coat finish but in order to really make the grain pop, you have to use a penetrating oil to make it dance. Linseed oil would be the go-to but I opted for Varnish because the effect was greater than the samples I made with the boiled linseed oil and I wasn't comfortable using straight oil under the clear (varnish is a mixture of oils and resins). I used Old Master Tung Oil Varnish.
To be clear; the varnish is not used as a finish but a penetrating oil. You don't want to build a traditional varnish film as you would if you were finishing the wood with varnish. Instead, you simply want to wet the wood to get the oil in the fibers and then wipe the finish off after sitting for a few minutes. You also don't want to let it sit and saturate the wood since you are using veneer. Unless you are using paper-backed veneer, using too much oil can cause it to seep through and plasticize your adhesive film....and potentially delaminate the veneer.
Instead of just rubbing the varnishing with a rag, I did it with with fine grit paper to create a swarf (oil mixed with the sanded wood dust) to create a bit of a natural filler for the pores instead of using a pore filler. Again, I did so because pore fillers (not the clear ones) use pigments which can bleed into the wood fibers and muddle the grain.
The key to this method when using a clear top-coat is to wipe the surface of excess oil and do not let it build. I kept wiping over a few hour period since oil will continue to bleed out slightly over time. The other import point I made in that thread is that the veneer was allowed to cure for a week. That allowed sufficient time for the oil to "dry" before top-coating.
Again; the varnish was just part of the finish process for a final effect. Hope that helps.
There are grain fillers that are oil based that also contain stain; I have used these many times over the years. A good quality stain/grain filler from Mohawk Finishing Products, Behlens, ML Campbell, etc. will fill the grain and make the figure in the grain really pop. Just wait 48 hours before starting to build the clear.
Attachments
Last edited:
Yes, if your surface is relatively tight and smooth already--forgo the grain filler and fill anything with your chosen top coat finish then level flat with very, very light sanding. The veneer is only 1/42" thick from the ad so any sanding to level you really want on the applied finish--not any wood. You have chosen a good choice for veneer glue and this will make a nice hard bond line--working in your favor over the temperature/ humidity range expected in a car's interior. Veneers need hard bond lines that don't creep. That's not always so easy to achieve for the individual use of an item.Welder and DAT, so would Crab Coat then be good for filler and topcoat with one product? Honestly I'd love to be able to use SPI Intercoat clear as a sanding filler and UV Clear, as I already have both and I know how to spray them. Interesting that the back of this dash wasn't finished at the factory, bare wood. There are a couple job numbers hand written on there that I'd like to preserve so I'm going to clean and scuff with gray scotchbrite and put a couple coats of topcoat to balance it.
2K poly, oil finish, water based--all will work well on something this thin from an application standpoint. But whatever you choose--finish a scrap piece and put it in an empty dresser drawer for a couple of days and then open it and see how much odor comes out. Or put it in your wife's lingerie drawer full of her things. Do that with an oil finished piece and see how unpleasant that is. Water base is often negligible with retained odor. That's what your car's interior is going to possibly smell like sealed up in the summer heat outside or in the winter with your heater blasting away for quite a while from your wood finishing and how much you apply of it. Small spaces are not like kitchens and living rooms with finished wood and lots of air exchanges. Equilibrium mositure content (EMC), Tangential/Radial shrinkage, retained core moisture content etc.......................really start to factor in with glued up panels in solid woods and potential finishing problems. That's what I mostly do now. That's where film forming build products like 2K polys don't really shine in a lot of environments. Single quarter sawn old growth boards embalmed in 10 coats of 2K poly for pick-up truck bed wood replacement--yes--glued up table tops or panels in the direct sun--not from a material science perspective. None of that matter for what you are doing.
Your SPI 2K poly you already have is a viable choice--but unlike any of what I previously mentioned--you cannot work as easily on toning as you are working things out to your final desired look. If you are happy with your coloring now on the piece I would use your SPI products you already have and avoid buying more products. Your piece on the workmate (as it's own focal point) isn't how it is going to look in the car. I'd stick it in and see how it works with whatever upholstery, carpet and interior colors you have--both in daylight and night. Sit in the passenger's seat and see if it is any different from that perspective. When you look over at this piece from the driver seat at an angle--it's really going to pop with how the grain flows and balanced and opening up (widening) toward the glovebox. You've done an exceptionally nice job with a very good eye. It's one thing to veneer--it's another to make it look exceptional with cut-outs, saw-out pieces, drilled holes etc.......... Some of these veneer dashes look better slightly darker or faded out dark on the edges when the inside interior of the car is darker green, white, or red. Lighter dash tones for black and blues is common. That's where the easy of aniline or alcohol dyes and Crystallac and tinting in applying them shines for balancing out color in a single board.
DAT, the grain on this wood is much like walnut so I suspect I need a grain filler, but the color is about perfect with my Cinnamon leather and carpets. I put some waterlox clear on a sample and it darkens to the perfect color. So I'm still thinking about using SPI intercoat for filler and carefully applied UV clear for finish. The feedback on most of the grain fillers on amazon run the gamut and I'm getting a headache thinking about it. There was one, Solorez uv cured filler that interested me but most reviews mention how overwhelming the odor is so I don't know. It would be mostly sanded off and under the UV Clear so maybe not as much a problem as the topcoat.
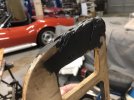
There was one, Solorez uv cured filler that interested me but most reviews mention how overwhelming the odor is so I don't know. It would be mostly sanded off and under the UV Clear so maybe not as much a problem as the topcoat.Well, to follow up, the dash was a fail. The veneer didn't go down flat (my fault, shortcut the pressing stage) and had a few spots where the glue came through. I tried to save it, got a few coats of intercoat on and sanded but I could tell it wasn't gonna pass. Cleared it anyway with UV clear, looks great where it looks great Tried ironing out some of the wrinkles and it worked surprisingly well but it's just not working out. I'll have to put it on the back burner as I bought an r53 Mini Cooper and my adhd has kicked in hard. At this point at least the dash is sealed well, I can store it inside and climate controlled with the custom Tr6 dash wood that's waiting on me too.
Tried ironing out some of the wrinkles and it worked surprisingly well but it's just not working out. I'll have to put it on the back burner as I bought an r53 Mini Cooper and my adhd has kicked in hard. At this point at least the dash is sealed well, I can store it inside and climate controlled with the custom Tr6 dash wood that's waiting on me too.MJM
Promoted Users
Well, to follow up, the dash was a fail. The veneer didn't go down flat (my fault, shortcut the pressing stage) and had a few spots where the glue came through. I tried to save it, got a few coats of intercoat on and sanded but I could tell it wasn't gonna pass. Cleared it anyway with UV clear, looks great where it looks great
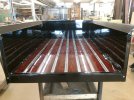
Very cool car. My brother had one, painted it silver with a black roof. It was a real firecracker to drive after he installed dual Weber carburetors.
Looking forward to your updates with it.