Re-coat window affected by the sun?

MAKZ06

Newbie
I’m confused by some of the previous posts I’ve read and need some clarification please.
If I’m going to use some filler and Dolphin Glaze on spi epoxy that I sprayed less than seven days ago, do I have to scuff the epoxy if I have been doing my block sanding outside in the sun?
Does being in the sun kill my 7 day recoat window?
I really don’t want to have to scuff the remaining shiny low spots because then it tough to find them and get the filler in the right
spots even if I do mark them with tape…
thanks
 
Does being in the sun kill my 7 day recoat window?
Yes it does. How much depends on how long it has been in the sun. When I asked Barry about this he said depending on where you are and what season 6-8 hours in the sun is the equivalent of 5 days inside. It's not a direct equation, i.e. x hours in the sun = x amount of days inside, there are other factors involved, but if your vehicle has seen siginicant sunlight the re-coat window is shortened.
 
Yes it does. How much depends on how long it has been in the sun. When I asked Barry about this he said depending on where you are and what season 6-8 hours in the sun is the equivalent of 5 days inside. It's not a direct equation, i.e. x hours in the sun = x amount of days inside, there are other factors involved, but if your vehicle has seen siginicant sunlight the re-coat window is shortened.
Shit. I just can’t catch a break with this crap. It’s certainly been a learning experience but has been a frustrating one…
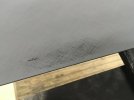
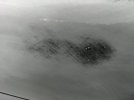
Any tips for the best way to deal with scuffing spots like this and marking or identifying them for a skim coat of Dolphin glaze without getting too much or beyond where I need it? (Previous rounds I’ve tackled like this I end up down to bare metal trying to get the filler down flat and then like I’m going in circles with more coats of epoxy and re-blocking)
thank you for the response and help.
 

Attachments

  • 4C84630C-E91F-426C-A17C-B6267482E00F.jpeg
    4C84630C-E91F-426C-A17C-B6267482E00F.jpeg
    82.5 KB · Views: 72
  • C60A93B5-365F-492B-8758-1B942FD84247.jpeg
    C60A93B5-365F-492B-8758-1B942FD84247.jpeg
    92.8 KB · Views: 71
  • 2A9B374D-A9E6-4834-B5EC-3FBEDE809C34.jpeg
    2A9B374D-A9E6-4834-B5EC-3FBEDE809C34.jpeg
    81.1 KB · Views: 78
Using a some tape to mark them and doing them one by one is how I do it. Looking at your pics those areas don't need much. Another round of primer would be better than trying to glaze them. Especially if you are having trouble glazing and not sanding thru.
 
What I usually do is sand the spots in a different direction than your block sanding scratches. You could also go maybe 2 inches past where you need filler with tape, outlining the area before sanding and applying filler.
 
Using a some tape to mark them and doing them one by one is how I do it. Looking at your pics those areas don't need much. Another round of primer would be better than trying to glaze them. Especially if you are having trouble glazing and not sanding thru.
A couple additional sprays of primer is what I was thinking too but on previous rounds it hasn’t worked out to be the case…. end up breaking through to bare metal In surrounding areas again before I get back down flat. I ordered some Dolphin Glaze hoping it will be easier to sand but when I went to pick it up the guy at the auto parts place argued with me that it does not require hardener… So now I have the glaze with no hardener and have to try and find some somewhere else tomorrow. SPI is 15 minutes from our house bu5 I don’t have a paint supply place nearby… aaaaghh!
thanks for the tips. I will try taping around areas for quick ID while I’m trying to hit the spots before it kicks off.
 
Last edited:
What I usually do is sand the spots in a different direction than your block sanding scratches. You could also go maybe 2 inches past where you need filler with tape, outlining the area before sanding and applying filler.
Thanks. I will try outlining with tape like you say. Previously I tried sanding in diff direction like you suggested and that helps but was still hard to pick up when in a rush to get it spread before it kicks off…. I only used a little piece of tape near the spot and would then have to wasted time trying to figure out exactly how and where to spread…
outlining should do the trick. Thanks
 
Thanks everyone for the suggestions and help.
If I ever get this F100 finished without shooting myself in the head then it may go a little smoother/faster when I get back to the old Cougar.
 
I saw a video where a guy circled his lows about two inches out with a pencil. He said he sanded the filler until he could see the pencil marks and then he knew it was time to stop. I have no idea whether the pencil mark needs to be completely removed but I'm sure there are plenty here who do.
 
Back
Top