I'm contemplating a hack and have been too afraid to even ask

So, I thought oil can effect was caused because the metal is stretched and needs to be shrunk back?

OP said he used hammer on dolly to stretch the metal, wouldn't that stretch it more?....

Is a shrink disc not an option ?
 
So, I thought oil can effect was caused because the metal is stretched and needs to be shrunk back?

OP said he used hammer on dolly to stretch the metal, wouldn't that stretch it more?....

Is a shrink disc not an option ?
When you weld something the heat from the weld will cause the area to shrink. This is call the heat affected zone or HAZ. Shrinking will present itself in many ways, oil canning being one of them because there is less area than before so the metal shrinks or contracts and you get a low area which can cause oil canning. Oil canning (or what is called oil canning) can be from there being too much metal as well, but it is less common on body panels, and never a symptom from welding. When something is stretched it is too full which usually presents more as a high, or even a gradual swell on a body panel rather than oil canning although it does happen. Oil canning can go both ways. But in this instance it is because welding shrinks the HAZ which then causes the low area. Being he welded on a large flat surface the HAZ shrunk and because of that the area of the metal is less and so you get a low or depression or what have you.

If something is welded and result of which is metal is displaced you can rest assured it is not from being stretched. It is shrunk and the hammer and dolly on the HAZ is the way to bring it back up. You need to stretch the metal back where it has shrunk. A shrink disc would only worsen the effect from welding.

Generally on a body panel you only see highs when something is dented in such a way that it stretches the metal (not all dents do this, many just displace the metal) or you have hammered on dolly in an area and stretched the metal. Clumsy Oafs who take a ball peen hammer to a dent to pound it out are stretching it as they are hammering on the surface.

But to concisely answer your question if heat and welding are involved and cause a panel to displace rest assured the metal being stretched is not the cause.
 
Last edited:
Thanks Chris.

I was under the impression that when something is oil canning it is "almost there" and doesn't need much but going overboard with hammer on dolly can make it worse.

Since the OP is considering a hack...would one solution be to heat a small area up with torch and smack with a pick hammer to shrink it and stabilize it, then throw some filler on it.....
 
This isn’t my first rodeo with this which is why I’m surprised it blew up so badly. And is also why I typically try to avoid putting a weld right through a wide open panel like this.
Application of various welding techniques and processes and filler metals are a lot like things in politics--they work fine until they don't. I'm glad you have had previous panel repair welding success. But whether it's your first successful rodeo or past your 100th time--the only job that matters is the one being done now. From your original post content--you ended up with a failure outcome I would have expected to occur more than not. You might want to get a higher panel piece and splice it in the area under the door molding where the panel ridge line is to salvage things.


I have the Smith Airline oxy-acetylene torch set up with all the available welding tips that Chris Hamilton recommends. I have used it for 44 years and like it. Works good for old automotive panel replacement with the right technique or it can become the worse warped mess you've ever seen pretty quick. I gap narrow where I start and wide (1/4") where I will finish on a long panel sheet steel edge and only use bridge bars for alignment. Coat hangers and baling/tie wire scuffed with an alcohol wet scotchbrite works fine. Sizes are fine because your torch is "your melt" and "your rod is your quench". I had a Dillon/Henrob/Cobra one and liked it. Mine was the Dillon made in Switzerland. I'd buy it again but my goal is tool sell off not accumulation. Their claim to fame was in the early 1980's on oxygen/acetylene fuel savings.


When people on this forum talk about learning to weld--they should be saying: "learning to make welding work for me.............and what it takes to embellishing deficiencies it imparts for my use and with what I have to use." 1000's of patch panels are sold each day and installed with welds right through them are done daily--but the skill is knowing "how to straighten them out" to a fit and finish acceptable to you especially when things don't go as others show in their staged and simplified how to do it videos. I relate more to the how not to do it videos. Best of luck in your endeavor.
 
Since the OP is considering a hack...would one solution be to heat a small area up with torch and smack with a pick hammer to shrink it and stabilize it, then throw some filler on it.....
No because adding more heat is not going to fix anything. And wacking it with a pick hammer is just going to mess things up further. There are essentially two ways IMO, weld it and deal with the shrinkage by stretching the HAZ, or if you are limited by what type of welder you have, i.e. a MIG or have to use a MIG, then you weld it in such a way as to limit shrinkage, then apply a thinnish layer of filler to finish. It can be done. Did it for years when doing production work.
 
Did a bunch (six) of Ford DHL vans back to back. All had moderate to heavy side panel damage. Those Ford van side panels were expensive and to do the job properly required drilling out the roof skin to remove the panel. No way I was doing that so I sectioned every one of them and MIG welded them. MIG because it was what we had and even if I had access to a TIG or Gas, I did not have access to the entire back side of the panel. I did the spot/tack method skipping around connecting the dots so to speak and when finished none of those vans need more than a skim coat of glaze. Almost no shrinkage.

Done many Mustang and other muscle car partial 1/4's that way as it was what I had access to and the jobs did not pay enough to justify the time it would take to TIG and metalfinish. All of those cars were done using the method I described with the MIG and had very little distortion, usually would take a relatively skim coat of filler. So it can be done. Choosing the right spot to section is very important. Doing in higher crown areas and near hard(ish) body lines helps control the distortion a lot.

Remember too that in some areas you may not be able to access the backside easily or at all, in that situation either you replace more of the panel or the entire panel or remove the panel to put the section in with Gas or TIG, or you use the MIG and weld the section in and limit distortion.
 
Ideally you want to use Gas or a TIG and then stretch the HAZ and really get it back out very close. It is not always practical to do so. So you do what is practical and try to do the best you can. That is the point I was trying to make.
 
This is my favorite torch, well this and the Smiths AW1A. Both are really light and feel good in your hand. The Meco with the ultralight hose feels no heavier than a feather. Maybe not a feather but it is light.:) Meco has enough tips and handles that you can weld 1/4" or thicker steel or aluminum. As does the Smiths. Years ago I bought a DHC-2000 (Henrob) pistol grip torch as I heard a lot of talk about how good it was. While the torch comes complete with tips and cutting accesories I find it awkward and heavy. It does cut nice though. It is very expensive and if I had to do it again I would not have bought it.

Meco

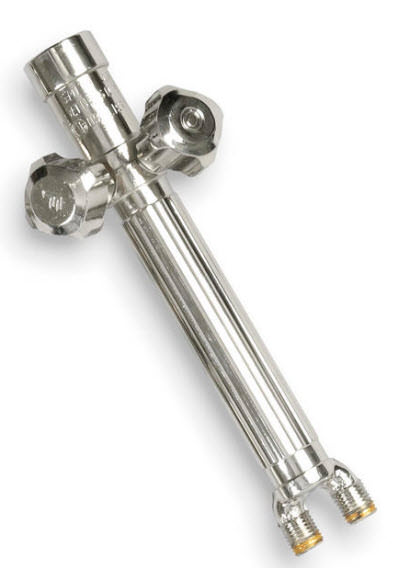
Smith(s) AW1A (airline) torch


Personally I prefer a TIG for steel as you have more control over the heat and the welds planish just as nice as with O/A. With AL sheet, using the torch gives really awesome results once you master the learning curve. Kent White (TM Technologies) has 3 great videos on how to weld AL sheet with gas.

MIG welds are hard because of the carbon content of the shielding gas. The weld gets carburized to some extent when using a MIG.

@Lizer I'm surprised that you had excessive warping seeing you were using the method I described above. I will say that every panel is different and some steel and panels seem to walk more than others. My guess is that where the joint is is the absolute worst place to actually weld on that panel. IDK. Doing it the way I described you should be able to weld it with a minimum of warpage/shrinkage but IDK. Did a 70 Chevy once where it went crazy when I was trying to patch a spot. Same spot same model truck (different truck() a couple of years later it welded near perfect.

Can you get a large patch and weld it in a higher crown area? When you are trying to get the job done it's probably not practical fro you to try and learn a whole new skill set. If you could get in a higher crown area or near a body line that would help when trying to do it with the MIG. My other thought is that if you can fasten a copper backing plate with either the comercial ones available or something you make, then you could do the tack method and it would pull enough heat out that it should not warp much at all.

You aren't blowing compressed air on the welds after you do a spot are you? That will make it shrink even more.

I'll have to look at the door re: larger patch size. Except the problem with that is longer welds which gives me more opportunity to warp it.

I never blow air on welds to cool them, always let them cool naturally. I'm so sensitive to shrinkage I'll put down a few welds evenly spaced across the panel and then walk away for 5 min and do something else, then come back, etc. That's why I'm surprised it blew up on me like this.

I went through a paint tech school program back in 2009 and the first thing we learned was stick welding and then mig welding. I had just enough experience with stick welding to know I'll royally mess up whatever I try to stick weld. When I get my new shop built I'd like to get into TIG welding as I understand the welds planish easier.
 
Thanks Chris.

I was under the impression that when something is oil canning it is "almost there" and doesn't need much but going overboard with hammer on dolly can make it worse.

Since the OP is considering a hack...would one solution be to heat a small area up with torch and smack with a pick hammer to shrink it and stabilize it, then throw some filler on it.....
I have the issue I do because of heat, so that's why I'm not going to go back and add additional heat, that will just exacerbate it. I do have a shrinking disc but it's about as worthless as tits on a boar. If I'm shrinking I use my stud welder without a stud in it.

Which is why I ground down the proud weld both inside the door panel and outside, to thin it as much as possible and then try to stretch. But trying to stretch a MIG weld is almost an exercise in futility and it has hardly relaxed the metal at all, if any.
 
I'll have to look at the door re: larger patch size. Except the problem with that is longer welds which gives me more opportunity to warp it.

I never blow air on welds to cool them, always let them cool naturally. I'm so sensitive to shrinkage I'll put down a few welds evenly spaced across the panel and then walk away for 5 min and do something else, then come back, etc. That's why I'm surprised it blew up on me like this.

I went through a paint tech school program back in 2009 and the first thing we learned was stick welding and then mig welding. I had just enough experience with stick welding to know I'll royally mess up whatever I try to stick weld. When I get my new shop built I'd like to get into TIG welding as I understand the welds planish easier.

Letting them cool like that does almost nothing... it is all about planishing the weld dots to relieve the stress.. I have done many tests in attempts to prove @MP&C wrong and I have not been able to do it...
 
This is how the door started out. Now sure why I took the repair so high when the damage was so low.

IMG_0762.jpeg


This was after several rounds of initial welding.

IMG_0767.jpeg


This was after getting all the welding completed and doing the initial grind of proud weld with cut off wheel. There was a high spot of warpage in the middle marked with an arrow. I think I had cut this spot back open in the picture.


IMG_0768.jpeg
 
Doesn't look bad. You have to expect some warpage with the MIG. Lots of "Pro" Shops do far worse work and cover up their sins with filler. If it's an 1/8 or so I say fill it.

Well I do appreciate that vote of confidence :)

That’s because it’s difficult to capture in a picture. I need to get a better angle. It definitely cannot be filled. Let me say definitely not should be filled. Even so, looking at it may not seem bad until I run my flat hand over it.

I’ll get another pic to change your mind ;)
 
Next time you do a patch, if you can don't use square corners. Round it off some. That will help minimize shrinking. The corner is getting pulled in two directions when it is square like that.

Can you planish it any or have you already tried? Even though it's MIG, sometimes you can do enough to get it livable.
I’ve tried planishing with hammer on dolly but to little benefit. I burned a few calories though.
 
Yes keeping your cut just below that first body line likely would have kept you out of trouble. I always try to use a body line to stiffen the patch weld area. I only have access to MIG.

Don
 
Were the folded edges locked so they could not move towards the weld? I would have likely un folded the lips, welded then rebent them around. If the patch could have moved it helps. I’m with Chris I have a few places that are much worse and I gave up and just filled it.
 
I’ve tried planishing with hammer on dolly but to little benefit. I burned a few calories though.

That area would be hard and you have to do it one dot at a time, which takes zero calories just a couple of quick smacks to relieve the stress on each dot. Takes a lot of time but virtually zero calories. After it is all welded, shrunk and ground down its is hopeless planish in my experience
 
Last edited:
Back
Top