Sorry for the long post but your getting into an area that I think a lot about? While I like working on cars/paint and body there is a LOT of dirty and just plain no fun work involved with removing paint and rust. Plus I love how much nicer it is to work with clean bright metal!!
Yes it's my number one tool and I built the entire thing and I made it BIG! Just like your shop there is never enough room!
I started with a kit from TP tools and went from there. Here is the kit.
Blast Box Plans
I will go over the addition's that I did and are rarely talked about as I have many hundreds of hours operating this box. 64" wide X 42" high X 38" deep. When you build a box of this size you won't be able to reach all the of the insides with your hands in the gloves. You need to blast and then stop and turn the fender or what ever around to get at all sides. My goal was to contain a fender and or door inside the box.
Mine is made from 3/4" plywood and I used 1/4" angle iron for the frame. No flex using 1/4"! I also added an expanded metal floor to the frame for storage. Filled all the gaps where the plywood came together with fiberglass and used my air file to level and square the corners up. The door is 10 gauge steel with a stainless steel piano hinge. This is one error I made. Since the kit was for a much smaller box the piano hinge was not long enough to span the entire door. So I cut it in sections with a piece at the top and bottom. It works fine but if I did again I would purchase a full length hinge. You can see the hinge gap in the picture below.
Under construction;
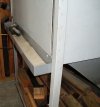
Note the piece of angle iron running along the top of the window cutout. This was such a large span the plywood was sagging across the front of the box. Obviously since a window was to be installed there it had to be flat. I used a jack inside the box to push the plywood up level and then used many screws and again fiberglass to attach a long section of 1/4" angle iron. Now that is perfectly straight has not moved since I built the box about 20+ years ago.
By far the most difficult part was building the base funnel section. Since I had completely changed the dimensions of the box I had to figure that out on my own. I had no way to cut the plywood edges at an angle back then so they would fit nice either. I had to figure how to build a pyramid with the top section cut off. A fairly involved geometry problem! I got it close and again used fiberglass and my air file to make it all good. I had to get the bottom of the funnel the exact right size for the flapper assembly that came with the kit. Now your could avoid that by custom making one from metal but the plastic version from the kit was what I had.
I added extra lights inside the box as this is another area where you just can't have too much light inside the box. I don't like or use LED's inside the box. What I have found to work best is high powered Halogen spot lights and I focus all 3 of them directly in front of the window where I will be blasting. Note the kit only came with two lights but with all the added volume I needed more light. I did lose some height as the lights hang down inside the box unlike a fluorescent or LED tube. You can see I have 2 in this picture but had to go back and put a 3rd one in directly in the center. The light are installed very far forward in the box so the light is a close as possible to the blasting area.
I have all the electrical connected to the steel junction boxes mounted on top of the box. These come from TP but you could use something else. I like them because outlets are switched. So one switch to turn the entire system on. Vacuum, lights, air dryer, vibrating motor.
You can see the door seal I installed and if I did again I would router a channel on the edge of the box for the seal to sit in. It works fine but as you can see in the picture it has moved and been pushed out a bit over the years. This did not come with the kit and I found an industrial gasket supplier that sold sticky back foam rubber sealing material. Cheap stuff from HD or Lowe's will NOT hold up!
Also note I added a blow gun inside the box to again reduce mess. If you have complicated parts with lot's of geometry it will hold all kinds of dust and debris. So blowing off inside the box with the vacuum running allows you take the part out without spreading the beads all over the place.
This also brings up another trick I use most of the time. It's difficult to see inside the box after blasting for a while even with the very strong vacuum system I have. The solution is fairly simple. Shut off the lights in the shop. You have all this glare coming off the window from the over head lights and even from having the doors open and sunlight coming in. I do the same thing when welding. Just a very strong spot light on the work and rest of the shop in darkness.
Here is the completed unit. Note that casters have been installed and I consider them mandatory or otherwise you have a giant immovable box that is always in the way and that part of the shop will become a crap hole from all the debris. Again another mistake I made was the casters are 500 lb/each rating so plenty strong but the larger the diameter the easier the box will roll. I used 5" casters and 6" or even 8" would have been better. Now also note that the caster size impacts the height of the gloves and viewing window. So do some modeling/checking before cutting the legs of the box. Nothing more exhausting than having a box that is too low or too high for you to comfortably operate it for hours at a time.
Please use a foot pedal as your hand will be in agony if you use a hand gun.
Blasting demands a lot of clean dry air. I only run large 7.5HP 80 gallon compressors. You want and need at least 22-25 CFM from the compressor. It is an absolute exercise in frustration trying to blast with small compressors and all the extra time and effort that requires. Not to even mention all that extra water that will be generated by running the too small compressor wide open.
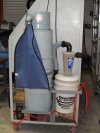
This next picture shows my Stainless Steel refrigerated air dryer. Again you can screw around with all the other methods but they ARE second rate! I got an absolute steal off ebay at $40 each as they guy was selling stuff from an auction and did not know what he had and he had 40 of these! I ended up buying 5 of them for me and my buddies. I got the first one and realized it was SS and quickly purchased more. Stupid me I should have bought all 40 of them! They seem to be trouble free as I have not touched it since I purchased it 20+ years ago and it was pretty old when I got it. Mine is a Norgren brand. I found out they sold for around $2000 new! They are considerable cheaper and more common these days as even Harbor Freight sells one. Still even the HF one is $550!
HF Air Dryer
This will be continued below.
.
.
.