68 el Camino Resto-Mod

Dean Jenkins

Promoted Users
I’ve posted various times about this ’68 el Camino project but thought I would start a thread to post updates to. Lots to do and I’m looking forward to it all!

I took a break from the el Camino to do a practice paint job on my Suburban and that came out pretty good. Pics and video are on that thread.

So, I’m back on this now. After the Suburban re-paint, I was a little tired of painting, blocking, sanding etc.… so decided to work on this custom dash for the el Camino. It’s been in the back of my mind for awhile and I spent way too many hours on YouTube watching various approaches. I mostly got my inspiration from the guys doing door panels and speaker enclosures.

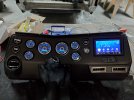
For the dash on this project, I wanted to put in Dakota Digital VHX gauges and a 2 DIN stereo/video head.
I’ve seen lots of guys who put 2 din stereo heads in a custom console, but I just didn’t like that look. I wanted it in the dash.
I was hoping someone made a custom part for this, but could not find one, so I decided to make my own, using the factory dash insert as a starting point.

Here is what I started with:

Original dash.JPG


And here is the final product:

Dash lit.jpg


I’m really happy with it! It took a “ridiculous” amount of time, but apparently that is what it takes. I learned a lot and could do the next one in only an “absurd” amount of time.
I recorded a video of the process for anyone who is interested in how I did it, or crazy enough to want to do something like this. The final approach includes some unlikely things like; Spandex and Bed Liner, seriously!


Next, I’ll get really weird and will be putting a “trunk” in the el Camino. Stay tuned for that!
 

Attachments

  • Dash-lit.jpg
    Dash-lit.jpg
    135.1 KB · Views: 143
Excellent work on the dash and the video.
I probably saw the same YT video you did on using the fleece for shaping. I will be building a custom dash, door panels, and interior trim for my 1970 Karmann Ghia and will "borrow" the spandex. bed liner, and silicone plug ideas. Thanks for sharing.

-----
Emil
Thanks. Borrow away. Glad you found some useful tips. Good luck with your Ghia project.
 
In my last post I said I would be putting a "trunk" in the el Camino. I've started that now.

The factory bed was in two parts, a back main section and then a front panel, about 1/4th of the bed length.
Here is a shot of the front section, brand new metal (the old one was pretty beat up.)
Trunk start 1.JPG


Under the front section is a LOT of room. GM was really good at reusing parts and designs and the el Camino and Wagon shared a lot of parts. There is a pan under the front part of the bed that is actually the foot well for the back seat of the wagon.
Here it is with the front panel pulled off. (The cross brace is only for el Camino, not the wagon. I'm leaving it in for strength.)

Trunk foot well 2.JPG


That is a lot of space! The factory put in a "smugglers box" behind the drivers seat, a little bit bigger than the glove box.
But I want ALL of this space for storage. I'm going to put the battery in there (better weight over the rear, clean up up the engine compartment) and be able to store tools etc.
I'm going to modify the front bed panel to hinge up, with hydraulic lifters, electronic trunk latch etc. and make it look like it would if the factory had done this (which they should have!)

I'm going to cut the brand new sheet metal to create a "trunk" lid. I didn't want to use the whole section as there is a gap around the perimeter that was filled with seam sealer and not filling it would look bad. And the edges around the inner fenders scrape. Grinding them back for clearance would result in a bigger, crappy looking gap.
So, I'm cutting out a rectangle for the "trunk" lid and will spot weld down the perimeter and seam seal it like the rest of the bed edges.
I'll put a rubber trim piece around the rectangle, again to make it look sort of factory finish.

Trunk panel trim.JPG


Here I go to cut this brand new piece of sheet metal!

Trunk cutting.JPG


And here is the cut and spacing to accommodate the rubber trim.

Trunk initial cut.JPG


So far, so good. Not the kind of master sheet metal fab that 123Pugsy and Chris Hamilton and others are posting, but this is within my wheel house and abilities at this time.
I'm putting together a video of the process and if it comes out good, I'll post that.
Wish me luck!
 
You'll be amazed how your metalworking skills progress as you tackle a project you are motivated to succeed at. I spent 40 hours removing an arrow-shaped dent/crease out of my passenger door. It's not perfect metal finishing but better than I expected it would be when I started. I had never worked metal before but I bought a hammer and dolly set and a stud puller at Harbor Freight and went at it. I watched your video above, don't sell yourself short.

Good luck,
Emil
 
Dean, are you using the origional AC unit in this El camino or are you installing a Vintage Air after market unit? Just wondering. That dash is really looking very nice. Good job.
 
Thanks! Yes, installing Vintage Air. In the picture of the finished dash, there are 3 knobs under the radio. Those are the upgraded, compact controller from Vintage Air. I liked them better than the factory horizontal lever setup.
 
Progress on the "trunk" for the el Camino. This is a pretty fun project!
I'd been thinking about a solution for the hinges on this thing, original plan was just a basic piano hinge arrangement, but I didn't think that would be all that cool and might have some issues and I kept trying to think of other approaches.

While I was thinking, I opened the trunk of my daily driver, a 2014 Infinity Q60S and started studying the hinges. They are a really cool articulating setup. Not only do they articulate up and out as the trunk opens, they have compact hydraulic cylinders on each hinge to hold the trunk lid up. A really nice, compact and neat package. Wow! I want to use these.

I did a quick search of the local "pick and pull" wrecking yard, but alas, no Infinities in stock.
But, I did more research and the same part number hinge is used on lot on Nissan cars (of course.)
Found a 2012 Maxima at the local place and went down there and scored not only the hinges, but the electronic solenoid latch and striker assembly. Now I have all the parts I need.

***How do you open the latched trunk on a car in a wrecking yard? Remove the back seat and crawl in through the wet and moldy trunk and pull the glow in the dark emergency escape cord. Lovely . . . I'm 60 years old and not fond of this kind of thing anymore. But hey, I did it and got everything I need for less than $50.

Then onto the fun stuff, I fabbed up some braces and mounted the new, very cool, articulating hinges.
Here is how it looks so far:

hinges installed.jpg
 
YOU, are a source of inspiration and part numbers.
I was thinking of using similar assemblies from a Chrysler 300 trunk lid but I think your choice is a better fit for a small car like mine,

Keep the great ideas coming,
Emil
 
Late model 5th Gen Camaro trunk hinges are another nice option and include integrated gas struts. They are dirt cheap on eBay.

Don
 
Last edited:
Rivet nuts are my new best friend.
Never used them before, but they worked perfect to attach the trunk lid to the hinges without any hardware showing in the bed.
Put the rivet nuts on a 3"X6" piece of sheet metal, then welded that to the underside of the panel.
Getting the measurements right was touchy, but it looks like I nailed it.
My 5th grade teacher was right, I would need to be able to add and subtract fractions in real life

20220201_194400.jpg
 
Looking good Dean. Great idea's on your welding. I have a mig welder that I use. I am still in the learning process with my my body and paint projects. I am so glad that I joined this group because in just a few months, I have learned a lot. Hopefully by the end of this year, I will know enough to be able to get me a old classic car or truck and do all the work on it myself. Have fun with your project.
 
Got the trunk fabrication all done. Now to shoot all the parts in epoxy.
Going to shoot the bed as well since getting it smooth is my next step.
Got all bare metal sanded with 80 grit and previously epoxied places with 180.
Took it outside and gave the areas I'm going to paint a good wash/scrub with Dawn and red pads, then rinse, rinse, rinse with clean water.
Leaving shop heaters on overnight at 68 and hoping to do 700-1 WG wipedown and spray black epoxy tomorrow.

20220208_160026.jpg

20220208_160013.jpg
 
2 good coats of black epoxy.
You can see I have my work cut out to get this smooth.
Pitted surface (carefully sanded and blasted clean) and 50 years worth of dents from "use." I can just picture Bubba chunking cordwood in from 5 yards away.

A gallon of Rage Ultra and a gallon of slicksand and it ought to be flat enough for bedliner.
20220209_200032.jpg

20220209_200038.jpg

20220209_200046.jpg


And the trunk parts came out nice. New metal much easier to deal with.
20220209_200232.jpg

20220209_200252.jpg
 
That's an Elcamino, some were babied and treated like cars. some were trucks for their owners. My grandad always drove one and he was a cattle trader farmer......his were trucks!
 
Back
Top