Tips Needed for Spraying Engine Bay With Epoxy

P

Piston Speed

Howdy,

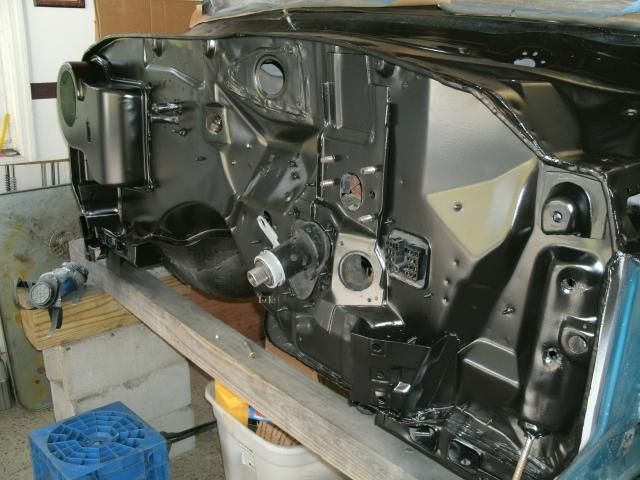
I have a '72 Dodge Demon on a rotisserie in which I blasted the engine bay with crushed glass. I'm going to be cleaning it with the SPI waterborne W&G remover then spraying it with SPI black epoxy. I'm also using a Devilbiss Finishline 4 spray gun with a 1.5mm tip.

Now, the firewall isn't flat and has a lot of nooks and crannies, especially a lot of narrow edges. I usually have the gun set to shoot a cigar shape 1.5" wide and 6" tall from a distance of 7". In the past, I noticed that when shooting primer on small edges like trunk gutters and whatnot, at these settings I tend to get orange peel which I do not get on flat panels.

For the engine bay, should I narrow my fan control on the gun to compensate for this? I'm assuming I'll have to also back off a little on the paint flow setting on the gun as well if I narrow the spray pattern.

Any other tips I should follow? Since the car is on a rotisserie, I'm able to stand inside the engine bay to spray.

Thanks!
 
Epoxy doesn't orange peel like urethanes. I'd spray it in a normal wide pattern with 2.5 turns out on the needle and consistently wet each coat.

First coat light just to coverage, second coat wet for slight gloss. Optional third wet coat will make it slightly more glossy.

Or three light coats with uniform wetness will net a flatter finish.

You might want to experiment what level of flatness you like because usually once you pick a sheen you need to do everything else the same way or your different stages can have different sheens. Hardly noticable but it is to some.
 
I appreciate the response.

Would you recommend a 50% overlap or a 75% overlap (the latter sprayed faster to compensate)?

Also, I'm assuming I won't need reducer?
 
Probably closer to 75% I don't think about it anymore, muscle memory just sprays it. You'll know quickly as your only shooting for a consistent wet spray. I think 50% would be more than needed. One of the nicest paints to spray, you have enough window that if you see a dry area you can go back and wet it a little and it melts right in.

No reducer needed.

Just be careful on the first coat. I mention a light coat the first time because this stuff will seperate/fisheye if you dump the first one wet. In fact, I did it last night on my shop truck. Double/triple sprayed a tricky corner and it fisheyed. Wasn't going for final spray so it didn't matter and the second coat pretty much covered it. If you fisheye the first coat on your firewall then you might want to stop right there, let it sit overnight/nib, and restart with your final light coats. It's not as tricky as I'm making it out but I want to make sure you are aware of this. I've turned some friends onto this epoxy and they had a lot of trouble dumping the first coat wet like variprime or laquer primer they were used to. Your not dryspraying by any means but your also not soaking it. Take a test panel and dump a coat on it. You know what I mean.

I usually run a hour or two between coats. Just me, you can do it sooner but I'm never in a hurry so I take my time.
 
The first time I sprayed epoxy, I learned that if you spray the first coat too heavy, it will look like moon craters. When I painted my radiator core support, I closed the fan a little bit. I payed close attention to keep the gun parallel to each surface, and spray in a methodical pattern. I made a few practice dry runs first, focusing on keeping the gun parallel and getting into all the nooks and crannies. That was the second time I sprayed SPI epoxy, and it turned out great! I also used a entry level Devilbis Finishline with 1.5 tip. After 2 coats, I still have some thin spots. When I am am done with my body work, I will shoot the entire engine bay with another uniform coat.
 
I shot 3 coats of summit racing chassis shield epoxy satin (before I knew about spi) on my firewall. This was after some 2k primer and seam sealer. Used a cheap grizzly brand gun (which actually sprays well) with 1.4 tip.

 
Back
Top