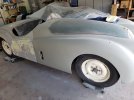
Recently retired and wife bought me my dream car, 1951 Jaguar XK120 OTS. All it needs is paint so I have taken it down to bare metal. No rust, no body work. It did have flash rust showing through the light coat of primer and tiny pits (nothing rusted through). I applied Picklex20 to the metal and followed the instructions to the T. The body has some areas of lead patches. Picklex said product will not work on lead so I taped them off and when done wiped those ares with damp cloth as they recommended. I sprayed the car with LIMCO epoxy primer and it sat for 3 weeks. I lightly block sanded one of the large flat side panels and it showed a LOT of very shallow low spots. The epoxy primer sands really nice but I have sanded through to the bare metal in a lot of spots and have re-sprayed that area. I understand you are to apply skim coat of filler over the epoxy but how do I find the low spots without blocking? I read that you should not apply filler over 2K primer so what do I do? The info on start to finish paint is very contradictory and confusing. Some say to do it one way, others say do it another. A lot of people say to use SPI products and I will do that but need to know HOW to do it before I waste a LOT of money. Appreciate any help.
You are using an out of date browser. It may not display this or other websites correctly.
You should upgrade or use an alternative browser.
You should upgrade or use an alternative browser.
Need big help
- Thread starter Skycab
- Start date
Chris_Hamilton
Trying to be the best me, I can be
To apply body filler over epoxy primer, first apply epoxy, min two coats. Then after the required cure time (24-48 hours @ minimum 70 degrees metal/panel temp) you can apply body filler. With SPI the epoxy has enough of a sheen so that it makes spotting areas needing filler rather easy. For panels with a lot of shallow lows you can skim coat the entire panel. After sanding your filler you would then apply more epoxy before proceeding.
I can't really outline start to finish how to do a job here. Do some searches here and you will find more answers to your questions. There is a ton of good correct info here. Spend some time reading and you will gain knowledge. Download the SPI Technical manual from the SPI website (link to the SPI site is at the top left ) Read the epoxy page and the various tech articles in the manual to start. If not using SPI products download the Technical Data Sheet (TDS) of the products you are using. They contain all the info you need to apply/use a product. To find the TDS google "TDS and the product name or part number". After a bit it will start to make some sense. Keep asking specific questions. We'll help as much as we can.
I can't really outline start to finish how to do a job here. Do some searches here and you will find more answers to your questions. There is a ton of good correct info here. Spend some time reading and you will gain knowledge. Download the SPI Technical manual from the SPI website (link to the SPI site is at the top left ) Read the epoxy page and the various tech articles in the manual to start. If not using SPI products download the Technical Data Sheet (TDS) of the products you are using. They contain all the info you need to apply/use a product. To find the TDS google "TDS and the product name or part number". After a bit it will start to make some sense. Keep asking specific questions. We'll help as much as we can.
Thanks for the reply. Believe me I've spent the last week pouring over every youtube video on painting/priming and the only thing I have found in common is the use of SPI products. They aren't all weekend painters, some are legit long-time body shops giving advice but they all differ on what to do first. Some say you should out filler only on bare metal, others say over epoxy. Some say put poly primer some say urethane. Some say you epoxy then high build, block filler, block, etc. Others say epoxy, filler, 2K primer, block, paint. Most say epoxy can't be sanded but the epoxy I used sands great. Some say don't allpy epoxy over the filler, just the sand throughs to metal. Some say after filler, re-spray the entire car with epoxy.To apply body filler over epoxy primer, first apply epoxy, min two coats. Then after the required cure time (24-48 hours @ minimum 70 degrees metal/panel temp) you can apply body filler. With SPI the epoxy has enough of a sheen so that it makes spotting areas needing filler rather easy. For panels with a lot of shallow lows you can skim coat the entire panel. After sanding your filler you would then apply more epoxy before proceeding.
I can't really outline start to finish how to do a job here. Do some searches here and you will find more answers to your questions. There is a ton of good correct info here. Spend some time reading and you will gain knowledge. Download the SPI Technical manual from the SPI website (link to the SPI site is at the top left ) Read the epoxy page and the various tech articles in the manual to start. If not using SPI products download the Technical Data Sheet (TDS) of the products you are using. They contain all the info you need to apply/use a product. To find the TDS google "TDS and the product name or part number". After a bit it will start to make some sense. Keep asking specific questions. We'll help as much as we can.
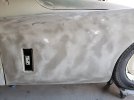
All I am looking for is now that I have sprayed epoxy, how do I find the low spots without blocking? When I did lightly block You can see in the pictures what I found which is not visible in the picture after I re-primed with epoxy. Blocking takes the panel back to metal. So I end up re-priming with epoxy over and over. That can't be the way to go. So, how do I find the low spots without sanding away the epoxy protection? I understand I can skim coat the entire panel but I don't want to skim coat the entire car when I don't know if it needs it. Very confusing.
Wow!! Did you see the Fella put the hood strut in place??I have to admit, that 1951 Jaguar XK120 OTS is one SEXY looking car.
Thanks for the reply. Believe me I've spent the last week pouring over every youtube video on painting/priming and the only thing I have found in common is the use of SPI products. They aren't all weekend painters, some are legit long-time body shops giving advice but they all differ on what to do first. Some say you should out filler only on bare metal, others say over epoxy. Some say put poly primer some say urethane. Some say you epoxy then high build, block filler, block, etc. Others say epoxy, filler, 2K primer, block, paint. Most say epoxy can't be sanded but the epoxy I used sands great. Some say don't allpy epoxy over the filler, just the sand throughs to metal. Some say after filler, re-spray the entire car with epoxy.
All I am looking for is now that I have sprayed epoxy, how do I find the low spots without blocking? When I did lightly block You can see in the pictures what I found which is not visible in the picture after I re-primed with epoxy. Blocking takes the panel back to metal. So I end up re-priming with epoxy over and over. That can't be the way to go. So, how do I find the low spots without sanding away the epoxy protection? I understand I can skim coat the entire panel but I don't want to skim coat the entire car when I don't know if it needs it. Very confusing.
Forgot to send the pics....To apply body filler over epoxy primer, first apply epoxy, min two coats. Then after the required cure time (24-48 hours @ minimum 70 degrees metal/panel temp) you can apply body filler. With SPI the epoxy has enough of a sheen so that it makes spotting areas needing filler rather easy. For panels with a lot of shallow lows you can skim coat the entire panel. After sanding your filler you would then apply more epoxy before proceeding.
I can't really outline start to finish how to do a job here. Do some searches here and you will find more answers to your questions. There is a ton of good correct info here. Spend some time reading and you will gain knowledge. Download the SPI Technical manual from the SPI website (link to the SPI site is at the top left ) Read the epoxy page and the various tech articles in the manual to start. If not using SPI products download the Technical Data Sheet (TDS) of the products you are using. They contain all the info you need to apply/use a product. To find the TDS google "TDS and the product name or part number". After a bit it will start to make some sense. Keep asking specific questions. We'll help as much as we can.
I block the epoxy with 220 the next day and it reveals all the low spots. Then fill and go to town.
Thanks. It's been my dream car for years, just couldn't afford one. So because I'm way past the window of the epoxy, I'll sand the car with 180, skim the panels that need it with filler, hit the bare spots with more epoxy then high build (polyester or urethane?) over the filler then block. sand. block, sand till straight? I really appreciate the help. Although I'm in no hurry, the car runs great and I can't wait to drive it. Thanks again.I block the epoxy with 220 the next day and it reveals all the low spots. Then fill and go to town.
Attachments
Chris_Hamilton
Trying to be the best me, I can be
Most youtube videos are done by amateurs wanting folks to think they are pros. Waste of time. Search here then read the threads. Everything you read here is correct. No bad info, if someone does post bad info it gets corrected very quickly.Believe me I've spent the last week pouring over every youtube video
You can also use Google in this format: site:spiuserforum.com your keywords here Obviously replace your keywords here with what you are trying to find. One advantage to using google instead of the forum search is that google will show results with small words like red whereas the forum search won't.
Also ask specific questions here and one of us will give you detailed replies. It's just hard to give an answer to a very broad or general question like "how do I paint my car?"
Got it. Ok, specific question...do I lightly block the epoxy primer to find the low spots, then skim coat filler where needed, then sand smooth, then touch up the bare metal spots I sanded through with more epoxy or do I spray the entire car with another complete coat, give it a couple of days then spray with primer (polyester or urethane) to block sand? If so then I have my answer.Most youtube videos are done by amateurs wanting folks to think they are pros. Waste of time. Search here then read the threads. Everything you read here is correct. No bad info, if someone does post bad info it gets corrected very quickly.
You can also use Google in this format: site:spiuserforum.com your keywords here Obviously replace your keywords here with what you are trying to find. One advantage to using google instead of the forum search is that google will show results with small words like red whereas the forum search won't.
Also ask specific questions here and one of us will give you detailed replies. It's just hard to give an answer to a very broad or general question like "how do I paint my car?"
As a side question, have you heard of the metal prep "PICKLEX 20)"? I was real hesitant to use it but all the articles I read said it was a good product and couldn't find anyone who had bad results. I only used it because of the surface rust and tiny pits under the primer that was on the car. It had sit for 50 years in the second owners barn.
Lizer
Mad Scientist
I know people who love Picklex but I’ve never used it. I don’t like to use acid under epoxy unless I absolutely have to.
Just lightly block your panel. You’re not trying to remove material so much as change the color to reveal low spots (so to that end you do remove a marginal amount of material.
This is a hood I block sanded epoxy on last week to show all the low spots:

I blocked it just enough to change color. That was the day after spraying epoxy.
After that I did bump work on what areas were accessible to me from beneath. Give just a few taps in a spiral and then lightly block the area again. Then more taps and block again to monitor progress. You will see the dark area get smaller as you raise the low spot. This decreases the amount of filler required.
Wipe all the dust off, wipe down with 710 solvent wax and grease remover, then start skimming filler over low spots.
I Cut the filler flat with a hard block and 80 or 120 grit first, then finish shaping/smoothing and feathering out with 220.
Depending on how many bare spots and filler there is, I’ll spot spray 2 coats epoxy or just shoot the entire panel again. I’d rather have more than less epoxy for corrosion protection, and to seal in the filler. Even if I shoot the entire panel I spot spray the bare spots and filler first, then come back and spray a full coat over everything.
You can spray 2k the following day or polyester after two days and block. Once you’re done blocking guide coat and block again. Block until you can just start to see rings of epoxy starting to show, then you need to stop and either apply more or you’re there. Ideally you want to remove 90% of the material you spray only to fill in waves and low areas, not to have excessive mil build on the panel.
I still don’t count on primers too heavily to do a lot of fill on low spots. I think this is one of the biggest misconceptions of new people, they expect the primer to do more than it can.
Poly primers I do the initial block with 120 grit to break the crust and then I switch to 220 grit. 2K primer I just block with 220 grit.
Once the primer is blocked, my personal method is to shoot a single heavy coat of 2k over it to help fill in the sand scratches. Then I wet sand that with 400. After that, it is ready for epoxy sealer. My method is 25% reduced epoxy sealer. after that it can be sprayed within 2 to 48 hours.
Just lightly block your panel. You’re not trying to remove material so much as change the color to reveal low spots (so to that end you do remove a marginal amount of material.
This is a hood I block sanded epoxy on last week to show all the low spots:
I blocked it just enough to change color. That was the day after spraying epoxy.
After that I did bump work on what areas were accessible to me from beneath. Give just a few taps in a spiral and then lightly block the area again. Then more taps and block again to monitor progress. You will see the dark area get smaller as you raise the low spot. This decreases the amount of filler required.
Wipe all the dust off, wipe down with 710 solvent wax and grease remover, then start skimming filler over low spots.
I Cut the filler flat with a hard block and 80 or 120 grit first, then finish shaping/smoothing and feathering out with 220.
Depending on how many bare spots and filler there is, I’ll spot spray 2 coats epoxy or just shoot the entire panel again. I’d rather have more than less epoxy for corrosion protection, and to seal in the filler. Even if I shoot the entire panel I spot spray the bare spots and filler first, then come back and spray a full coat over everything.
You can spray 2k the following day or polyester after two days and block. Once you’re done blocking guide coat and block again. Block until you can just start to see rings of epoxy starting to show, then you need to stop and either apply more or you’re there. Ideally you want to remove 90% of the material you spray only to fill in waves and low areas, not to have excessive mil build on the panel.
I still don’t count on primers too heavily to do a lot of fill on low spots. I think this is one of the biggest misconceptions of new people, they expect the primer to do more than it can.
Poly primers I do the initial block with 120 grit to break the crust and then I switch to 220 grit. 2K primer I just block with 220 grit.
Once the primer is blocked, my personal method is to shoot a single heavy coat of 2k over it to help fill in the sand scratches. Then I wet sand that with 400. After that, it is ready for epoxy sealer. My method is 25% reduced epoxy sealer. after that it can be sprayed within 2 to 48 hours.
EXACTLY what I was looking for! Thank you very much. Now I'm sweating having used that Picklex stuff. I did visit a really good restoration shop and they are the ones who recommended it so I felt safe but..... Thanks again.I know people who love Picklex but I’ve never used it. I don’t like to use acid under epoxy unless I absolutely have to.
Just lightly block your panel. You’re not trying to remove material so much as change the color to reveal low spots (so to that end you do remove a marginal amount of material.
This is a hood I block sanded epoxy on last week to show all the low spots:
View attachment 27635
I blocked it just enough to change color. That was the day after spraying epoxy.
After that I did bump work on what areas were accessible to me from beneath. Give just a few taps in a spiral and then lightly block the area again. Then more taps and block again to monitor progress. You will see the dark area get smaller as you raise the low spot. This decreases the amount of filler required.
Wipe all the dust off, wipe down with 710 solvent wax and grease remover, then start skimming filler over low spots.
I Cut the filler flat with a hard block and 80 or 120 grit first, then finish shaping/smoothing and feathering out with 220.
Depending on how many bare spots and filler there is, I’ll spot spray 2 coats epoxy or just shoot the entire panel again. I’d rather have more than less epoxy for corrosion protection, and to seal in the filler. Even if I shoot the entire panel I spot spray the bare spots and filler first, then come back and spray a full coat over everything.
You can spray 2k the following day or polyester after two days and block. Once you’re done blocking guide coat and block again. Block until you can just start to see rings of epoxy starting to show, then you need to stop and either apply more or you’re there. Ideally you want to remove 90% of the material you spray only to fill in waves and low areas, not to have excessive mil build on the panel.
I still don’t count on primers too heavily to do a lot of fill on low spots. I think this is one of the biggest misconceptions of new people, they expect the primer to do more than it can.
Poly primers I do the initial block with 120 grit to break the crust and then I switch to 220 grit. 2K primer I just block with 220 grit.
Once the primer is blocked, my personal method is to shoot a single heavy coat of 2k over it to help fill in the sand scratches. Then I wet sand that with 400. After that, it is ready for epoxy sealer. My method is 25% reduced epoxy sealer. after that it can be sprayed within 2 to 48 hours.
MJM
Promoted Users
Skycab,
I'm assuming from reading your posts and replies, you're looking just to prep the body for paint after filler and primer before painting.
With that said, are you concerned at all with panel alignment and panel gaps? Looking at the pictures you have posted, I see panel alignment is needed at the lower door to front lower fender. It appears the front grill to hood at the top needs some alignment. That might just be the angle of the picture, hard to tell. Also panel gap at hood to to body panel.
Skycab,
I'm assuming from reading your posts and replies, you're looking just to prep the body for paint after filler and primer before painting.
With that said, are you concerned at all with panel alignment and panel gaps? Looking at the pictures you have posted, I see panel alignment is needed at the lower door to front lower fender. It appears the front grill to hood at the top needs some alignment. That might just be the angle of the picture, hard to tell. Also panel gap at hood to to body panel.
View attachment 27640
Yes, I'm trying to get it ready for paint. The gap at the lower part of the door and front panel is due to me having removed the inner fender brace for painting the brace. The panel will go back to the proper fit. The bonnet is a little off because the inner panel that the hinges are mounted to needs a couple of new tig welds. That's why I haven't removed the paint yet. Taking that bonnet off is easy. Getting it back on is a whole different challenge so that's the last thing on the list. As far as the rest of the gaps, they aren't "perfect" but they are the way the car came from the factory so they will stay the same. I got the car from the second owner who got it from the original owner in 1971, drove it for a few months until he became ill and it sat in his barn up in the warm wine country ever since. It's going to be a driver, not a trailer queen so it does not have to be perfect.
MJM
Promoted Users
Good to hear Skycab. I was really hoping you'd go after at least a really nice driver quality. That car whole heartily deserves it.
Maybe your aware of this blocking technic but, I'll share it with you anyways. The sandpaper is what makes the panel flat. You don't want to apply pressure to the sanding block, very little if any. The block should be flat to the panel, and let the sandpaper do the work.
If you come across a panel that has flex in it, meaning a panel that moves down and up while block sanding, you're either applying to much pressure or you'll need to temporarily reinforce the backside of the panel to not flex while block sanding.
I had panel flex on the roof of my car while blocking. An old school trick I learned was to hot glue paint sticks to the back side of the panel. This stiffened the panel up enough to block sand without panel flex. Once I was satisfied with the blocking, I removed the paint sticks. This method provided me with a perfectly consistent flat panel.
Also looking at your panels, I would have no problem skim coating the entire panel and blocking off. A panel skim coated and sanded down to 1/32" or less is absoluty nothing to frown at.
Personally I believe it provides a flatter panel to work from before moving on to primers.
I'll post some good blocking video's that should give you a good understanding of what you should be looking for.
Last edited:
Thanks, I'd appreciate the blocking videos. You don't see these cars on the road. I have seen a few professionally restored ones and while they look beautiful, they are not the way they were built and the owners admit it. Mine will stay the way it was put together, save the paint and new interior. It will still be a beautiful car and with some good painting advice will turn heads as a "really nice driver".