Intercoat on woodturnings

Randy A

Promoted Users
Greetings, I'm new here but have been reading and learning about using SPI products. I'm a woodturner and for some time have been using SPI clear coat on my large wooden floor vases that I turn. Great stuff although I have no experience with any other product. Up until recently I've been using products from ICA for my sealer and barrier coats prior to spraying SPI CC. I had never sprayed CC before and am getting the hang of it, I think. On the advice of Andy at SPI I just tried using SPI intercoat as my sealer and base coat on a couple of pieces.

My process, based on how I used the ICA products, is to spray 1 coat of intercoat as a sealer, let it soak in and cure, sand it back with 400 with a ROS and by hand where needed with 400 or maroon 3M pad, then spray 3 coats of intercoat wet on wet about 30-45 minutes apart, let that cure overnight and sand back with 400 and maroon 3M pad again. I finish up with 4 coats of SPI CC. Since CC will not fill any pits, voids, tiny cracks, open grain, etc I need a good thick base coat that I can sand back to dead flat before I can spray CC. The ICA base coat product is a polyester and sprayed on fairly thick would fill lots of the tiny pits, hairline cracks and grain openings. I fill all I can find with black wood filler but there are always very small places I miss or can't fill. My first try was with intercoat at the recommended 1:1 ratio with reducer. It was too thin to really provide a good fill. I've cut back on the reducer to about 80% for a second try and got better results.

Question - anyone else using intercoat as a sealer and base under clear coat on wood and is it OK to cut way back on reducer to provide a thicker spray?

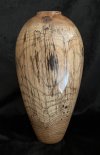
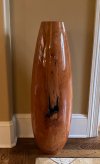
Here's a pic of a typical piece. It's 33" tall. I'm still learning about the sanding, buffing, etc for CC. Sometimes I get it right, sometimes I have to go back and redo it a bit. The auto body guys on youtube make it look so easy. It ain't. The pieces end up in an art gallery so no room for less than stellar deep gloss finishes.
 

Attachments

  • IMG_9146.jpg
    IMG_9146.jpg
    124.5 KB · Views: 77
Last edited:
Michael, never heard of it but just popped over to their web site and will take a look. Thanks for the tip. One of the reasons for moving away from the ICA barrier coat product is it's not an easy product to deal with. Terrible fumes, complex (and dangerous) to mix and comes in different sized containers for the base and other additives so hard to keep up with supply for it. I'm out of the base product which got me looking at alternatives. The outcome/results are good but a hassle to work with. Having my entire finish lineup from one company like SPI is very appealing for lots of reasons. Big question is long term compatibility with SPI CC and crystal clear finish as a sealer.
 
Last edited:
It was a passing thought, but it might be worth a try of a test specimen…maybe one with a worst case defect.
This would be a @JimC question since he is the master of such things
 
Thanks for the tip. I'm new at all of this so not sure of the 1K and 2K product definitions but I've read the specs SPI sends with the products to be sure I'm following the directions. In addition to what I've gotten from Andy based on finishing wood vs car panels. I try to keep my intercoat coats as thin as necessary. Not looking for a thick overall coverage, just thick enough to fill pin hole size grain pores or hairline cracks. The CC will find every tiny opening and show. I've done some dabbing with a brush or sprayed those type small spots with my airbrush with the CC where I've found them, or bumped the piece against something in my shop. Fairly easy to flatten them to match the rest of the surface.
 
so not sure of the 1K and 2K product definitions
All 1K or 2k means is one component (1K) or two component products (2K). Two component implies a catalyst or activator is used. 2K components "dry" or cure by catalyzation. 1K components dry by evaporation. 2K components are more chemically resistant than 1K components.
 
i have used a ton of spi intercoat as a sanding sealer over the years. almost everything i do that is a real wood finish, the intercoat is my go to. i have never had an issue using it. grain filling a light to med open grain wood with it is probably ok. i dont however fill super open grain woods like oak or mahogany with it. i feel its just too much of that material as it does get hard an a bit brittle. you actually may be perfectly fine with it, i just have not done it so i cant say for sure. typically i will spray a coat or two, let flash then sand smooth. on occasion i have sprayed again to help fill the grain a little bit but i never get it 100%. once the intercoat is sanded then i typically go right to clear coat. you can brush a coat or two of clear on so it works into any open grain, let it stiffen up a bit then spray the remaining coats. do maybe 4-5 coats of clear coat, sand smooth then final clear it. you dont need to fully reduce the intercoat. you can cut way back but it will need some in it...unless you are brushing the intercoat. in which case right out of the can is fine
 
Thanks. It's good to have it validated as a goto sealer and basecoat for clear coat on wood. I go over every inch of a piece and fill with wood filler before I start any spraying but, my experience is that even the tiniest pinhole that I miss will show in the clear so some sort of sealer and basecoat is necessary. I also don't want a gap, knothole or crack you can feel that breaks the flow of the surface filled with anything clear. That will show up as well and is not a good look underneath the clear. Glad to hear that for spot application I can use thicker intercoat with a tiny brush as is.

As for oak, I avoid it except in rare circumstances for a number of reason, including the large open grain. That said, this one is spalted white oak where I painted the entire piece with a good coat of black wood filler then sanded back to get a flat surface.
 

Attachments

  • oak.JPG
    oak.JPG
    127.1 KB · Views: 64
Jim, been reading your info here on the forum re sanding and buffing and learned a lot. One big tip I used today that I think was a big help was using the Buflex 3000 to wet sand. Had never done that before based on how it was labeled dry only but it seemed to be a big improvement. I use Assilex 1200 and then Assilex 1500 dry which I like and get reasonable life out of but have always been disappointed in the lifespan of Buflex 3000. Seemed to quit cutting way to quickly. Using it wet seemed to help it work and extended the life quite a bit from what I could tell. Based on your other posts here I ordered some Buflex 2500 to use instead of the 3000 going forward. Thanks!
 
yes the 3000 black is just too fine a grit to use wet. its better than using it dry though. what seems to be happening for me is after the first couple sqft when used wet, it seems like the grit wears down to the thickness of the water film and then it just slides over the paint surface doing nothing. the green and blue dont do this. the 2500 blue will just keep going and going. you will be much happier with the blue.
 
yes the 3000 black is just too fine a grit to use wet. its better than using it dry though. what seems to be happening for me is after the first couple sqft when used wet, it seems like the grit wears down to the thickness of the water film and then it just slides over the paint surface doing nothing. the green and blue dont do this. the 2500 blue will just keep going and going. you will be much happier with the blue.
Jim, buffed out my first piece today where I had used Assilex 2500 wet instead of the 3000 for my final sanding. You were right of course, it did last a lot longer (finished the piece with one half sheet) and seemed to do a much better job in the end. Still getting the hang of the right amount of water spray to keep the surface wet but not too wet, the paper still cuts and I can feel the drag to get a sense of progress. I think the final finish is one of my best yet. Thanks!
 
Well, of course now when I put the latest one on the shelf next to others can tell the difference. Subtle and I'm likely the only one that would notice but, if it's not right it's not right. Reworking one this morning. Sanding again with 1500 to get a better surface (no tiny sparkles as I call them) then will wet sand with 2500 and rebuff. One or two others might get reworked once I get going.
 
you can easily miss some of those little grain divots and it ends up giving you the little sparkles when done. something else to keep in mind is that paint will shrink over time into the grain as the solvents come out so even though you got it smooth originally, they can reappear. the more open grain the wood the worse it will happen. slower is always better with this stuff. not sure your process but once everything is smooth with the intercoat, i would make sure you let that vase sit a day or two before you apply the clear. this allows all the solvents from the sealer to come out of the wood.
 
Jim, good point. I do let them sit for a few days (much longer sometimes) before I move on to clear coat spray but haven’t been inspecting the surface like I should to see if any sparkles have developed. I hit them again lightly with a maroon pad but need to take them into the sunlight and inspect again. I also let them sit a while before final cc spray to see if there’s any movement where I’ve had to do some epoxy fill or a new crack around a knot has developed. It happens.
 
Have you seen the JimC cut and buff method?
It not to imply that what you are doing needs any improvement.
This method was priceless to me.
 
Have you seen the JimC cut and buff method?
It not to imply that what you are doing needs any improvement.
This method was priceless to me.
Yep, read through the various places it’s mentioned and have adjusted accordingly. Thx.
 
Back
Top