Dry air system is finally complete.

MJM

Promoted Users
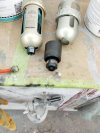
Since I'm getting closer to final paint, I had one more piece to install for my air system. That piece is a Motor Guard M-60 filter. I wanted to make sure that any desiccant dust didn't make its way into the air stream. My desiccant filter is right before the M-60 filter. I now feel confident that any contamination won't be from the air system.

I have a shut off ball valve right before the M-60 filter so I can bypass to use my air tools. The M-60 will only be used for spray painting. That should extend the life of the filter.

I also received my Iwata Air Gunza 2k primer gun today. Thanks again 1968 Plymouth GTX for all your help.

If anyone sees an issue with how I set my air system up, please speak up. You won't hurt my feelings. Doing what's right is all that matters, thank you.

20230405_150316.jpg
 
Last edited:
I like the air gunza. Mine is 2.0

Glad to hear you like the Air Gunza. After hearing what member 1968 Plymouth GTX had to say about the gun. and after reading other reviews, I bit the bullet and purchased one as a dedicated 2k Primer gun. I purchased the1.8 tip for $128, and bought a 2.0 needle and nozzle for $40. The 1.8 and 2.0 will work with the same cap. I have my Devilbiss FLG 5 as a dedicated epoxy primer gun, and I have an Iwata LPH 400 for base and clear. I have a few cheaper $40 dollar 2.5 tip guns as needed for Feather Fill or Slick sand. As of right now, I think I have enough spray guns to do what I need done. Who knows what the future holds but, for right now, I'm more than satisfied with my arsenal, lol

I am curious though about something I read in the Air Gunza manual about not spray thinner through the gun? For the life of me, I can't figure out why. For the last year and a half, I've been spraying thinner to clean out my FLG 5 between spraying coats of epoxy. I haven't seen any ill effect doing so?
 
Last edited:
Glad to hear you like the Air Gunza. After hearing what member 1968 Plymouth GTX had to say about the gun. and after reading other reviews, I bit the bullet and purchased one as a dedicated 2k Primer gun. I have my Devilbiss FLG 5 as a dedicated epoxy primer gun, and I have an Iwata LPH 400 for base and clear. I have a few cheaper $40 dollar 2.5 tip guns as needed for Feather Fill or Slick sand. As of right now, I think I have enough spray guns to do what I need done. Who knows what the future holds but, for right now I'm more than satisfied with my arsenal, lol

I am curious thought about something I read in the Air Gunza manual about not spray thinner through the gun? For the life of me, I can't figure out why. For the last year and a half, I've been spraying thinner to clean out my FLG 5 between spraying coats of epoxy. I haven't seen any ill effect doing so?
I pretty much have and use the same guns. The air gunza is great for 2k high build. I'm looking for a cheapie to spray poly. I use the airgunza. It works. I clean my guns with thinner. I don't spray it though? I can't see it hurting it...I clean my guns immediately after use.
 
I pretty much have and use the same guns. The air gunza is great for 2k high build. I'm looking for a cheapie to spray poly. I use the airgunza. It works. I clean my guns with thinner. I don't spray it though? I can't see it hurting it...I clean my guns immediately after use.

I too tear down my FLG-5 when I'm done spraying epoxy. What I do while spraying epoxy is, spray my first coat. While waiting the 45 to 60 minutes before the next coat, I remove the PPS2 cup, fill the PPS2 adapter with thinner and spray out. I'll do that like three times. I don't want to take the chance of any epoxy building up inside the gun during flash time. My FLG-5 still looks brand new.
 
Here’s a step I will now perform after changing desiccant beads. I will remove the bottom canister and filter from the Motor Guard M60, then open up the air supply to exhaust any desiccant dust that may be present after installing new desiccant beads. My desiccant filter has a large tube that is the length of the filter housing. The tube screws into the top of the filter housing.

I have to rotate the desiccant housing side to side while pushing up on it to be installed. I know I'm crushing beads via the center tube while doing this, I can hear it grinding beads.

Hence the reason for me installing the M60 after the desiccant filter.
Is the tube in your desiccator attached to the top or is it fixed in the canister? If it's fixed in the canister it prevents crushing of the desiccant altogether. I just run a cheap HF desiccant canister that is set up this way, it is the final filter after my M60, but I haven't had any issues with dust in the 9 years I've been using it.
 
Is the tube in your desiccator attached to the top or is it fixed in the canister? If it's fixed in the canister it prevents crushing of the desiccant altogether. I just run a cheap HF desiccant canister that is set up this way, it is the final filter after my M60, but I haven't had any issues with dust in the 9 years I've been using it.

The tube is fixed into place once it's screwed into the top of the housing. The beads being crushed are happening from the bottom of the tube when installing housing. The tube has to be installed first before installing the canister housing. The canister housing locks into place via a quarter turn. It does not screw into place. I don't remove the center tube when installing new desiccant beads. I only removed it for this conversation and picture.

Center tube
20230406_120720.jpg


Center tube unscrewed from top of housing.
20230406_120825.jpg
 
Last edited:
i dont run air tools through my filters. my booth air and filters are for paint only. air tools move vapor. i run them off my main line. right after my dryer.

I'm trying to understand what your saying concerning moving vapors. I'm assuming the vapors your speaking of are oil vapors? If so, I didn't install an oiler canister on my system. I only use a few drops of oil at the air tool. No oil used for sanders.

I made provisions at my air dryer to adapt if necessary. I just need to understand this vapor issue you speak of.
I do the same as Shine, I don't run my air tools through my filters, desiccant etc. I just use a cheap water trap from Home Depot to catch the worst of the water. And it is not that humid in my area, so that works fine, I don't get water dripping out of the DA etc.

I think the vapor comment is regarding oil vapor. Normal piston style compressors have oil on the crankcase and there will be some small degree of oil vapor escaping past the rings and into the compressed air.
Any legit air filter system for painting has an oil trap/filter of some kind.
Because of this, I have a dedicated air hose for painting and it is never used on the main line that doesn't have an oil trap/filter, as it could get contaminated. It has only ever had air through it that was fully filtered and dried.
 
constant air movement by tools moves vaper further down the line. my booth air is 60 ft from the nearest hose fitting. my paint hose never sees anything but gun pressure and volume. air tool is best closest to compressor.
 
constant air movement by tools moves vaper further down the line. my booth air is 60 ft from the nearest hose fitting. my paint hose never sees anything but gun pressure and volume. air tool is best closest to compressor.

Understood. I will ad a fitting at the air dryer since I left enough pipe for future modifications.

20220419_124835.jpg


20220418_154626.jpg
 
Fabricated this 3/8" thick bracket yesterday for the Motor Guard M-60. It was sturdy without the bracket but, I could see pulling on the air hose too hard, or tripping over the air hose ( never done that before, lol) and that could cause the cast in place aluminum M60 housing to crack at the inlet side.

20230407_125859.jpg


20230408_073304.jpg


20230408_073344.jpg


20230408_073327.jpg
 
Last edited:
may as well order a trap for the dryer. the one in the hf dryer has plastic guts which break. i just replaced mine with one with steel guts.
 

Attachments

  • IMG_20230406_124943800.jpg
    IMG_20230406_124943800.jpg
    137.8 KB · Views: 90
Thank you Shine for the recommendation. I changed the water trap to full metal with auto drain last year.

20230408_183709.jpg
 
Last edited:
Back
Top