Blocking out the small waves

Lone Star

Promoted Users
Ok I give its my turn now

These waves show up by using the solvent method and sky lighting down the side of panel. Even after applying epoxy I can see them looking at a angle.

OK, I have blocked and blocked several times and appears the same method is not going to work.
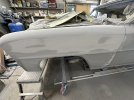
I have applied epoxy over bare metal, then filler work with 80 grit then another two coats of epoxy blocked with 120 grit and then another two coats of epoxy and blocked 120 and 150 and still have these real small waves. Yes I used guide coat and it goes away and did that several times.


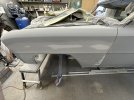
Note I only have this problem on the fenders not the rest of car. The doors have a similar crown areas but it appears metal is different or thicker. These are original parts too. I am sure someone has run into this before so that's why I am posting.

The fenders have a slight horizontal and vertical crown so to speak and about 3 inches before the molding line it is like a inverted crown that goes in then back out slightly. I am thinking maybe the blocks are riding over the crown in the middle where it drops slightly and causing the issues. Do I need to use a thinner not so wide of block maybe? I have used long and short standard width blocks.

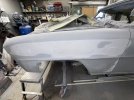
I have been using just epoxy and blocking but I though I would try something different and currently have two coats of epoxy and two coats of Turbo on the fenders as maybe the Turbo will sand easier not take as much pressure etc.
I need some professional advice on this issue so I can move on.

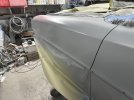
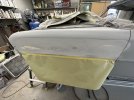
I will post a photo but its not going to show the waves which are only in the middle which is above the wheel opening area and about 2-3 inches above the molding body line. Only way to see waves is a video sighting down the side with wet solvent method etc. Also I think the fender has some transitioning from front to rear so a long block has not worked for me to get the waves out either.
If it was a paint job that had orange peel you would probably be OK but I am going to cut and buff so I want it Don Hutton straight :)

Maybe a short narrow block? But would it ride into a low etc?

I have tried light pressure too as the fender does flex some since there is no support behind the fender in this area.
66 Chevy II
 

Attachments

  • IMG_0275.jpeg
    IMG_0275.jpeg
    128.6 KB · Views: 143
Criss crossing x pattern. Acrylic blocks 18 inch and a 22 inch 2 3/4 wide that are flexible. I tried Deans too.
 
Criss crossing x pattern. Acrylic blocks 18 inch and a 22 inch 2 3/4 wide that are flexible. I tried Deans too.
wipe the whole area and block it is what i would do. when i do a lazer straight car i wipe the panel and block then move on to my primer. basically used just to refine things. ive gotten to where all i use is spi epoxy now works excellent
 
@zachm that is a good point. I applied a full wipe on the panel after epoxy on bare metal and blocked down till I hit epoxy and then two coats of epoxy a couple more times with guide coat.
 
Unless you have been doing this for a long time you can't spot block waves out. You just make a bigger wave doing that. That is what it sounds like you are trying to do?

Only advice I can give is this. Guide coat then block the entire length. From the front to the back in that section. Do not spend more time in the wave area. Crosshatch going one direction down (front to rear) the panel, then come up (rear to front) the panel and cross hatch going the opposite direction. One round of going up and back and it should be clear from the guide coat where the lows and highs are. Then you need to decide if you can block them out or need more primer. If you are unsure keep going till you start to sand through the 2K in places. Once you do that stop. Re-prime.

You want to use a an acrylic block or Deans block that flexes some but not too much. Just enough to conform the panel as you are sanding. If you are having trouble sanding the area close to the molding, kick the block up a little on edge and sand that area. Again only sand the entire length. No spot sanding. Key to blocking is even sanding. Never concentrate in one area. Keep applying guide coat to help you understand what is going on. Close your eyes and run your hand back and forth and you will be able to feel the highs and lows.
 
I should add to use a coarse grit till you get the panels flat. 150 would work well.

And to clarify something I said above, you don't have to sand the entire width of the panel or section of a panel when blocking, just the entire length. You can make several passes sanding say the lower half and then the top half. The key to it is to do it very evenly.
 
Last edited:
Sometimes once it's sanded put a glove on and use a towel and wipe the fender without looking at it. Wipe slow and fast. Without looking at it. Sounds funky but I feel like I can feel something better without looking at it
 
I should add to use a coarse grit till you get the panels flat. 150 would work well.

And to clarify something I said above, you don't have to sand the entire width of the panel or section of a panel when blocking, just the entire length. You can make several passes sanding say the lower half and then the top half. The key to it is to do it very evenly.
Sounds good I am going to try again with your method front to rear and rear to front crosshatching and guide coat.
Maybe using the turbo over the epoxy will give me some feedback too. I appreciate everyone’s help. These fenders remind me of a hood that flexes which takes a lot of time and patience which at my age it can be an ass whipping. Thanks Chris
 
Well I blocked off the Turbo as I had two coats of epoxy before it. First photo shows the line where the area is. Other photos after show blocking and basically using the 2k as guide coat and last photo shows bare metal spots that these waves are working off of as a straight line etc. Using a straight edge the bare metal spots do no show as highs but maybe since there is a few coats around them they are. Should I lightly tap down the bare metal spots and spray some epoxy and go from there?
 

Attachments

  • IMG_0607.jpeg
    IMG_0607.jpeg
    101.4 KB · Views: 115
  • IMG_0610.jpeg
    IMG_0610.jpeg
    157 KB · Views: 106
  • IMG_0617.jpeg
    IMG_0617.jpeg
    153.4 KB · Views: 107
  • IMG_0620.jpeg
    IMG_0620.jpeg
    153.5 KB · Views: 99
  • IMG_0623.jpeg
    IMG_0623.jpeg
    167.6 KB · Views: 109
Hard to tell you from pictures. Did the "high" areas start appearing first? If so that would indicate they are high. You need to use your hand and run it back and forth over the area. Your hand can tell you if those are highs. Close your eyes and go back and forth. If you are having trouble feeling then you can use a thin cloth, paper towel etc and that sometimes helps someone feel better. If they are high, then yes lightly tap them. Use the normal face of the hammer first. Lightly tap. See if that helps. Don't use a pick hammer unless you have no other choice. If you do just lightly lightly tap with it. Check your progress often.
 
Hard to tell you from pictures. Did the "high" areas start appearing first? If so that would indicate they are high. You need to use your hand and run it back and forth over the area. Your hand can tell you if those are highs. Close your eyes and go back and forth. If you are having trouble feeling then you can use a thin cloth, paper towel etc and that sometimes helps someone feel better. If they are high, then yes lightly tap them. Use the normal face of the hammer first. Lightly tap. See if that helps. Don't use a pick hammer unless you have no other choice. If you do just lightly lightly tap with it. Check your progress often.
Bare metal did not show up at first but in the second photo the white area in the middle is where they are at and I kept going blocking off the 2k. I cannot feel it with my hand either.
Some of the metal in areas is hard as a rock and does not move with light tapping which maybe from the media blasting just for a note.
 
Last edited:
Bare metal did not show up at first but in the second photo the white area in the middle is where they are at and I kept going blocking off the 2k. I cannot feel it with my hand either.
Some of the metal in areas is hard as a rock and does not move with light tapping which maybe from the media blasting just for a note.
If that fender was blasted that likely caused the waves in the metal.
 
I appreciate all the help guys. It’s one of those type of deals where lots of experience with old metal and with issues pays off. I tapped on a few bare metal spots and took it back down to metal and epoxy. I will wipe again and epoxy and I may do what Don said use some poly. Now to find the best deal on some Clausens Rust Defender. eBay $275 Amazon 255.
 
I appreciate all the help guys. It’s one of those type of deals where lots of experience with old metal and with issues pays off. I tapped on a few bare metal spots and took it back down to metal and epoxy. I will wipe again and epoxy and I may do what Don said use some poly. Now to find the best deal on some Clausens Rust Defender. eBay $275 Amazon 255.
One of the other guys on here was telling me that the Clausen Sandy polyester primer is the same as Rust Defender just without the zinc. We don’t need the zinc when we use epoxy. The price is a lot less. Might be worth a try. I’m going to try it on my next build.


Don
 
It’s probably laying flat against a brace.
The only brace these old novas have is at the cowl and a bolt on piece at headlamp area to core support with nothing in between which makes it flex a little at the wheel opening area. The fender does not have a bolt on inner liner either at the wheel opening so there is no support at the middle of fender.
These hard metal spots I am referring too have to be lightly heated and then tapped on. It’s not all of the fender just some areas.
 
Back
Top