You are using an out of date browser. It may not display this or other websites correctly.
You should upgrade or use an alternative browser.
You should upgrade or use an alternative browser.
Best way to cut lexan
- Thread starter OJ86
- Start date
Dean Jenkins
Promoted Users
I cut lots of lexan when prototyping blocks. You can get a "decent" edge with a new fine tooth circular saw if you tape both sides of the cut line.
For a really sharp, clean cut, CNC is the only way I know of. That's what we do for Black Diamond production.
For a really sharp, clean cut, CNC is the only way I know of. That's what we do for Black Diamond production.
Dean Jenkins
Promoted Users
I had these guys custom cut some parts for me. Pretty reasonable and fast.
 www.eplastics.com
Plastic Sheets, Rod, Tube & Fabrication Services Since 1914 | ePlastics®
ePlastics is a distributor of plastic sheets, rod, tubing and fabrication trusted for over 100 years. We carry a large stock of plexiglass, acrylic, polycarbonate, fiberglass, hdpe and other speciality plastics. Based in San Diego we ship worldwide.
www.eplastics.com
Jim C
Oldtimer
they do make special table saw blades for plastics. it has a special angle on the teeth to let it cut without melting it. prob not something you will find locally but you should be able to find easily online. special router bits are also available. the router bits leave that super clean edge on acrylic that you typically see on something like store displays, etc.
")
MJM
Promoted Users
https://www.mcmaster.com/products/plastic-cutting-router-bits/ Though routers do work very well cutting lexan, there is a small learning curve finding the correct speed to push the router, or lexan, into the router if the router is mounted on a router table. Pushing the router to fast, or pushing the lexan into the router to fast, will melt the edge, even using a router bit made for cutting plastics.
No matter what tool you use to cut the lexan, my recommendation is to contact cement "felt" to the bottom of the tool base. This will insure you don't mare the finish of the lexan, even if you have the protective removeable plastic film that comes on the lexan for protection.
I have also cut plastic on my bandsaw which worked out good.
Tools I can help you out with are circular saw, jigsaw and router.
Last edited:
Worn Out Welder
Promoted Users
A router with a flush cut bit would be my choice, but feed and speed are critical.
You would have to rough cut then run a trial with 1/16 -1/8 left for final cut.
When I machined some thick 1” polycarbonate I couldn’t get that frost edge finished out to a gloss, and one of the senior gentleman showed me how to use the hot air of a cutting torch to “ flame polish “ the machine finished area.
A heat gun would be a better option depending on the starting finish your edge.
My pennies worth
I already have the windows. I just need to cut one of them down now that some vents were added.I had these guys custom cut some parts for me. Pretty reasonable and fast.
Plastic Sheets, Rod, Tube & Fabrication Services Since 1914 | ePlastics®
ePlastics is a distributor of plastic sheets, rod, tubing and fabrication trusted for over 100 years. We carry a large stock of plexiglass, acrylic, polycarbonate, fiberglass, hdpe and other speciality plastics. Based in San Diego we ship worldwide.
MJM
Promoted Users
A router with a flush cut bit would be my choice, but feed and speed are critical.
You would have to rough cut then run a trial with 1/16 -1/8 left for final cut.
When I machined some thick 1” polycarbonate I couldn’t get that frost edge finished out to a gloss, and one of the senior gentleman showed me how to use the hot air of a cutting torch to “ flame polish “ the machine finished area.
A heat gun would be a better option depending on the starting finish your edge.
My pennies worth
Interesting, very interesting. I've never heard of this process, I'm intrigued by the process to seek information about it. I know edges can be sanded working up the grits and then polished out but, that's a pretty lengthy process. What you posted seems like a much faster process once learned.
Worn Out Welder
Promoted Users
There are YouTube videos….some better than others. The key is a good machine finish.Interesting, very interesting. I've never heard of this process, I'm intrigued by the process to seek information about it. I know edges can be sanded working up the grits and then polished out but, that's a pretty lengthy process. What you posted seems like a much faster process once learned.
A sanded edge will have a better optical clarity than say a reciprocal saw finish.
There are different forms of polycarbonate…evidently. Lexan, Marlacon(sp) which I have successfully “ flame polished “ but it’s really only the heat that fuses the surface…or that’s my experience.
There’s a couple of videos that show removing scratches from acrylic and polycarbonate, but it’s really only giving the scratch a polished surface and returning it to some degree of optical clarity.
Depending on how large the pieces are and what radius of curves and how thick--a typical 14" vertical bandsaw is what I use with great result with carbon, bi-metal or carbide tipped bandsaw blades--all work well and fewer teeth per inch to exit the chips but enough teeth in the cut not to chatter. Cutting is on the downward motion of the blade with way less chipping. Circular saw are reversed and tend to chip without support where the blade exits. Polishing the edges is straight-forward--work out with files and sanding blocks or drums quickly. As @woreout welder has mentioned--a router bit for woodworking will be good cutting way and I use them for a very slight edge chamfer on all edges if the thickness is over 3/8" thick. Other wise it is a handheld deburring tool with the swivel scraper edge. I wouldn't recommend any sharp edges with plastics--that's a typical failure spot with heat transfer out in the sun.
score your cut with an awl, a utility knife, or a scriber and you don't need to worry--the blade will follow the score for the most part if your feed is slow and your eyesight is good. I just take a piece of 1/8" hardboard run it in the blade and make a table cover to use with plastics. A couple of pieces of double-sided tape on the bottom and that's it. Some strips of 2" masking tape on the bottom of the plastic and that's all the protection I use.I'd love to use my band saw but its a relatively long cut and it makes me nervous.
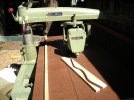
Another option if you have one--these mounted on an old radial arm saw are downward cut toward the table rather than a hand-held saber or jig saw which the blade teeth are up cut. I take up-cut blades and turn them around and grind the attaching end where the end of the down-cut blade was to install them. I forgot how good these work on cutting plastics--they optimized the speed of the shuttles on these attachments to give nice control. Score your line and use the fence for straight line cuts or free hand as shown. you can move it anywhere on the table and drill a pass through hole for the blade and cut at any or bevel or combination with your own positioning fence. I use one of these to cut thick upholstery foam with a knife blade as well--superb cuts