Another tool fabrication for this old fool

MJM

Promoted Users
I've been dailing in panel alignment and panel gaps before laying down highbuild primer. I read that high millage at panel ends is a not good practice. One of the pro's here had mentioned it so I took that advice to heart.

With that being said, I'm striving for 3/16" panel gaps and flush metal to metal panel alignment before paint. After the doors where set and gapped at the quarter panel, I focused my attention to the front fender to door panel alignment and gap.

Panel gap required stitch welding up the edge using 1/8" electrode rod.
20230722_114036.jpg


Front side
20230722_125830.jpg


Backside
20230722_162453.jpg


Welds dressed
20230727_095514.jpg


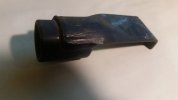
Next reply below will be the tool I fabricated to aid in panel alignment.
 
Last edited:
Obviously when welding up the edge of the fender, it caused shrinkage. I was able to hammer & dolly 98% of the lows out but, I still wasn't happy knowing it could be closer to perfect not requiring any filler.

That last 2% was a pain in my a$$. After the 3rd or 4th time pulling and reinstalling the fender to check panel plane to not have it where I wanted it.

So being pissed off is good because it made me think of a way to panel align with the fender on the car.

So here's what I came up with. I welded a piece of 3/4" angle iron to the head of a slide hammer stud puller. I softened the edges of the angle iron so it wouldn't dig into the fender metal.
20230724_132740.jpg


20230724_132823.jpg


20230724_132946.jpg


Next was to try it out.
 
Last edited:
I mostly use it to pull damaged fenders out so the door can be opened, but have also used it for that same adjustment.
 

Attachments

  • 20231002_131555.jpg
    20231002_131555.jpg
    55.4 KB · Views: 61
  • Love
Reactions: MJM
I used the new fabricated tool to move the last bit of metal at the very edge that rounds over to the backside. I guess I could have used a hammer and dolly but I didn't want to flatten out the tip at the rounded edge. I had used a door skin hammer for the initial hammer and dolly because that hammer was narrow enough to stay away from the very outter edge.
 
Last edited:
i have an end some thing like that in a slide hammer set....it is not long enough, i like yours better.
bear in mind, most all of my experience is with dodge pick ups, but, i always have the opposite problem. not enough clearance. so i either loosen the support bolts under the radiator to slide that ahead, or leave the fender proud of the door slightly. some times both. after market fenders drive me nutz, oem used usually arent too bad.
btw i have that same aluminum straight edge. mines 6'
 
Last edited:
You have the right ideas, but you have to roll the straight edge over the whole area at different angles to make sure you have the conture. Without the right contour you may have to use a lot of filler to make it right, even on the edges.
Just weld beads on the edge of the panels seems to make it shrink away from the edge more than inward, then just shrink the bulge.

I think I I understand what you're telling me about the edge. I did spray two coats of epoxy on the repair area and blocked it with a 16" block using about a 45 degree cross hatch pattern across the joint of both panels. No low spots detected. What I didn't do is modify the existing tip of of the door edge. On the fender I made a new edge tip with the use of the welding rod for a consistent shaped edge tip. I have no doubts that edge tip is different than the door edge tip but, visually I can't tell. On both the door and the fender, I simply flattened out the edge (Sketch- B) so it was in a flat plane rather than a rounded over plane (Sketch - A)

Door to Fender Edge .jpg
 
The best panel fitment, body work and paint: nobody knows was even done.

Oh so true, well said.

It makes me really appreciate what these craftsman have done to get a vehicle looking "Solid" and well defined. It don't matter if the vehicle is in bare metal, primer or final paint. Having the body lines, door gaps and body panels in plane makes the vehicle look solid and defined. I believe it was Chevyman who recently posted his mustang in bare metal. His vehicle looked so solid and defined because of the gaps, body lines and body panels in plane.

I've been learning the basics of sheet metal repair. Now I'm learning body panel gaping and body panel alignment. My project vehicle is starting to look solid and defined. It's been worth the journey.
 
The best panel fitment, body work and paint: nobody knows was even done.
That was mostly my thought while doing that mustang, and its why I didn't weld or grind on the panel edges to make the gaps perfect, so it would all look like original untouched factory panels. I think its something that Brad must be very good at.
 
I can hear Chevman screaming in the background..........STOP ALREADY, just use the original factory gaps, lol :)

Finished gaping the trunk lid to quarter panel a few weeks ago.

Driver side 3/16" gap is good.
20230803_112532.jpg


Passanger side gap is to tight
20230803_112521.jpg


Grinded the edge down, then rewelded the edge.
20230806_124702.jpg


Once rewelded, I laid down another piece of masking tape so I had a straight edge to grind too for the 3/16" gap
20230806_125822.jpg


Welds dressed with a 3/16" gap to quarter panel.
20230806_194431.jpg
 
Last edited:
Back
Top