What went wrong?

RosharonRooster

Promoted Users
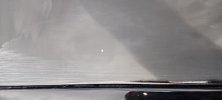
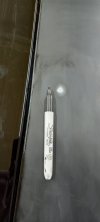
I zoomed in macro mode on the camera to get this picture. Its the size of a q tip head or so.

It sat in 2k high build for a couple months inside. Then we sanded 600 wet and all looked fine.

Sealed it In black reduced epoxy. Waited about 4 hours. Then 3 coats of spi black base. Waited 24 hours then 3 coats of euro. Looked fine. Last Wednesday

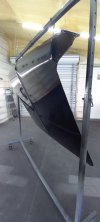
Took it off the hanging stand Saturday and mounted on the car. Began wet sanding the trunk with 1500. We noticed this bubble. It was soft. Let it sit outside yesterday and today in the sun.

Today I sanded the area with 2000 grit wet for literally 1 minute because I timed it. Stopping during to see what I have.. the bubble shaved off and reveal grey. (Thats 3 coats of clear. 3 coats of base and 1 coat of epoxy)...pretty instantly and appears to be like a chip in the paint. I burned thru in the area next do it as u can see the dimples are the basecoat. I have never burned thru clear that fast with that fine of a grit? Thats one thing..but what would cause that bubble and nothing to adhere to it?? Some sort of contaminant? Its the only spot on entire car and of course its front and center on the top of the deck lid.

How should I approach fixing? 600 and spot base and re-clear the whole panel?

Edit: I hit the area with rubbing compound by hand to confirm burn thru on the zoomed in picture
 

Attachments

  • 20210419_154715.jpg
    20210419_154715.jpg
    59.9 KB · Views: 188
  • 20210419_160528.jpg
    20210419_160528.jpg
    54.6 KB · Views: 194
Curious how long between wet sanding and sealer?

Don
Well we wetsanded it on a Saturday. And hung it up. And rinsed it all out. The inner structure and top and I sealed and based it on the following Tuesday. I really felt like I followed everything to the letter. Even wore gloves when I wax and greased it and tack rag. Allowed about 20 mins between wax and grease. And it wasn't even dirty because we washed it with soap and water. This is the only area on the trunk...or entire car for that matter.
 
I see a few things that have me scratching my head but I think it will be best to wait for the pros to respond.

Just out of curiosity, what was the high build applied over? To what grit was it sanded before applying the high build?

Don
 
I see a few things that have me scratching my head but I think it will be best to wait for the pros to respond.

Just out of curiosity, what was the high build applied over? To what grit was it sanded before applying the high build?

Don
That macro picture really makes it look bad. I just went out and feathered it out with 1500 grit. Its smoothed out now.

But to rewind to the beginning...
Trunk was bare metal and 2 coats epoxy. Then filler work. Then poly primer...80 then 180. Then 2k high build...then 180...then 2k 3 coats then sat for several weeks then 600 wet. Here's a picture for reference...one thing I will admit was that it was tricky to spray the way it was hanging but there is no way it didn't get the proper amount of coverage.
 

Attachments

  • 20210419_182555.jpg
    20210419_182555.jpg
    51.5 KB · Views: 184
  • 20210414_180805.jpg
    20210414_180805.jpg
    73.1 KB · Views: 191
3 coats of 2k high build only wet sanded with 600 says to me the material is quite thick. At least the way I spray it...

Don
 
3 coats of 2k high build only wet sanded with 600 says to me the material is quite thick. At least the way I spray it...
I am leaning more towards something landing on the surface instead of something coming up from it. Because it's an isolated spot? But im a rookie so I'm just guessing. The panel the way it was hung was difficult to spray. And resulted in some peel down on the bottom. Could explain the burn thru but we had 2 sets of eyes on it. When we re spray we are going to spray it on a stand.
 
So what layer was at the bottom of that bubble? If it feels like a chip now, did a chunk pop off while sanding? Any time something like that happens, there is an adhesion problem between layers, and more often than not, it comes from the bottom. Could be lots of different things, but getting to the bottom of the bubble is essential. Just shaving off the top, it will come back. Could have been a chunk of filler, poly, or 2K that didn't get activated in the middle and stayed soft, or a dried chunk out of the gun, but that is just a guess.
 
So what layer was at the bottom of that bubble? If it feels like a chip now, did a chunk pop off while sanding? Any time something like that happens, there is an adhesion problem between layers, and more often than not, it comes from the bottom. Could be lots of different things, but getting to the bottom of the bubble is essential. Just shaving off the top, it will come back. Could have been a chunk of filler, poly, or 2K that didn't get activated in the middle and stayed soft, or a dried chunk out of the gun, but that is just a guess.
Its down to the 2k high build. It feathered out nicely. Going to be working on this ,this coming weekend. Plan to let it sit in the sun until then
 
Did you use guide coat when sanding the 2k build primer?
Many times a small pin hole or a drop of contaminant can get by you if you don't use the guide coat.
When spraying black it is especially critical that everything be perfect!
 
I've got something similar that popped up on my c10 cab, 1 little dimple. It showed after about a year of it being painted and has been stable for a couple years. I figure it's either improperly mixed filler or primer on my part.

I'm just leaving mine in hopes it progresses no further, but if it would happen to go south I plan on trying to treat as a small rock chip now. My makeshift booth is gone, so my options are limited.

One of those deals that can and does happen on occasion.
 
Did you use guide coat when sanding the 2k build primer?
Many times a small pin hole or a drop of contaminant can get by you if you don't use the guide coat.
When spraying black it is especially critical that everything be perfect!
Yes. I always use a dry guide coat. I use it religiously. I guess this car just don't want to leave without making things difficult. Everything has gone smooth so far
 
If it was mine to do, I would spot the area in with some epoxy, wait 24 hours, then sand the whole lid exterior with 800, spot the area in with color, and re-clear the whole panel.
Thanks crash. That is what I was thinking. Or mist on some 2k primer

So if I go the epoxy route. What grit to prep that area? Red pad?. I figure the spot epoxy might be a 4x4 area...

Then the base might turn into a 6x6 area. However will there be a halo or a blend edge if I just spray basecoat in a 6x6 are and reclear...or will it all melt away when I spray the clear?
 
I've got something similar that popped up on my c10 cab, 1 little dimple. It showed after about a year of it being painted and has been stable for a couple years. I figure it's either improperly mixed filler or primer on my part.

I'm just leaving mine in hopes it progresses no further, but if it would happen to go south I plan on trying to treat as a small rock chip now. My makeshift booth is gone, so my options are limited.

One of those deals that can and does happen on occasion.
If it was anywhere else I wouldn't bother with it. I would dab some touch up paint ...but being on the top of the deck lid. Front and center. I have to make it right for the customer. Will amount in a week delay but its ok
 
Yes. I always use a dry guide coat. I use it religiously. I guess this car just don't want to leave without making things difficult. Everything has gone smooth so far
Hmm, it's odd that you wouldn't have noticed that spot then during the final sanding. That means it was probably introduced while spraying. I find it amazing how fresh paint attracts dust, hair, bugs and contaminants from a freshly cleaned booth.
 
Thanks crash. That is what I was thinking. Or mist on some 2k primer

So if I go the epoxy route. What grit to prep that area? Red pad?. I figure the spot epoxy might be a 4x4 area...

Then the base might turn into a 6x6 area. However will there be a halo or a blend edge if I just spray basecoat in a 6x6 are and reclear...or will it all melt away when I spray the clear?
Base coat systems are designed specifically with these kinds of repairs in mind. Just use a slow enough reducer so that your base overspray is not dry. This job should be a piece of cake because it's a solid color. Metallics are where guys struggle. As for the repair area prep, I would use 600. Opinions may vary on this.
 
Back
Top