Smoothing out a 3D Printed Part

Raymond_B

Hobbyist
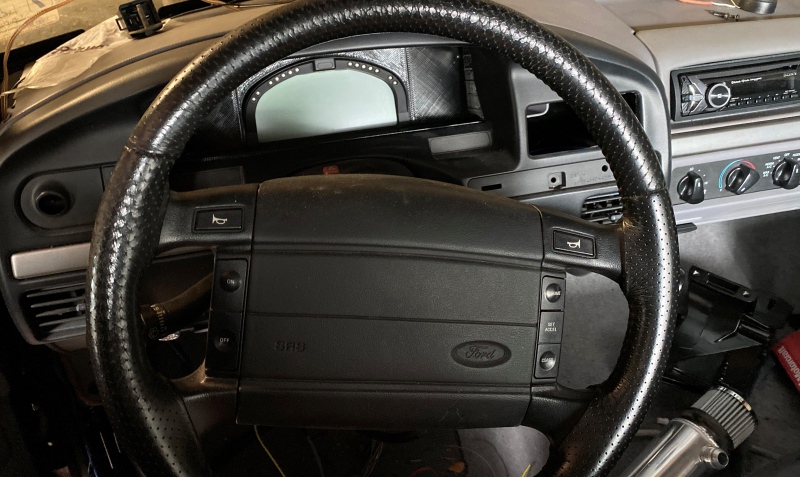
Hey guys, I picked up a 3D printed dash adapter for a RacePack display panel. I'd like to smooth out the rough surface that the printer left (I asked if he could turn up the resolution and he said no). Would it be OK to use something like SEM's rattle can high build primer then sand it smooth? Here's a pic of the adapter so you can see how rough it is.

20200111_191821241_iOS-2.jpg
 
Since you mentioned primer, I assume you're going to paint it. Personally I rather never rattle can prime anything I care about ever again. Epoxy would be best.
Depending on the type & density of whatever the heck they use for 3d, it possibly could be sanded & buffed. Could also sand ,probably adhesion promoter, & a sem interior rattle can paint I would consider acceptable. They also have a texture coating,which would look more appropriate than cross hatch.
 
i do alot of 3d printing myself. do you know what type of plastic he printed it in? generally you can treat it like anything else automotive. epoxy and or 2k primer then sand smooth and paint.

turning up the resolution of the print would be useless in this situation because the surface you are seeing is the one that is against the print bed. resolution refers to the layer height which on this part your not even seeing.

this is something i modeled, 3d printed a few years back and painted. you can see that you can get the surface smooth. i believe this was 4-5 coats of hb primer, sand then base and matte clear.
https://www.xtremekreations.com/portfolio-items/miscellaneous-gallery/#iLightbox[gallery_image_1]/5
 
Last edited:
i do alot of 3d printing myself. do you know what type of plastic he printed it in? generally you can treat it like anything else automotive. epoxy and or 2k primer then sand smooth and paint.

turning up the resolution of the print would be useless in this situation because the surface you are seeing is the one that is against the print bed. resolution refers to the layer height which on this part your not even seeing.

this is something i modeled, 3d printed a few years back and painted. you can see that you can get the surface smooth. i believe this was 4-5 coats of hb primer, sand then base and matte clear.
https://www.xtremekreations.com/portfolio-items/miscellaneous-gallery/#iLightbox[gallery_image_1]/5

Wow, amazing is an understatement! Thanks for the advice, I believe he used PLA, but I will double check.
 
Jim I just went through most of your website, all I can say is incredible. The detail is impressive, especially on your wood, probably the best faux wood Ive ever seen.
 
lol thanks guys. that bomb made it to a big nj newspaper and the headline was "nj man makes 3d printed bomb". holy crap the phone didnt stop ringing for 3 weeks. i had police depts calling me. even someone from the dept of defense ordinance div. haha.

if he used pla then that is going to be a problem in your car. pla should never be used since it turns rubbery and will deform at very low temps. it will never withstand the heat inside a car in the summer sun. if you hold it in your hand long enough you can actually tell it has gotten softer just from your body heat. abs or petg would be more appropriate for that application.

Wow! Now that's crazy!

OK, I better make for sure and find out what I paid $175.00 for. I think I will run it as-is until temps warm up and I order some epoxy and some kind of base and be able to shoot it. I have neither and that's why I was trying to cheap out on the SEM :) But first I'll find out what the material is.

Thanks again.
 
From what I have learned, (and it gets as bad as 3D printing stainless steel) is you can either print them to get the purpose done which makes them lighter and more hollow, or longer prints that are more solid. If its solid enough, you can do alot of smoothing before you even deal with primer.
Its what we are all going to have to deal with eventually. There are 200,000 square foot facilities for the printed metal whatever you want to call it, powdered, fused, welded. Being a metal finisher, I usually see alot during pretreatment. This was a simple 20.00 handle from home depot, but engineers want new technology, so they had them 3D printed in stainless, had done them in titanium too. 360.00 each. the radius of the handle was darker, which saw more heat after a phosphate treatment.
I remember seeing Kindigit do a louver panel in their printer and they purposely made it heavier where it was more important. So If its heavier, I would say sand it smoother.
Part of me thinks its like carbon fiber, and people want you to know its carbon fiber so clear is the answer. Leaving it as is without smoothing shows it is printed. I guess you have to like the look though.
 
SEM makes a flexible high build made for plastics that works very well. I've sprayed bumper parts on our shop truck around 13 years ago that are still holding up well. It will work well on an interior panel.
 
i do alot of 3d printing myself. do you know what type of plastic he printed it in? generally you can treat it like anything else automotive. epoxy and or 2k primer then sand smooth and paint.

turning up the resolution of the print would be useless in this situation because the surface you are seeing is the one that is against the print bed. resolution refers to the layer height which on this part your not even seeing.

this is something i modeled, 3d printed a few years back and painted. you can see that you can get the surface smooth. i believe this was 4-5 coats of hb primer, sand then base and matte clear.
https://www.xtremekreations.com/portfolio-items/miscellaneous-gallery/#iLightbox[gallery_image_1]/5
Jim,
After reading your post I realized there was someone here that is familiar with 3D printing. I spent all of last winter designing and printing 2 complete bumpers and grill for my Falcon project. They are printed from ASA. Similar qualities to ABS, specifically temperature resistance. ASA is UV resistant whereas ABS is not. I bonded the sections with a slurry I made from scrap ASA and MEK. Currently they are hanging on walls unfinished while doing bodywork.

Next I have to figure out the best way to get a good foundation for paint & filler. I did do a little testing to see if epoxy will stick as follows.
No sanding just epoxy. Fair adhesion.
Sanded smooth then epoxy. Good adhesion.
Sanded lightly not completely removing layer lines then epoxy. Good adhesion.
Sanded lightly, brushed with urethane reducer to soften the plastic surface then epoxy. Good adhesion.
Sanded smooth then epoxy. Good adhesion.

It appears I won't have any issues but I'd like to hear your thoughts as to what is the best way to prep for an epoxy base. I figure an ad-pro such as bulldog would be good.

IMG_3712.JPG
 
First, i cant believe you got all the pieces to print with such little warping that the bumper was dimensionally accurate when done. I have printed with abs but not asa. Abs is nice but it warps like a sob. Anyway i would not use bulldog. Your going to want to sand out the layer lines anyway so you can just epoxy it after sanding. To get the epoxy to stick better then reduce it with slow reducer. The slow reducer will let the epoxy bite into the plastic. If you are going to use all epoxy to get it smooth then thats fine. If you were laying down a coat or two and then move to 2k then you may be wasting your time with the epoxy all together. 2k, as long as you spray it nice and wet will lock onto the plastic just as well. Both primers will melt in and lock on really good
 
First, i cant believe you got all the pieces to print with such little warping that the bumper was dimensionally accurate when done. I have printed with abs but not asa. Abs is nice but it warps like a sob. Anyway i would not use bulldog. Your going to want to sand out the layer lines anyway so you can just epoxy it after sanding. To get the epoxy to stick better then reduce it with slow reducer. The slow reducer will let the epoxy bite into the plastic. If you are going to use all epoxy to get it smooth then thats fine. If you were laying down a coat or two and then move to 2k then you may be wasting your time with the epoxy all together. 2k, as long as you spray it nice and wet will lock onto the plastic just as well. Both primers will melt in and lock on really good
The big advantage to ASA is it warps a lot less than ABS. You still have to print at the same high temperatures in a heated enclosure same as ABS. It does still Warp!

In the picture you can see how each section is hollow. With a straight edge I measured up to .030" using a feeler gauge. If the sections were longer the hollows would be even greater. Joints between sections are flush. I plan to block about half of that amount out. My plan was to put some poly primer on it to fill those areas. The Evercoat super build tech sheet does list rigid plastic as a compatible substrate.

Do you think I should put down epoxy first or the super build direct to plastic? I am leaning towards epoxy first simply because 3D printed models are porous and not watertight. Have you or anyone else had experience with poly primer on plastic? Plastic bumper covers are quite a bit more flexible then ASA so I think that may be comparing apples and oranges. An ABS motorcycle faring would be a great comparison.

IMG_3865.JPG
 
yeah that pretty good. not much warp in your part at all. i usually do most of my printing in petg. i found while abs is strong, petg layer bonds far better. the layers on petg are fully melted together so if you crack or break it, it wont break on a layer line. abs i can snap on a layer line. ill have to give asa a try at some point.

im not sure i would put poly direct to plastic. you might be just fine but why bother chancing it. spray 1 or 2 good coats of reduced epoxy, let it sit for 24hrs then put the poly primer on it.
 
Not gonna lie. I’m a little bit envious of those skills… :)
Agreed. When I saw Jim C's gallery and the printed stuff he has made and painted. I was rendered speechless with his skill and attention to detail. Outstanding! Thanks Jim for your input.
 
Thanks! I dont do much cad work anymore. I just got so busy with business that i just dont have the time. I get on my computer and i can barely remember How to use the software. It is something you need to do every day to really become proficient with it.
 
Back
Top