Shape filler to body contour

Marior1995

Promoted Users
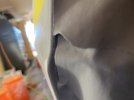
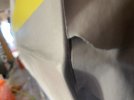
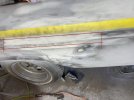
Hey guys, I’ve been on this forums for awhile and learned quite a bit but I was hoping someone could give me advice or some guidance on how to shape this filler on my body line. I’m working with a 1966 Caprice and the drivers quarter panel had a dent right on the body line contour. Well I’ve been attempting to shape the body filler and I can’t get it right. Maybe I’m just overthinking it too much but just but running my palm down it, it doesn’t feel the same. I’m new to body work in general so there’s a huge possibility I’m not understanding something. I tried taking some pictures to show what I’m talking about. In between the red lines there’s a lip where the body line sticks out and I’m having trouble shaping the body filler to match the rest of it. I guess what I’m mainly asking is how would you guys tackle something like this ?
 

Attachments

  • E5E86F15-E9F8-48A7-94E2-7EF574D050AC.jpeg
    E5E86F15-E9F8-48A7-94E2-7EF574D050AC.jpeg
    62.6 KB · Views: 190
  • F57A39F6-EA25-4402-BE02-2CCDBDB57D26.jpeg
    F57A39F6-EA25-4402-BE02-2CCDBDB57D26.jpeg
    67.1 KB · Views: 185
  • 4D29DB6E-5EB7-4274-99A5-61D54BB7CE4B.jpeg
    4D29DB6E-5EB7-4274-99A5-61D54BB7CE4B.jpeg
    140.4 KB · Views: 201
Visually separate the top and bottom at the line. The peak of the line is your separation point. Start with the top, then block sand with a long block in a crosshatch pattern. Crosshatch means to sand 45 degrees to an imaginary horizontal line running through your panel then come back and sand 45 degree in the opposite direction of where you just sanded. Do this right down to the peak. Do not cross the peak of the line. Stay on that side of it. Do it evenly. Don't concentrate on any one spot just keep making even passes crosshatching it .Use a guide coat of some sort to help you see the progress. As you progress you should start to see the peak of the line at the edge of your sanding. Observe what that tells you. Use your hand and close your eyes and run your hand back and forth and observe what you feel. After you have done the top half, proceed to the bottom half and repeat above steps. Keep observing the peak of the line as you are sanding. It should start to get closer and closer to correct as you are doing this. If not stop and try to understand why not. Never sand over the peak or round it off until you have the line right. It may take you several rounds of sanding and applying glaze or primer to get it correct.
Much harder to try and explain it in text than to show you. So if you have questions keep asking them.:)
 
What I do is put a double layer of masking tape on one side right at the high point of the body line. Then apply filler to the opposite side, apply guide coat (I like 3M dry) and sand like Chris explained above. The tape will give you a reference point as well as protect the ridge of the body line.

Once you have the top side done, tape it off completely so as not to mess it up, with a double layer near the peak. When finished sanding the opposite side you can remove the tape and check the very top of your body line.
If you see it is not uniform, apply tape to both sides exposing only the very top of the body line and lightly block sand it into shape.
Exactly how I do it. The tape helps tremendously
 
Also are you trying to get it done in a one or two applications those first two should be heavy and long blocked in the X pattern as stated with 80 grit till you get it shape right then a few coats/blocking of glazing with 180 to get the imperfections and sharp body lines. Don’t try to get it smooth with finer paper early. It won’t cut, much like cutting the clear later you need to use 1000 or less the get it to cut any wave out and not just want follow the contours
 
Thank you guys I did exactly what you guys said to do and I got it to blend a lot better ! I just need to sand one more time in the area to get this body line complete, but it’s almost done. Thank you guys so much.
 
Back
Top