Repairing bed supports on el Camino

Dean Jenkins

Promoted Users
Some of the bed braces on my el Camino have rust holes on the bottom.
Rust is totally stopped as the entire shell was acid dipped (and properly neutralized.)

Replacing the braces is a massive undertaking and I don't think it is required, I believe they can be repaired.
They are basically square tubes made of sheet metal. The sides are great and 90% of the bottom is great, just rust holes at the lowest point, where water collected and sat.

I'm thinking of two options;

1) cut out the rusted sections and weld in new metal. Totally doable.

2) just cutting some strips of sheet metal to overlap the rusted area and then weld them down. Basically cover the rusted section with new metal (leave the rusted sections in place. Would weld the full perimeter and then seam seal as well. This is the easiest, just wondering if there is some pitfall to that, that I haven't thought of.

Appreciate any feedback from those with more experience.

BTW - The rotisserie is "the bomb!" Makes this kind of work so much easier.

Here is the big picture of the underside:

On rotisserie.jpg


Details of the rusted supports:

Brace 1.jpg


Brace 2.jpg


Brace 3.jpg
 
It's a real shame that the places that do dipping don't also dip the bodies in primer. I guess you'll know better what to do if you cut out a little of that and have a look.
 
The only thing that really slows this kind of corrosion down is primer immersion, or the use of a wand to prime inside boxed areas. The problem is that if you've never been inside the box, you can't tell if primer will even help there. We use wands in collision repair, but we scuff and prep everything before it goes together, so it's reasonable to assume that the primer shot through the wand will coat a prepped and non-corroded surface. Without looking, all bets are off.
 
I would prime it and plate it with 1/8th inch, going over the current joints and weld to the good adjacent metal and wait the 75 years it would take to get thru that.
 
Another option if fabricating is not your strong suit, is to check your local pik and save or salvage yard for truck beds with a similar size box section bracing . All pickup beds have box sections similar to yours. Find the right size and it will be fairly simple to cut and adapt a section and keep your underside looking OEM after the repair. There are lots of damaged beds in salvage yards, and the yard would be willing to cut out a section on those. Or find it at a Pull your own Parts yard for very little.
 
This forum is awesome! The discussion here led me to solutions I hadn't thought of.
I was thinking "either cut out the metal and then cut exact pieces to fit and butt weld them in, or just plate over them."
I was worried about getting good butt welds and the chance of blowing through . . .
Turns out (duh!) I could do both.
I cut out the bad metal and then fabricated pieces with a 1/4" overlap and then lap welded them.
Worked great!

Here is before and after of the first section:

Before:

Brace 3.jpg


After:

Repaired support.jpg


By the time it is sprayed in epoxy primer, seam sealed, and then Raptor undercoat, it will be very hard to tell it was ever repaired.

On the the next sections . . .

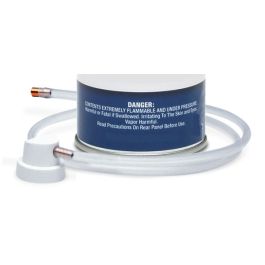
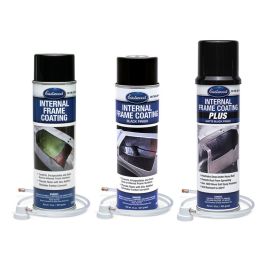
Someone suggested a "wand" and I found that Eastwood has one that you can attached to rattle cans and spray inside frames and supports like this. That is the plan. Not as good as SPI epoxy, but will be better than nothing. And The next 50 years of this classic's life will much more pampered than it's first 50 years.
 
Another option if fabricating is not your strong suit, is to check your local pik and save or salvage yard for truck beds with a similar size box section bracing . All pickup beds have box sections similar to yours. Find the right size and it will be fairly simple to cut and adapt a section and keep your underside looking OEM after the repair. There are lots of damaged beds in salvage yards, and the yard would be willing to cut out a section on those. Or find it at a Pull your own Parts yard for very little.
Good stuff Chris, thanks. Made me think that on the worst ones, if I cannot fab what I need, I can just order the replacement braces and cut out what I need.

I'm not the best fabricator around, but I don't suck at it either.
Here is the transmission tunnel I did to make the T56 work.
Not pretty, but it is solid, clears the transmission (T56 is huge compared to M22 and such) and the factory console fits perfectly.
Once the dynamat and carpet are down, it will look great.

Trans tunnel.jpg
 
Who else has this kind of day?

Friday I was welding on the transmission tunnel and the MIG started sputtering and splatting. Oops, out of gas.
So, I rush to the welding supply shop before they close and get another bottle of Argon 75/CO2 25, because I'm planning to do a lot of welding over the weekend.
Bring the bottle home and go to hook it up and look at the label. WTH? 100% Argon!
And now they are closed.
So, I find another shop this morning that is open on Saturday, and of course I have to buy the bottle and the gas :(
Well, now I have 2 bottles, more time between refills. OK.

The guy at the Saturday shop is really nice and knowledgeable and we BS about welding and it comes around to my setup.

I'm using a Lincoln 210 MP (really sweet) and I tell him that I'm doing MIG on 120V and it seems to work.
He say's "Dude, you've got to plug it into 240V, you will get a much better duty cycle, arc, etc."

I've got 240V in the shop, but the outlet is nowhere near where I need to weld and the welder only has a 6' cord.

So, I go to Home Depot determined to get 30' of 8/3 cord and some plug ends and make me an extension cord.

Of course, Home Depot is out of 8/3, but they have 6/4, at $4.00/foot. :(
Ok, I'll take it.
Of course, the spool on the rack doesn't have 30' on it. So, queue the forklift and the crew . . .
An hour later I have 30' of 6/4 and the plug ends and go home to set it up.

Anyone ever tried to wire a plug with 6 gauge wire? Major PITA!

4 hours after leaving home, I have the correct gas, a 240V, 30' extension cord and I'm ready to weld.

I strike the first arc, too close, and plug up the tip. The wire feed in the welder pumps a bird's nest of wire everywhere . . . and as I'm trying to clear it the spool of wire goes "sprong" and the whole thing unravels.
20 yards of wire later, I get it all sorted out.

5 hours and ~$400 later, I get to run a bead. And the guy was right, 240V is a nicer arc.

Ain't this a great hobby?
 
This forum is awesome! The discussion here led me to solutions I hadn't thought of.
I was thinking "either cut out the metal and then cut exact pieces to fit and butt weld them in, or just plate over them."
I was worried about getting good butt welds and the chance of blowing through . . .
Turns out (duh!) I could do both.
I cut out the bad metal and then fabricated pieces with a 1/4" overlap and then lap welded them.
Worked great!

Here is before and after of the first section:

Before:

View attachment 15354

After:

View attachment 15355

By the time it is sprayed in epoxy primer, seam sealed, and then Raptor undercoat, it will be very hard to tell it was ever repaired.

On the the next sections . . .

Someone suggested a "wand" and I found that Eastwood has one that you can attached to rattle cans and spray inside frames and supports like this. That is the plan. Not as good as SPI epoxy, but will be better than nothing. And The next 50 years of this classic's life will much more pampered than it's first 50 years.
eastwood had an actual product with a hose attached to get into the rails I tried. I thought it would have been nice if it was one of their activate cans, but now they just have the cap and nozzle attachment to add to whichever you want. This was what it is if anyone was looking.


I am guessing a wand is alot like this but a whole lot better. Its your restoration. I do like their platinum stuff for places that are hard to finish. Big difference is when its yours or when its a customers.
get it all done at once.
 
Back
Top