Sparky
Promoted Users
Hi Gang,
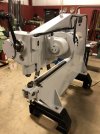
Well, here I am diving into the world of painting with SPI product line, and figured before I move on to my car, I should go through my learning curve with a Pullmax I’m fixing up.
I appreciate any advise on what I’m doing wrong or right, and I’ll be taking notes on your critiques as I seem to learn better when I write something down, just like back in school.

The Pullmax was used well, and most of the seals leaked profusely, 2 of 3 belts were blown due to a seized idler roller, but it worked. Took it all apart, had to make some special tools, but got it apart.
I media blasted all the parts to be painted down to bare metal, with an aggressive grade of coal slag, to remove the three + layers of old paint. I found that there was a lot of filler used from the factory to fill the numerous craters, and smooth out the welds


I prepped for my first SPI epoxy. Masked and cleaned all the parts with SPI solvent W&G remover, but I noticed this left a lot of lint on the rough surfaces. I used heavy shop towels, but wonder if I should’ve used more expensive lint free at this early stage? I blew off most of the lent but some of it was stubborn and would not come off even with the air, as I later found out. After waiting about an hour for the waxing grease remover to dissipate, I got my exhaust fan going, my supplied air mask set up, suit on, and mixed up some black epoxy 1:1 And sprayed two coats, using a Iwata lph400 set up exactly like Barry explains in the gun setup doc.


I waited 24 hours and spent the day mixing up small batches of 3m filler I had in stock from a previous project. Man it must’ve been older than I thought as it was very thick and took a lot of effort to mix and spread evenly. I filled all the craters.
The next day I spent sanding down the filler with 36 grit on a DA. It didn't sand well, was like a rock, but I got it all feathered out. I’m not going the block the thing laser straight, but more want to get my feet wet with the products and proccesses.
Here is where I think I screwed up, I vacuumed all the overspray in the Booth, blew off the parts with air, fan going, W&G wiped everything, waited 1 hour, and shot SPI 2k primer through the cheap Vaper 2.5. I think I was supposed to epoxy one more time first. Now where the filler is on the main machine body I can see a different shade of gray. I only did one wet coat. The other parts are fine as I did no filling on them, just the 2 coats of epoxy.


I plan on tonight sanding the main body down and shooting with epoxy.
I purchase a ppg essential gray machine SS paint for the final, but have some work before I get there.
please comment and ask away, I need to learn from my mistakes.
chris
Well, here I am diving into the world of painting with SPI product line, and figured before I move on to my car, I should go through my learning curve with a Pullmax I’m fixing up.
I appreciate any advise on what I’m doing wrong or right, and I’ll be taking notes on your critiques as I seem to learn better when I write something down, just like back in school.
The Pullmax was used well, and most of the seals leaked profusely, 2 of 3 belts were blown due to a seized idler roller, but it worked. Took it all apart, had to make some special tools, but got it apart.
I media blasted all the parts to be painted down to bare metal, with an aggressive grade of coal slag, to remove the three + layers of old paint. I found that there was a lot of filler used from the factory to fill the numerous craters, and smooth out the welds
I prepped for my first SPI epoxy. Masked and cleaned all the parts with SPI solvent W&G remover, but I noticed this left a lot of lint on the rough surfaces. I used heavy shop towels, but wonder if I should’ve used more expensive lint free at this early stage? I blew off most of the lent but some of it was stubborn and would not come off even with the air, as I later found out. After waiting about an hour for the waxing grease remover to dissipate, I got my exhaust fan going, my supplied air mask set up, suit on, and mixed up some black epoxy 1:1 And sprayed two coats, using a Iwata lph400 set up exactly like Barry explains in the gun setup doc.
I waited 24 hours and spent the day mixing up small batches of 3m filler I had in stock from a previous project. Man it must’ve been older than I thought as it was very thick and took a lot of effort to mix and spread evenly. I filled all the craters.
The next day I spent sanding down the filler with 36 grit on a DA. It didn't sand well, was like a rock, but I got it all feathered out. I’m not going the block the thing laser straight, but more want to get my feet wet with the products and proccesses.
Here is where I think I screwed up, I vacuumed all the overspray in the Booth, blew off the parts with air, fan going, W&G wiped everything, waited 1 hour, and shot SPI 2k primer through the cheap Vaper 2.5. I think I was supposed to epoxy one more time first. Now where the filler is on the main machine body I can see a different shade of gray. I only did one wet coat. The other parts are fine as I did no filling on them, just the 2 coats of epoxy.
I plan on tonight sanding the main body down and shooting with epoxy.
I purchase a ppg essential gray machine SS paint for the final, but have some work before I get there.
please comment and ask away, I need to learn from my mistakes.
chris
Last edited: