Porsche 911 backdate project

getto822000

Promoted Users
Hello there,

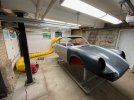
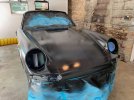
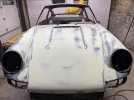
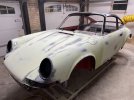
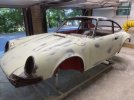
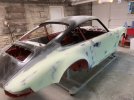
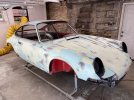
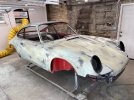
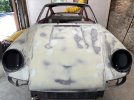
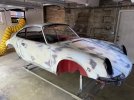
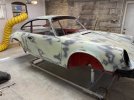
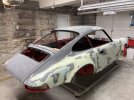
I've been lurking in these forums for a few months and today finally painted my car in SPI black epoxy. For the past 7 months I've worked on restoring a 1988 Porsche 911 as a 1973RS tribute car. It's been a lot of fun and hard work. I've never done bodywork before, but have done many engine and race car builds in the past.

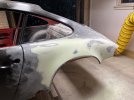
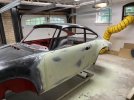
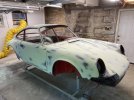
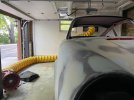
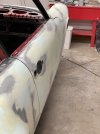
After cutting off and replacing the entire roof, front clip and rear bumper, I finally finished the metalwork on the car. This morning I put on two coats of black SPI epoxy using a FUJI Q5 turbine sprayer with T75G gun and 1.5 tip. It worked pretty well the over spray was manageable in my small booth setup. The first coat was WAY TOO HEAVY, as I poorly adjusted the fluid needle. I then dialed it in and the final coat laid smoothly. I do have some runs from the first coat. But I'm planning to do my bodywork now and sand off the runs anyway so no sweat.

The major thing I am wanting to know, is the best process for using epoxy as a build primer? How long should it cure between coats? How many coats does it take? Any advice from you all on this topic? I'm going to take my time with this and finish the body filler and build primer over the summer. I can wait and let it cure, dry, shrink or whatever is needed to flat it out. My booth setup pulls air from my house and works very well for that. I can feed the room with 72 degree, 40% humidity air, then after it cures a bit I can open the doors and let the sun shine on it and have the summer heat help bake the epoxy.

In the end, I'm going to try to paint it with Glasurit 22 single stage with my turbine sprayer. I have a gallon of it in Aubergine purple which was an original color from 1973. I know this kind of painting is hard to do for a rookie, but I'm willing to go slow and learn, just like I have with all the metalwork.

Any and all advice is greatly welcome!

Adam
 

Attachments

  • IMG_2042.jpeg
    IMG_2042.jpeg
    140.9 KB · Views: 183
  • IMG_2054.jpeg
    IMG_2054.jpeg
    187.9 KB · Views: 178
  • IMG_2057.jpeg
    IMG_2057.jpeg
    138.4 KB · Views: 173
Cool project! I don't have any experience with shooting epoxy through a turbine, but typically time between coats is at least 30 minutes, and some glaze or filler can be applied 24-72 hours after application. That's also the best time to block out the rest of the body and re-apply epoxy. I think that the temp regimen you describe might be highly variable, and the times between coats and to reprime might vary radically depending on the surface temps of the vehicle over time. You might be able to get a better idea about when to do things if you had an infrared thermometer to measure the vehicle's surface temps. Don't rely on air temps alone! Depending on the season and environment, air temps can be very misleading.
 
Looks like the metal temp is 71.5 with an infrared gun. Epoxy has dried well enough and bodywork has started. Last winter I cut and welded in a new roof panel and shaved the drip rails. I bodyworked that directly on the metal and sealed with epoxy. Now I’m starting to bodywork the rest of the car on top of the new epoxy and blend it into the top. It’s getting dusty.
 

Attachments

  • 28E137C0-1DF6-458B-9463-472BD0490386.jpeg
    28E137C0-1DF6-458B-9463-472BD0490386.jpeg
    142.9 KB · Views: 163
  • 8F7838E2-E823-44CE-8C64-F1A3F94DA48E.jpeg
    8F7838E2-E823-44CE-8C64-F1A3F94DA48E.jpeg
    167.7 KB · Views: 162
Continuing to skim coat all around the car. Dust, dust and more dust. But damn does this process work well for flatting the body. I’m doing 80 grit with body filler and then will skim some putty and block it with 120 grit and finally 180 grit. Then I’ll epoxy prime it again, wait a couple of weeks and then block 120 grit and 180 grit again. Prime again and Repeat with 180 and 220, repeat with 220, 320 wet and 400 wet. If anyone has feedback please chime in.
 

Attachments

  • 4CD14EBA-CBB0-45A4-BFB4-29DBC1BB0E9D.jpeg
    4CD14EBA-CBB0-45A4-BFB4-29DBC1BB0E9D.jpeg
    134.6 KB · Views: 156
  • FD0EFAAD-B671-4144-B763-21F1911EB974.jpeg
    FD0EFAAD-B671-4144-B763-21F1911EB974.jpeg
    141.9 KB · Views: 152
Also it’s up to 80 degrees in the garage now with 28% humidity from running a large dehumidifier. That’s really helping me dry out this substrate.
 
All skimmed now. Well almost all. Need to do all the odds and ends, check edges, etc. Then spot fill the low areas and move on from 80 to 120 grit. It’s getting flatter and flatter. It was 100 degrees here today and very dry, which was good for shrinking this filler. Can’t wait to get it all smoothed out and epoxied again.
 

Attachments

  • E10EEB8A-DA0B-4867-853C-1F2C269B77D8.jpeg
    E10EEB8A-DA0B-4867-853C-1F2C269B77D8.jpeg
    161.4 KB · Views: 143
  • 625B9723-B748-4432-95FA-7E50D7C76728.jpeg
    625B9723-B748-4432-95FA-7E50D7C76728.jpeg
    164.6 KB · Views: 139
  • E6605FD3-BDA2-40D1-9D91-3497A33698E2.jpeg
    E6605FD3-BDA2-40D1-9D91-3497A33698E2.jpeg
    169 KB · Views: 138
  • 756B5737-3B74-43E1-B84E-575D4FDDAD41.jpeg
    756B5737-3B74-43E1-B84E-575D4FDDAD41.jpeg
    159.9 KB · Views: 140
Touching up with two part glazing putty. Then wiping on some guide coat. I thought I could go to 120 grit but got ahead of myself and will do one more pass on 80 grit tomorrow to finalize the shape, then will move on to 120 grit to remove those scratches. It was again 100 degrees today and 28% humidity in the garage. It’s like we are baking these fillers.
 

Attachments

  • 00AFBF91-C238-4990-AF7C-A76F889CA830.jpeg
    00AFBF91-C238-4990-AF7C-A76F889CA830.jpeg
    186.5 KB · Views: 127
  • 10A54026-771A-41D3-B347-088457FCDE75.jpeg
    10A54026-771A-41D3-B347-088457FCDE75.jpeg
    201.2 KB · Views: 128
  • DC10104A-534D-4281-8484-8268EDEA003A.jpeg
    DC10104A-534D-4281-8484-8268EDEA003A.jpeg
    157.2 KB · Views: 151
Another round of 80 grit and she’s looking pretty flat. Still need to touch up like a hundred spots, edges, gaps, etc before I can go to 120 grit.

I was thinking of doing that and after the 120 grit and fixes then epoxy it again. Then block the epoxy with 120 and 180 grit (assuming no major blow thrus to metal

Does that sound reasonable?
 

Attachments

  • 2B87BAD0-6193-414A-BBC2-D35506E03DBA.jpeg
    2B87BAD0-6193-414A-BBC2-D35506E03DBA.jpeg
    148.9 KB · Views: 142
  • 69AC4728-085B-4C00-A51A-9D57311BEAE4.jpeg
    69AC4728-085B-4C00-A51A-9D57311BEAE4.jpeg
    177.9 KB · Views: 130
  • 6060184E-2590-4964-8284-A90A2AB37CD7.jpeg
    6060184E-2590-4964-8284-A90A2AB37CD7.jpeg
    148 KB · Views: 125
  • 1D250C52-DD7F-430A-B6D8-5AC7B82393E5.jpeg
    1D250C52-DD7F-430A-B6D8-5AC7B82393E5.jpeg
    141.4 KB · Views: 138
I tend to go to more epoxy early, even if I know that some areas will need attention. One reason amongst many is that the gloss helps show where things might need a bit more work. The eye can see what the hand might miss. From the pics of your car there may be some filler build in areas where it might not be necessary. Pausing to prime and block gives a chance to knock high filler areas down without exposing large areas of metal. Less filler is better, but more epoxy has never been a problem in my experience.
 
Yeah that’s what I was thinking. I blocked it all over again with 80 to pull it tight and then cleaned it up with 120. I finished the passenger side, rear deck lid and roof. It’s looking much tighter on the filler. Hopefully tomorrow I can finish the hood and drivers side, then clean it up and get ready to shoot more epoxy.

Blocking the epoxy now seems a little gooey. It’s been drying for one week at 72 degrees. After this next round of epoxy how long should I let it dry before blocking? How many coats should I do for building on it?
 

Attachments

  • 9A9395AF-9402-4F2F-B3C8-3EB4450C9906.jpeg
    9A9395AF-9402-4F2F-B3C8-3EB4450C9906.jpeg
    169.5 KB · Views: 125
  • 2AF87041-464A-408C-B565-D8936D4C38AD.jpeg
    2AF87041-464A-408C-B565-D8936D4C38AD.jpeg
    173.8 KB · Views: 120
I should say that the top felt soft but then it sanded nicely after breaking through. I’ve never sanded it before and it felt softer than sanding filler. It did block out nicely.
 
Like when you slide your finger nail over filler it is slick, but a fingernail over the epoxy top (shiny part) felt more “rubbery”.
 
Oh, okay, that is normal. Epoxy is a pretty slow material, so a bit of a rubbery feel is no problem. If it's sanding good and only the top skin is sticking to the sandpaper, you are fine.
 
Ok whew. Another day of finishing the 120 and a few touch ups and it will be ready to coat again. The car is looking so nice can’t wait for it to be all one color… and look flat/straight.
 
So, this is unasked-for advice, but my preference is to use something finer than 120 before re-priming. I think you might be happier if you went over it with some 180 or 220 before primer just to knock the peaks off the 120 scratches.
Thanks for the advice. I’ll go with 180 then next. This is my first time doing bodywork so I’ll heed the advice of experts.
 
Sometimes sanding the epoxy with a rough grit like 80 or 120, it has a tendency to want to "rip" the epoxy off the metal until it is good and dry, which can vary a lot depending on temperature, thickness applied, and time between coats. 180 will feather it out much nicer as a final grit.
 
Back
Top