Need some help with urethane wave.

LITJOHN

Promoted Users
Hi all, I'm a newbie here. I've been on the site before reading and checking things out.
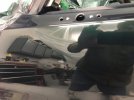
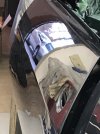
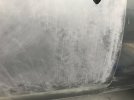
I have a question about urethane wave? I shot BB/CC on a long term project (72 Chevelle) last fall and got back to it a few weeks ago ( Temp got warmer ). After cutting using durablocks with 1000, 1500, 2000, 3000 and buffing a small section on a door (Hood and Deck lid are done). I notice waves / marble bumps looking down the side of the door. Looking straight on it doesn't look to bad...Started hitting it with 800 using a 1/2" x 1 1/2' x 11 3/4" polycarbonate block and couldn't beleve what I missed..... I'm just a novice, painted a few old bikes and 10-12 cars/trucks over the years and have never seen this outcome. Anyway after cuting it this many times I figure I'm going to have to reshoot the clear. Would that be the best route to go?? Attached a few pic's. Any help would be great.

Thanks
John
 

Attachments

  • Urethane Wave0.jpg
    Urethane Wave0.jpg
    91.3 KB · Views: 349
  • Urethane wave.jpg
    Urethane wave.jpg
    120.3 KB · Views: 353
  • Urethane wave2.jpg
    Urethane wave2.jpg
    53.5 KB · Views: 358
  • Blocks.jpg
    Blocks.jpg
    80.9 KB · Views: 323
Durablocks are not good for getting something totally flat. I've had the same problem. It is amazing how much flatter a piece of oak or poly cuts the surface. Urethane wave can come from the undercoats as well, especially if heavily sprayed poly or 2K is sanded with too fine a grit or too soft a block.
 
Last edited:
Thanks texasking, a 2k poly was used as a feather fill primer. I cut that starting at 220 and worked up to 400 for the base...I'm thinking the cause was of course me. I shot the clear using a Sata jet 4000 B RP using the suggested settings but probably was moving too slow :mad: Thats the 1st time i'd used that gun...
 
you can get scraps from a cabinet shop and make your own . buy sticky back roll paper and your good to go .
you can cut down the wave by adjusting your gun habits. wet slick thin coats instead of thick wet coats . it's not going to flow like enamel so shoot for effect . cut back on fluid and slow down and maybe up the air .
 
Thanks Shine, I had the psi set at 33-35 at the gun and the fan set to full. I'll mess with the fluid setting before I reshoot. Won't be for a while now since I'm blocking all the side panels. So hitting it with 800 before reshooting is ok or go down to 600? I'm leary of cutting through to the color.
 
400-600 grit is what you want.

to cut out wave i have always had issues with blocking clear flat with wet/dry paper wrapped around a block. since the paper isnt really attached it can sort of float over the highs and into the valleys of the wave making you think you got it all when you didnt. i much prefer to find a psa paper that will stick to the block then wetsand with that. once its cut flat you can just do the rest all with an orbital since your just refining scratches. like shine said, alot of wave is cause by gun settings an spray technique. the thicker the coats and the closer you spray the worse it is.
 
Thanks Jim, that makes sence. I'm trying to block it out to reshoot the clear on the side panels with out cutting through to the base which is why I'm leary of using a courser grit. I've got a roll of 800 psa paper that I started using today. So your thinking that's still too fine? I did notice the 800 wears out quick doing this.

Thanks
John
 
https://linearblockingtools.com/our-products/ols/products/wet-sanding-paper-1200g. Haven't tried the Oslong, but the linear blocking paper works pretty good. It definitely sticks, even when wet.
 
Last edited:
Thanks guys, the psa paper I have is in 6" disc's. The Oslong roll is about the same price as buying 4 packs of 5 non sticky back 3m paper but 25m of it!! I'll drop down to 600 and just hope I don't cut through. Base is a metalic so it won't be any fun fixing if I do. Oh well, thanks again.

John
 
Just realize the 600 will cut it quick, and you have already sanded it. It will not take much to get it flat, but only you know how much clear you have to work with. If I was worried about breaking through, and was planning to reclear, I would probably just sand it lightly with 800 and a gray scotchbrite with scuff stuff. Reclear, then block to get the wave out. It would be safer.
 
Thanks Texasking, I blocked the door in the picture with 600 and it flatened out nicely then moved to the quarter. I only did a small section with 2 passes using very light pressure and it's not near as bad as the door was. I'm going to switch to 800 and go on from there.
All the panels were shot with 3 coats. The hood, deck lid, filler panel below the back window and the top of the quarters were blocked with 800 after the 3, then stripes were added and reshot with 4 coats of clear to bury the stripes. Those panels were all blocked again using 800 and then stepping up and turned out fine. Just the side panels have the wave...those are the ones I started with 1000. I thought it would be better to start with a lighter grit cuz of less coats....but I was wrong. Anyway I'm going real slow and not much presure until I can see how bad they are on the rest and then reshoot them.

John
 
Remember how you sand is just as important as what you sand with.
You want long strokes, not the little short back and forth strokes like so
many people do.
The rules to sanding clear is the same as sanding body filler
 
Morning JC, when I blocked the door I started on the bottom of the door ( edges are taped ) and came straight up the full heigth to the body line. Then working straight down from the top of the door to the body line. The contours on the doors aren't too bad but the quarters are a different story, I'll have to cut some of those using a 6-8" stroke and some at an angle. I've seen some places when sanding previously that when using a round block that putting too much pressure at the begining of the stroke or twisting at the end can leave a linear divot line for lack of a better term so i'm adjusted my strokes and pressures as I go. I'll be hitting it again this afternoon, have to go get some Bocat service parts this morning.

Thanks
John
 
Photo 2 makes it look like the clear was applied too wet and probably at low air pressure. Not that it helps now, but better gun setup/technique might help in the future. Usually gun makers air pressure guidelines need to be ignored because their main concern is staying within the law for transfer efficiency, not the best outcome. Also the pressure need to be observed with full trigger pull, fluid flowing through the nozzle.
 
If you blocked poly with 220, then sanded the clear with Durablocks, you might need to scuff and shoot 4-5 coats of clear to have enough to block it flatter without hitting base. Poly really needs 80-100 grit on an acrylic block to get it flat with no texture. 220 on a Durablock or similar softer block might be cause of the distortion/wave you're seeing now. The Trueblox website has a ton of tips on how to make the primer and paint truly flat.


This is a '66 F100 bedside in poly primer that I blocked with acrylic blocks, starting with 80 fully flatten it, then worked up to 400. Almost zero ripple across 6' even at steep angles. Blocking this way ensures that you're not applying paint to a choppy surface. Poly blocks and aggresive paper to initially flatten and shape the panel is the way to go, and same with the clear to get it flat- rougher paper to flatten, then work up with finer grits to refine the scratches enough to buff.

 
Hey Crashtech, I had the psi set at 33-35 at the gun with the trigger pulled and the center of the fan spray at the lower wet edge of the previous pass which should of put it at 50% overlay. Also I was trying to keep the tip about 6" off the work. I will adjust the fluid flow on it when I'm ready to shoot and probably do some tests on another hood (hanging vertical) I've got laying around.
Hey John, I been thinking about what you mentioned. Pushing the coats up to 4 thin coats would probably be best beings I need to start over...
Thanks for info, I got lots of reading to do. :)

John
 
To apply thin coats you need to have a lot of overlap. 75% or so. Less material with tighter passes (more overlap) is what is meant by thin coats. Less material with less overlap will result in orange peel and/or dry spray.
 
Ok guy's.... IDK what FNG's stands for but I can guess. In my case that would be Old FNG. I've never shot Enamel except on a house, only Lacquers and BB/CC. Orange peel and dry spray is what I've be told in the past to try and avoid. Is that incorrect and do ya expect it, then the cut and buff process is to correct that amongst other things? Just food and reminders for my old brain.

Thanks
John
 
Back
Top