I added an aftercooler between my compressor pump and tank and it’s awesome.

Lizer

Mad Scientist
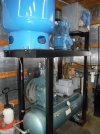
This is the Best thing I’ve done in a long time, and I do know it is a pretty common mod. But what I did was I removed the plumbing on my air compressor and installed a transmission cooler In line with the pump and the tank.

Mainline comes out of the pump and directly into the cooler, and out of the cooler through a water separator, and then into the tank. The line going into the cooler is too hot to touch after about 30 seconds. The line coming out of the cooler is room temperature or even cool. My tank used to get extremely hot when the compressor was running for a long time but it no longer does this. The air is getting cooled so much before entering the tank that there is substantial water removal before it even hits the tank.

Anyway I think the entire modification cost me less than $160 and only a few hours of time. But it has been a game changer and making dryer cooler air before even leaving the compressor tank. I show exactly what I used and how I did it in this video. As it turns out though, the water filter is not autodraining and it fills up so fast it needs to be auto draining. I thought it was when I bought it.

 
I did the same with my compressor. Atop the aftercooler I mounted two 12" radiator fans blowing downward through the aftercooler. That helps cool the pump and the original cooler that goes between first and second stage cylinders also. I put an infrared thermometer on the line into the cooler and the line going into the tank. Temperature drops from 285 degrees down to 91 degrees. That was this morning when I first fired up the compressor and starting at 60 PSI. I know it gets considerably hotter when I'm using a lot of air sandblasting or using air tools. The water trap will fill about halfway per day. About a quarter that of that amount well collect in the tank. Absolutely no water ever collects at the trap on the wall about thirty feet from the compressor. There's a second line out of the tank that goes to the far end of the building that I use for sandblasting outdoors. I do get some water from that line because it is only 1/2" and not plumbed uphill.
IMG_3851.JPG
 
Nice job. That looks very similar to my setup. I added a trap between the cooler and separator to get out the large water droplets and also see a reduction of temperate to ambient at the exit of the cooler. I also have a box fan hanging in front of the cooler to provide added cooling when I know I'll be running the compressor constantly when doing media blasting.
compressor.jpg
 
I've ran this one for years. Only run the fan if I'm using it for a long time. It's way oversized. Paid 50 bucks for it. They are obsolete to the industrial world so you can pick them up cheap if you look. I replace the beads in the desicant tower once a year and they are still in good shape. coolers help with moisture.
 

Attachments

  • DSCF3022.JPG
    DSCF3022.JPG
    148 KB · Views: 331
I had to relocate my compressor and that caused me to have to shorten the bracket where the cooler is mounted. Since I had everything apart I went ahead and swapped the fan from push to pull. That simple change made a big difference and cooling efficiency.

I am using a cheap harbor freight water trap between the cooler and the tank and it doesn't seem to be catching as much water as you guys are saying it should. Does anybody have a recommendation on what water trap I should be using? The line going from the cooler to the tank is 1/2 inch.

-----
Emil
 
I did the same with my compressor. Atop the aftercooler I mounted two 12" radiator fans blowing downward through the aftercooler. That helps cool the pump and the original cooler that goes between first and second stage cylinders also. I put an infrared thermometer on the line into the cooler and the line going into the tank. Temperature drops from 285 degrees down to 91 degrees. That was this morning when I first fired up the compressor and starting at 60 PSI. I know it gets considerably hotter when I'm using a lot of air sandblasting or using air tools. The water trap will fill about halfway per day. About a quarter that of that amount well collect in the tank. Absolutely no water ever collects at the trap on the wall about thirty feet from the compressor. There's a second line out of the tank that goes to the far end of the building that I use for sandblasting outdoors. I do get some water from that line because it is only 1/2" and not plumbed uphill.
View attachment 21382

Clean installation, well done.
 
Nice job. That looks very similar to my setup. I added a trap between the cooler and separator to get out the large water droplets and also see a reduction of temperate to ambient at the exit of the cooler. I also have a box fan hanging in front of the cooler to provide added cooling when I know I'll be running the compressor constantly when doing media blasting.
View attachment 21383
I did the same thing with a coil of copper tubing zip tied to the guard. I had to replace the factory line from the pump to the tank, and I had to get whole roll of tubing, so I figured why not. Even my farmer engineered copper tube after cooler drops the temp considerably.
 
I did the same with my compressor. Atop the aftercooler I mounted two 12" radiator fans blowing downward through the aftercooler. That helps cool the pump and the original cooler that goes between first and second stage cylinders also. I put an infrared thermometer on the line into the cooler and the line going into the tank. Temperature drops from 285 degrees down to 91 degrees. That was this morning when I first fired up the compressor and starting at 60 PSI. I know it gets considerably hotter when I'm using a lot of air sandblasting or using air tools. The water trap will fill about halfway per day. About a quarter that of that amount well collect in the tank. Absolutely no water ever collects at the trap on the wall about thirty feet from the compressor. There's a second line out of the tank that goes to the far end of the building that I use for sandblasting outdoors. I do get some water from that line because it is only 1/2" and not plumbed uphill.
View attachment 21382
Nice clean setup. I was always worried about rigid copper and solder joints with the vibration.I’m assuming no issues for you? I’m probably overthinking it.
 
Nice clean setup. I was always worried about rigid copper and solder joints with the vibration.I’m assuming no issues for you? I’m probably overthinking it.

No issues here using 3/4" copper for my after cooler and this was the first time I have ever sweated copper joints.

Top of cooler manifold
20200107_134758.jpg


Bottom of cooler manifold
20200107_164529.jpg


Installed on wall
20200114_183922.jpg


Wall filters
20200201_193653.jpg


Added air dryer earlier this year.
20220419_124646.jpg
 
Nice clean setup. I was always worried about rigid copper and solder joints with the vibration.I’m assuming no issues for you? I’m probably overthinking it.
Been going for 3 years. No issues. The back is supported with rubber inserts that came with the trans cooler at each corner. The front is supported only by the copper tubing. I believe something else will fail before anything regarding the aftercooler mod will.
 
Another modification I made was after 20 years or so after installing the system was because I carelessly would leave the compressor turned on 24/7. Even when I was gone for a weekend or longer. With with age comes wisdom... Okay I'm a little late to the party. I decided it would be good to come up with some way should I forget to turn off the breaker EVER it would shut off by itself. Also the pressure control switch was underrated and I know would eventually fail. What I did was plan a motor starter relay controlled by 120 volts to power the 220 volt compressor motor. Now, the control side of the motor starter relay is powered through a 12 hour spring wound timer in series with the light switch for the washroom the compressor resides.

I could have done this myself but I have an awesome nephew that had volunteered. An accomplished electrician that works on commercial equipment control systems. So now in order for the compressor to run the spring timer must be wound and the washroom light must be turned on.

Hopefully now I won't burn my shop down
 
Been going for 3 years. No issues. The back is supported with rubber inserts that came with the trans cooler at each corner. The front is supported only by the copper tubing. I believe something else will fail before anything regarding the aftercooler mod will.
Ok thanks, good to hear. Yeah I’m pretty good about cutting power to the compressor when I leave but you can never be too safe!
 
No issues here using 3/4" copper for my after cooler and this was the first time I have ever sweated copper joints.

Top of cooler manifoldView attachment 21444

Bottom of cooler manifold
View attachment 21445

Installed on wall
View attachment 21446

Wall filters
View attachment 21447

Added air dryer earlier this year.
View attachment 21448
Your setup looks great. Also great job for never sweating copper before. I was referring more to his aftercooler that was fixed directly to his compressor though as far as vibration. You have a rubber hose separating your compressor from rigid copper, which is good. Also something I noticed, I’m sure it’s because your dryer came after your manifold, but I believe they recommend 30-50ft of line between compressor and cooler for maximum efficiency. I know a pain in the butt, you could’ve run thru the manifold first and then to the cooler, then on to your filters. Very nice clean setup nonetheless!
 
Your setup looks great. Also great job for never sweating copper before. I was referring more to his aftercooler that was fixed directly to his compressor though as far as vibration. You have a rubber hose separating your compressor from rigid copper, which is good. Also something I noticed, I’m sure it’s because your dryer came after your manifold, but I believe they recommend 30-50ft of line between compressor and cooler for maximum efficiency. I know a pain in the butt, you could’ve run thru the manifold first and then to the cooler, then on to your filters. Very nice clean setup nonetheless!

Valid point on the location for the air dryer. I did it this way because my compressor makes water like a water bottle manufacturing company, lol. Before I installed the air dryer, I had to drain all the drops on the copper wall mounted cooler daily, and even then, I still had moisture vapors inside the copper line all the way to the filters. As you can see in the picture, I have a water /oil separator at the compressor tank, then another water/oil pressure regulator set at 140psi just before the air dryer. When I'm painting, I turn that regulator up to 175psi, then I set my wall regulator to 120psi.

As of now, I'm not getting any water in the copper wall mounted cooler manifold or vapors thru the last set of filters using the tissue test. Keep fingers crossed it holds out. Right now I have my air dryer set at 42 degrees.

A big help is the automatic drain valve I installed on the bottom of the compressor tank. I have it set to go off every 10 minutes for 2 seconds. I drain the two filters before the air dryer daily.
 
Last edited:
I hear you, I have the same compressor. It’s a water pump for sure. Putting in a aftercooler between the pump and tank helps a ton cooling the air and getting rid of the moisture before it even hits the tank. Still need a cooler for painting but it gets rid of a huge amount before it even hits the tank. Some day I’ll get a nice low rpm compressor. But that’s what fit my budget at the time.
 
my cooler is halfway to my booth. the further from the compressor the better. when i redo my lines i will move it to the booth.
 
I have 2 aftercoolers with fans that I bought from my compressor guy that had them lying around and didn't need them, I haven't installed them since I also bought a refrigerated dryer, they are the size of the large pulley/fan on the pump. My air dryers inlet has a built in after cooler, once the compressed air temp is cooled to ambient temp there is no reason to worry about having a long distance away from the compressor before the dryer. The reason for the distance is to get the compressed air temp down, some dryers are only designed to handle air at a lower inlet temp, that temp is stated in the manuals along with the rated CFM it can handle.
I still might install one on my compressor just to have a cool tank when running hard and let the auto tank drain spit the lions share of the water out before it reaches the dryer but that is what my type of dryer is designed to do.
 
I still might install one on my compressor just to have a cool tank when running hard and let the auto tank drain spit the lions share of the water out before it reaches the dryer but that is what my type of dryer is designed to do.
Makes sense to me.
 
Back
Top