How to prep old textured epoxy primer

RBrid

New Member
Greetings everyone!
Here's my situation:
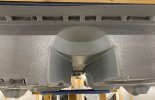
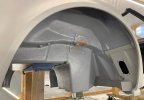
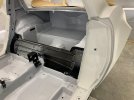
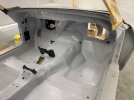
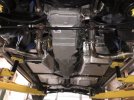
Several months ago I applied LizardSkin products on my C3 corvette, inside and out, as noise and heat barriers. Then I covered them with several coats of SPI epoxy primer. The result is highly textured as you can see on the pictures. The interior will be 'racer-looking' without carpet.
Anyways, now I want to do the next steps:
- apply the SPI 2K Urethane Sealer I have.
- apply the PPG single stage urethane paint I have.

Given the textured aspect of the existing epoxy primer, how do you prep it to have good adhesion with the 2K urethane sealer?

Thanks in advance for the input you may have. -Régis
 

Attachments

  • 20210110_224448890_iOS.jpg
    20210110_224448890_iOS.jpg
    145.7 KB · Views: 143
  • 20210110_224505568_iOS.jpg
    20210110_224505568_iOS.jpg
    138.1 KB · Views: 166
  • 20210523_001943820_iOS.jpg
    20210523_001943820_iOS.jpg
    125.7 KB · Views: 128
  • 20210523_002814563_iOS.jpg
    20210523_002814563_iOS.jpg
    150 KB · Views: 165
If you want to save the texture about the only option you have now is to use some red scotchbrite (3M 7447) and scuff it very thoroughly. Then use epoxy for a sealer and then topcoat. Keep in mind that adhesion will be not be as good as doing it the correct way. Save the urethane sealer for the exterior although reduced epoxy makes an ideal sealer. I only like urethane sealer for collision work,

Ideally you want to apply the epoxy within the 7 day window and then apply your topcoat (no urethane sealer would be necessary) When it goes out of the re-coat window for maximum adhesion you would need to sand with 180 grit and re-coat with epoxy. Ideally you would apply epoxy first then the lizard skin. That would give you max adhesion.
 
RBrid, I put LS on the underside and up the firewall but not inside, I think it's made a big difference but hard to compare since I put side exhaust on. I also put Zero Clearance insulation over the LS. My biggest heat source now is holes under the console. They're covered but I'm still getting lots of pressurized air from the shifter area (t56). I'll address that later. I Highly recommend aftermarket AC, I only replaced underhood. Now I wish I'd replaced all the cockpit components too.
 

Attachments

  • UNADJUSTEDNONRAW_mini_25da.jpg
    UNADJUSTEDNONRAW_mini_25da.jpg
    99.3 KB · Views: 140
@Slofut, thanks for the tips. Since I am not planning to put in carpet, any trick to reduce noise & heat is welcome. I will also install insulation in the doors and other places where it won't be visible. With the recent heat waves we had in the PNW, I feel like AC is becoming a must, so I am planning for a complete Vintage Air system.

@Chris_Hamilton, thanks for the recommendations! I had shot several coats of SPI epoxy on the raw fiberglass before applying the LizardSkin.

I would have preferred a smooth look inside and out, but I feel it would require a ton of work to get rid of all the texture. So how about I do the following:
- sand the textured epoxy with 220 grit to smooth things out a bit.
- very thoroughly scuff with the red scotch-brite.
- shoot with SPI epoxy sealer.
- shoot with my PPG paint.

- use my SPI 2K urethane sealer as a primer (i.e. without reducer) over the Slick Sand (you can see on the pictures my body is currently in Slick Sand).

Thanks, -Régis
 
Back
Top