G
gerard143
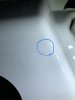
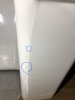
So I sprayed the universal clear for the first time. 3 coats. Had several runs. Tried using a nib file for the first time. Worked good in a few areas, a couple other areas it actually torn some small chunks out of the clear. Down to the base coat. One area is about the size of a 3/16 drill bit. This area the base coat is still intact at this point. If I try and sand it smooth with surround area I am sure I will lose the base color. Not sure if I should just try putting a drop of clear in this area then sanding once its hardened and hope it blends well or what to do there? Edges of the chunk it tore out are rough and erratic so I worry it would still be noticeable even if I dab some clear in there.
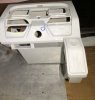
Another area a bit bigger and it actually chunked down past the base color.
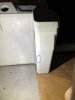
Question is how best to fix this? I plan to finish wet sanding as much of the dash as I can, but this is a molded plastic marine dash with tons of angles and corners and curves. So sanding the entire thing down and recoating with base then clear would be a major pain in the ass.
So can I do this.... can I wet sand dash in as many areas as I can including these damaged spots.... Then touchup those small spots with some base coat then re-clear the entire dash? Or will those damaged areas I hit with base color not blend well as I would essentially be spraying the base color over the dull out wet sanded clear. Hopefully you follow me on this.
I'll try to word it another way. Wet sanding clear on as much of the dash as I can aside from the crazy rounded edges and corners I can't buff. The damaged areas where the clear/color chunked out I could sand a bit more until they are flush with surrounding area. I would have to hit them with color again though. So seeing as the surround area is sanded clear coat, would hitting these small spots with color over this sanded clear, then clear coating the entire dash cause a messed up look in these repair spots. I worry it might not blend well as the repair spots will be color, the surround areas dull out sanded clear so when I hit this with fresh clear coat I have to imagine you are doing to notice this.
If there is some other better way please let me know, open to ideas on this. I can get photos tomorrow afternoon.
Another area a bit bigger and it actually chunked down past the base color.
Question is how best to fix this? I plan to finish wet sanding as much of the dash as I can, but this is a molded plastic marine dash with tons of angles and corners and curves. So sanding the entire thing down and recoating with base then clear would be a major pain in the ass.
So can I do this.... can I wet sand dash in as many areas as I can including these damaged spots.... Then touchup those small spots with some base coat then re-clear the entire dash? Or will those damaged areas I hit with base color not blend well as I would essentially be spraying the base color over the dull out wet sanded clear. Hopefully you follow me on this.
I'll try to word it another way. Wet sanding clear on as much of the dash as I can aside from the crazy rounded edges and corners I can't buff. The damaged areas where the clear/color chunked out I could sand a bit more until they are flush with surrounding area. I would have to hit them with color again though. So seeing as the surround area is sanded clear coat, would hitting these small spots with color over this sanded clear, then clear coating the entire dash cause a messed up look in these repair spots. I worry it might not blend well as the repair spots will be color, the surround areas dull out sanded clear so when I hit this with fresh clear coat I have to imagine you are doing to notice this.
If there is some other better way please let me know, open to ideas on this. I can get photos tomorrow afternoon.