You are using an out of date browser. It may not display this or other websites correctly.
You should upgrade or use an alternative browser.
You should upgrade or use an alternative browser.
Getting started
- Thread starter Dave C 5
- Start date
Dean Jenkins
Promoted Users
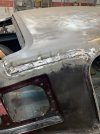
I used 3M panel bond to fill the crevices and partially fill the depression.I thought about that but doesn’t it basically become a lap weld at that point ? And then I end up with a “ghost “line that shows up when it expands and contracts ? There’s a picture of a tailgate floating around on this site that shows what a lap weld can end up doing
Will top that with a metal based filler like USC all-metal, or evercoat metal glaze.
Chris_Hamilton
Trying to be the best me, I can be
Here's an article from Street Rodder. Steve Frisbie demos. This is the correct way to do it. It's very achievable for someone.So what do I use here on the factory lead seams if I don’t know how to lead ? I want it permanent !
Chris_Hamilton
Trying to be the best me, I can be
Part II


Dean Jenkins
Promoted Users
I would respectful offer that "correct" is subjective.Here's an article from Street Rodder. Steve Frisbie demos. This is the correct way to do it. It's very achievable for someone.
If it means how the factory did it, then yes.
If it means proper structural integrity, finish, and corrosion protection, there is more than one correct solution.
There is a reason auto makers stopped using lead, it is highly toxic (makes Isocyanates look like a joke.)
I worked in electronics manufacturing for 20 years. You wouldn't believe the controls that have to be in place for vapors from molten lead.
I avoid it at all costs, especially when there are modern composites that do a great job, without the risk.
Material science has come a long way since the sixties.
Chris_Hamilton
Trying to be the best me, I can be
Method he shows is the correct way to do it on an automobile. I didn't think it needed qualification but "correct" refers to the proper technique to apply lead to a car. Not correct as in the only way to do it. I will say that properly done, lead will outlast any of the typical fillers in use today. Including those named in this thread.I would respectful offer that "correct" is subjective.
If it means how the factory did it, then yes.
If it means proper structural integrity, finish, and corrosion protection, there is more than one correct solution.
There is a reason auto makers stopped using lead, it is highly toxic (makes Isocyanates look like a joke.)
I worked in electronics manufacturing for 20 years. You wouldn't believe the controls that have to be in place for vapors from molten lead.
I avoid it at all costs, especially when there are modern composites that do a great job, without the risk.
Material science has come a long way since the sixties.
I think we all know lead is poisonous. A full face respirator rated for lead and gloves should be considered mandatory.
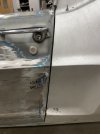
When the panel bond came out, a lot of bodymen thought it was a replacement for welding. It is great for what it is designed for, but for structural repair, and seams that show, not so much. All Metal is not metal based filler, it is a polyester with some aluminum thrown in, and has been misused because of clever marketing. Customer asks body shop, "Are you going to use bondo to fix those holes?" Bodyshop replies, "No sir, it will be all metal"I used 3M panel bond to fill the crevices and partially fill the depression.
Will top that with a metal based filler like USC all-metal, or evercoat metal glaze.
")
Chris_Hamilton
Trying to be the best me, I can be
The only real lasting option that will not show, if not using lead is doing like was mentioned earlier in this thread and actually cutting out the seam and butt welding in a piece on both sides. Key is you have to cut out the seam.
Chris_Hamilton
Trying to be the best me, I can be
Is that stuff that is used on vettes something that will work - have read about it here before - VP something- maybe a fiberglass filler of sorts ?
Any of the various fillers will have mapping to some degree or another. Some more than others. Also as it ages it will show more. What's the best? IDK. maybe some of the other guys will have some thoughts. The epoxy based resins would be more stable something like West system or other epoxy based products. I have no experience with them though as I have always done it one of two ways on something that mattered. Lead or cutting the seam.
I will say this there was a reason why OEM's continued using lead well into the 90's (Fox body Mustangs were full of it), because it worked better than any polyester based resin product. And that's why they don't use any resin type product today. Silicon bronze fills those seams (much smaller) now.
Chris_Hamilton
Trying to be the best me, I can be
You don't cut it all out just the top layer. The roof skin and the quarter skin. You make a section to join them independant of that seam. Butt weld them together at the top and bottom. If it makes you feel better mash it down at the old seam and plug weld a few spots to it. Or modify the bottom layer to allow it to meet the new top layer without mashing it down, then plug weld it there. Problem solved.Guess I have some reading to do ! I thought about leading it in - would be cool to learn . Not too exciting about cutting that area out 123pugsy - a lot of structural support in that area and ties into the roof - I think all the overlap is needed
Pretty easy to do on that car. Also I think rusty428 has shown some examples of how he has handled it, search through his threads for some pics.Dave C 5
Member
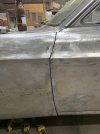
Started working on gaps …1/8 inch…adding weld where it’s wide and grinding back and re- welding where it’s tight- 1/8 may be too tight at fender/door once I get paint on - might have to open that up a bit
Attachments
Dean Jenkins
Promoted Users
1/8" is tight in my opinion. For GM muscle cars of that era, 3/16" was the spec and what most folks seem to shoot for, after paint.Started working on gaps …1/8 inch…adding weld where it’s wide and grinding back and re- welding where it’s tight- 1/8 may be too tight at fender/door once I get paint on - might have to open that up a bit