Flat Hood Weld Repair

G

grogetter

Hi, everybody. I'm new to SPI and this forum. My friend Roger1, who has been my "answer man" for a long time suggested that I ask you guys for help.
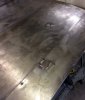
I'm working on a 64 Chevelle project. One of the issues that the car has is two rust through holes on the hood. These hoods are very flat, that is, having very little crown in them.
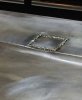
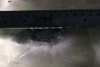
I cut out the rust holes and welded in patches using TIG tacks and taking great care to let the hood cool down after each tack but I still got enough shrink to cause problems. Roger strongly advises me to separate the structure from the skin of the hood then plannish out the shrinkage. However, I'm really concerned about causing more damage than I started with.
Any and all help would be greatly appreciated.
 

Attachments

  • Hood_repair_002.JPG
    Hood_repair_002.JPG
    123.5 KB · Views: 324
  • Hood_repair_005.JPG
    Hood_repair_005.JPG
    81.9 KB · Views: 300
  • Hood_repair_009.JPG
    Hood_repair_009.JPG
    85.9 KB · Views: 300
He's right, you'll need to planish the weld out, then file it up. I would repeat the repair on a piece of sheetmetal about 18"x18" and practice planishing and filing on that before I would go any further.
 
A couple questions before you get too deep into this.... in looking at the second picture (005) what does this weld look like on the back side? the welds showing look extremely cold, so if there is no weld penetration to the back side, your weld is subject to failure. Don't sacrifice weld strength/penetration worrying about getting things too hot. Any weld deformity can be addressed with planishing. A weld that comes apart two years down the road is likely going to have paint on it. Everything is more expensive to fix once paint goes on, so let's make sure the welds will hold, first and foremost.

On your rust spots, did they start from the top side or the underside?

On using the TIG welder, you have much better localized control over the heat than MIG. If using MIG you would want to use tacks or dot welding. With the TIG, use enough tacks to hold it the patch in place and then once the patch is stable, use as long a weld pass as you're able. Reason being, every weld dot or tack shrinks as it cools, in a circumferential pattern, ie: it pulls from all directions. When you do a weld pass with the TIG, it gradually heats up and then gradually cools down as you work across the panel in a weld pass, so you SHOULD experience less shrink effect using the TIG in a full pass than the circumferential shrinking seen with tack welding.

Regardless of how "flat" the hood seems, it will have crown in at least one direction, if not both, to help hold the panel's shape. Now take the distance from one end of the patch to the other, and consider it has a slight arc. When the shrinking from welding occurs, this slight arc starts to form more of a straight line, which is why most of the time you see these panels pull into a valley. Planishing is required to add back some of the shape to the arc that the shrink took out.
 
Last edited:
More info on the hood.
The hood has a crown of about 1/4" per foot cross wise and somewhat less length wise.

The rust holes started on the under side of the top panel where it was in direct contact with the stamped structure. Because of that I can only access about 1/4 of the total of the welds. There are some signs of corrosion at other places where they were in contact, as well.

The portion of the welds that I can see on the back side are a mixed bag. Some of it is 90% penetration while the adjacent seam may only have 10%. I'm not sure why this happened since I was using the same welder with the same settings and randomized the weld spot locations. The only thing that makes sense to me is that the stamping process thinned out the metal in some places more than in others.

What should I do with the welds that didn't penetrate? Cut out and install a slightly larger patch? If so, should I do that before removing the structure from the under side?

When it comes to plannishing the weld, should that be done before or after grinding down the weld bead? I've already ground down the bead of the smaller patch.

If you say to cut out and re-patch, I'll give TIG a try. I don't have much experience with it but I've done quite a bit of gas welding (aircraft frame repair and building headers).

One question about TIG welding using the longest pass that you can. Wouldn't the same logic apply to MIG welding?

Thanks
 
Roger1 just brought it to my attention that I said that I used TIG tacks in my first post. That should have been MIG.
 
The middle of a flat hood, where lesser angels fear to tread.

I wouldn't begin to know how to fix that without total access, and I bet there are braces in the way. If it was mine, I believe I would paid dearly for a better hood rather than try that.
 
The middle of a flat hood, where lesser angels fear to tread.
I wouldn't begin to know how to fix that without total access, and I bet there are braces in the way. If it was mine, I believe I would paid dearly for a better hood rather than try that.
I agree and why I told him to post here after he asked me and sent me the photos. I've done enough of this to know the middle of a hood with not much crown is the most difficult sheetmetal thing to deal with in a car. I think I could do the one near the style line maybe but that one in the center scares the heck out of me. I tried something similar with the hood with my '55 Bel Air. Gave up and bought a repro. Luckily, it was a great fit right out of the box.
The big problem for Donny is finding another hood. I did a search and I don't believe they reproduce '64 Chevelle hoods. Finding a good original might be hard to do since it's a one-car and one-year hood.
One thing I told him though is without a doubt, that the inner structure needs to be removed to even attempt the fix and not to be intimidated by that part of it.
 
With either MIG or TIG in welding sheet metal, the goal is a full penetration weld so that road vibration and other such abuse won't result in cracks in the future. So in order for a MIG weld to have full penetration at the first "zap" you need to have the welder set a little on the hot side. To keep the extra heat from blowing holes in the parent metal, you need the feed speed a little faster. And with this setup, if you think you're doing a full pass, well, prepare for blow outs. That's why MIG and Sheet metal is typically welding one dot at a time and planishing and grinding between each step. If you have a choice between the two (i.e.: your skill set will permit) then TIG is a better choice as the welds will not have as much proud for easier planishing and grinding, welds are softer for easier planishing, and you can use full weld pass for the benefits described above as the heat is able to be controlled on the fly (pedal).

So do you also have TIG as an option in your shop? Do you have a Martin or Snapon or similar spoon? Many times these can be maneuvered between the skin and structure to use for planishing.

Presently the problem I see with repeated attempts using larger patches is that you are already starting to distort (pull) the crease line where that drop off is located. without good access for planishing to correct this pulling action, The smaller the width to the crease the easier it will pull.
 
So are you saying that if MIG spot welding you should grind and plannish each spot before proceeding to the next?

Since I have already welded the patches in how do you think I should proceed?

I get the advantages to TIG and I do have TIG available. I've just never taken the time to develop any skill with it. I'll have to fix that.

I don't have a spoon. I may try that before taking the hood apart but what would you suggest as far as having insufficient penetration on the welds that are already done? Is there any way to fix it or -----?

Sorry to ask for so much detail.

Thanks
 
Since the patch is relatively small could you just cut out the small section of brace behind it, planish the weld and then weld the brace section back in. No need to planish that weld.

Don
 
Adding to what everyone else has said. (btw listen to MP&C (Robert), he's giving good advice) judging by the look of your weld you need to practice on some scrap to both get your settings right and to get a little practice at doing it. If you have no experience with a TIG it is not going to be the best choice for now. Stick with the MIG turn up the heat and wire speed. Practice doing that type of weld on some scrap. Don't try it on your hood until you start getting some satisfactory results.
Do as Robert said and if you don't have one get a body spoon, something like this
1024_lg.jpg


or this
1026_lg.jpg
lots of different places to get them, you could try here:https://www.tinmantech.com/products/hand-tools/body-fender/martin-tool-auto-body-spoons-dollies/.
Use it like Robert said by trying to wedge it between your work and the backside bracing. If it is practical you could also try what Don suggested.
 
So are you saying that if MIG spot welding you should grind and plannish each spot before proceeding to the next?

Since I have already welded the patches in how do you think I should proceed?

I get the advantages to TIG and I do have TIG available. I've just never taken the time to develop any skill with it. I'll have to fix that.

I don't have a spoon. I may try that before taking the hood apart but what would you suggest as far as having insufficient penetration on the welds that are already done? Is there any way to fix it or -----?

Sorry to ask for so much detail.

Thanks

Do you own or have access to an English wheel? At this point, as others have mentioned, I would focus on some more practice before jumping back on the hood. If you have access to an English wheel I would shape a practice piece about 16 to 24" square to mimic the crown of the hood, and you can see first hand what the heat from welding will do to the panel. if you don't have access to one, how about making some profile templates of the good side of your hood in both directions and go to the local auto salvage and find a panel in similar shape that you can cut out for practice. cut your "patch" out of the center of your practice piece and see how things react, and what it takes to correct. Use this to help dial in your welder to provide full penetration welds.

If you do decide to use the MIG, just understand it is a harder weld, it is a lot more cleanup, but can be used with good results providing you have PATIENCE. Rather than me re-write something at this point, check out this thread and if you have any questions afterward, ask away!


http://www.spiuserforum.com/index.php?threads/help-with-welding-sheet-metal-please.3134/


.
 
Do you own or have access to an English wheel? At this point, as others have mentioned, I would focus on some more practice before jumping back on the hood. If you have access to an English wheel I would shape a practice piece about 16 to 24" square to mimic the crown of the hood, and you can see first hand what the heat from welding will do to the panel. if you don't have access to one, how about making some profile templates of the good side of your hood in both directions and go to the local auto salvage and find a panel in similar shape that you can cut out for practice. cut your "patch" out of the center of your practice piece and see how things react, and what it takes to correct. Use this to help dial in your welder to provide full penetration welds.[/QUOTE
Robert, an English Wheel is one of those tools I would love to have access to but don't have funds or room for one so the idea of finding a similar panel at the pick and pull is a great idea. Thanks
 
go to the local auto salvage and find a panel in similar shape that you can cut out for practice. cut your "patch" out of the center of your practice piece and see how things react, and what it takes to correct. Use this to help dial in your welder to provide full penetration welds.
.
Just a couple things to keep in mind. Any panel you find at a salvage yard is going to be high strength steel, and depending on how new it is, some of them are not suppose to be welded, and they will be about 24ga steel and the 64 is 20ga steel. Also, I would do practice welding and plannishing on a full panel because the heat related distortion will be different on a smaller piece of metal. I think that is what Robert means, just cut it out and weld it back in, but of course it will have a bigger gap.
 
If you are able to find something in the salvage yard for practice, yes, you will need older stock.. I would suggest to cut out a similar size hole to what you are working with as a patch, and then cut a new replacement to fit the hole nice and tight, just as you would if welding on the hood.

Location of weld seams to promote easier access for planishing, cutting out replacement patches and trimming for a nice TIGHT fit, it is ALL part of the welding process. Wide gaps mean more chance of the panel pulling together. While you are practicing, do everything as if you are doing it on the car.. This includes to not weld on a panel directly on the welding table. If your patch on the car is in free air, so should your practice piece be in free air. A steel work bench will act as a heat sink and change the heat required to do the welds. This is another reason for grinding down weld dots between your repeat sessions. If the welder is set for 19 gauge steel, welding next to a proud weld dot may have up to 4X the thickness or more than the sheet metal alone. This affects heat required and can lead to cold welds/lack of weld penetration. MIG and sheet metal is not ideal, but as you may start to pick up from my posts, consistency in ALL of the methods is key for consistent results.

The next thing that I forgot to point out, is that your sharp corners in a patch will normally buckle worse at the inside corners as you are focusing more heat and thus shrinking at the inside corner; it is seeing heat from two adjacent sides. Cutting the patch with rounded corners will help to minimize this effect, but it will also be more of a chore to cut/trim accurately. To help out in that regard, please watch this video. I don't care how long you've been using tin snips, you will learn something.. I certainly did.

 
Last edited:
Back
Top