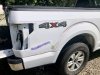
Personally I would never spot in clear on a panel. Only in very rare instances and this IMO is not one of those. Especially on a 2019! Open blends of clear are never a good idea and do not last more than a few years at best before they start showing and peeling. I'll share the only way (IMO) any quality shop would repair it. It's standard collision repair type stuff. First do your spot repair. Block out your primer finishing with 600 wet. Make sure you have a solid area of primer (no sand throughs to metal or filler) Then using 800 wet "block" the entire panel. Basically you are just sanding out the texture in the clear. You can use a hand block. I personally like the "roller" block from Motoguard for this. Don't have to get it all just the majority of the texture. If you don't, the clear going over it will look worse than OEM no matter how slick you actually spray it. Get the edges and crevices as well. Best way is after you have sanded the texture get a gray scotch-brite (no red, only gray or finer) and some sanding paste. Scuff Stuff by Presta is what I use but there are others and scuff the entire panel with it. It will scuff it and clean it as well.
Mask, W&G, then you are ready to base. No need to seal it if your primer is solid. Spot in your color then clear the entire panel. SPI Euro would be the ideal clear for this. If flows out nicely and is very user friendly. If you have it looking slick after 2 coats and don't need to color sand then 2 coats is enough. Equivalent to OEM. If you think you need to color sand then shoot a third coat. Will last as long as the rest of the paint on the truck.
More work but not really. Especially considering the potential for complications from taping trying to spot in clear.
Like I said every Shop I ever worked at does it this way. Not trying to be a jerk but spotting in the clear on a 2019 vehicle would be a half ass repair.
Edit: As for masking I would have no issue masking off the plastic top cover as opposed to taking it off. They are not really designed to come off once on, and doing so often damages them enough to where they don't fit right when you do put it back on. Pretape it scuff the paint very good right up to it, work underneath the edge, and you will have no issue. Did dozens of them that way never had a comeback. Ideally you would take off the rear bumper though. If there is a clear plastic chipguard I have masked those in the past but usually removed them and re-applied the guard. You can get it from Ford. It is not a high riced item. The plastic on the bottom of panel behind the wheel comes off fairly easily so I would remove that. Re-apply with 2 sided tape and it's screws. All I can think of right now.
")