Butt Welding ?

Outlaw;n78201 said:
Rustover, you got some pretty nice welding going on there. Can you tell me a little about the "mini belt sander" you make reference to? I have looked at the 3M version and the fein model. They are both pretty expensive but look like they do awesome work.

Thanks Outlaw. I just have a cheap 3/8 model. It has come in very handy for hard to reach areas. For example on the trunk pan between the inside frame rail and where the trunk pan turns down was a very tight space and the underside of the patch in this thread. You just have to be careful because it removes a lot of material fast. You get the hang of it and learn to throttle the trigger checking as you go.

http://www.ebay.com/itm/Air-Belt-Sander-3-8-in-/301254515594?hash=item46242b1b8a:g:XFAAAOSwRLZT0PRF
 
Thanks Rust. I wonder if it has options for different grits and belts?
 
Outlaw;n78204 said:
Thanks Rust. I wonder if it has options for different grits and belts?

You can buy different grit belts, It uses a 3/8X13 inch belt and I have been using 80 grit.
 
Outlaw;n77896 said:
Chad, do you planish each spot after you spot it or do you planish the seam after its closed? My understanding of planishing is to hammer it immediately after the weld is applied. That would mean hamering each spot immediately after its welded. Thats a lot of stopping and starting on a long seam. Spot, stop, hammer, weld, stop, hammer and keep going until you connect the dots?

I do one of two things, keep in mind I use a tig welder so it could be different if you only have a mig to work with, first of all if you are using a mig get a softer wire than what is standard. It helps.
But if a tig is available it's a completely different animal and really helped me out with my metal work.

The first thing I do no matter what method I use is to get the panel tacked together, at least every inch, sometimes on a finicky panel I will get them down to .500 or .750 apart. Depends how the panel is acting. Then I will planish the welds slightly, looking at each weld area as I do it, at this point some need more than others, you should be able to tell by the stress on the panel, you want it relaxed, some spot welds will possibly pull the two panels together more than you would like, I have had them even pull over each other. So I planish them out so they are all the same, then I grind both sides gently so they are flush. I really don't like passing through another weld so by making them flat you can weld right over them and you wont even notice them. maybe even planish a few again if something doesn't look right.. This whole process is time consuming, if you are trying to hard or thinking that you should be going faster you will usually mess something up.


1. I will weld a few 1" welds far away from each other, you will see them pull as they cool, then I will grind, plannish, grind until they are relaxed, this method I usually use on something like a door skin that needs welded the whole length across the panel, especially in a weaker area, if it's on a fender edge and has more integrity I may use method 2. This may be a better method for a beginner of this as well because you can spend more time seeing what the metal will do.

2. I will weld the whole stretch as quick as I can without stopping, then grind,plannish grind. Many times I see less warpage with this method but you need a really good fit and it tends to work better when it's on a panel that is a little bit stronger. this is my favorite method as it's much quicker, I just used this method on the 57' fender patch I recently did, a panel like that is plenty strong enough to handle this method.. I find this will work much better on a straight weld line vs a square patch in the middle of the panel, because you keep it moving and don't concentrate the heat in one area. I wouldn't suggest trying this with a mig welder.

another thing I will do when it's possible is I will not completely plannish the welds out, I will get them to where they need a little stretch and then I will run the panel through the english wheel, very light pressure, then shrink, stretch as necessary. Once again, this is all very time consuming.
 
A little above my ability. I dont have a tig welder but rather Miller 185 mig but I do have a spool of .023 EZ Grind wire. I have an almost perfect fitment on the panel that is anywhere from tight to .023 gap. Im working on the gap to have a more consistent .023. My plan is to spot weld and connect the dots. Plenish grind level each spot immediately following the weld, then move on to the next. The weld is 6 feet long. With each spot weld approximately, thats six hundred trigger pulls. I plan on jumping around to avoid heat in one area. I plan on taking several days to a week for just this one weld. If this dont work, I may consider a tig but that would also mean starting all over to learn a new method welding. What is the learning curve Mig to Tig?
 
Honestly once I got the guts to try it, the learning curve wasn't bad at all.. I got a few pointers from a guy and about a 30 second lesson, and then I was on my own.. I found after I made the switch I rarely use the Mig welder.. What's the part number on the welding wire. 70S-6??

You can pretty much do the same thing. however I would try to maybe put maybe three dots next to each other and try doing as I mentioned, if you do one spot and grind I am worried you are going to get thin spots. 3 dots should give you enough to work with and keep your from grinding thing spots.. You should be able to achieve the same with a mig welder, it will just take longer and you really need to be gentle with the grinder. Keep in mind when you grind that when the weld cools it will shrink a little. That's why sometimes I grind a little, plannish a little and then grind again.. Going to a tig welder cuts back on this because it's such a small weld.. Also grinding the direction of the weld seam vs across it seems to really help to, less likely to create thin spots because you would only be grinding on the weld or in the direction of the weld.
 
Lol, I just got off the cyberweld.com site looking at Tig Welders. I will probably not invest yet, but you sure got me thinking. I will check on the wire when I go to the shop, but it was recommended to me by a fellow forum enthusiast on FTE. He seems to have mastered welding sheet metal with a mig welder. I also liked what I saw here with rustovers posts. I will test your advise in the next few days on some scraps and let you know how it worked. Thanks for the help.
 
Chad.S;n78227 said:
Honestly once I got the guts to try it, the learning curve wasn't bad at all.. I got a few pointers from a guy and about a 30 second lesson, and then I was on my own.. I found after I made the switch I rarely use the Mig welder.. What's the part number on the welding wire. 70S-6??


Chad, I agree on rarely going back to the mig, but I have noticed that some people have a very difficult time learning to tig weld. Those that have learned to weld with oxy/acetylene seem to make the switch easily, not that I have mastered any type of welding, but my efforts are ok for sheet metal.
A few years ago I did some research on mig wire to find which wire would be more malleable, so it could be planished with less fear of cracking, and some of the mig welders might be interested in what I found out.

First of all you need to know what makes metal soft or hard, and the answer---as I understand it--- is the carbon content for the most part. High strength steel used on newer cars has a higher carbon content, although they are also doing many different things to the steel today.

I don't know anything about wire or the chemical makeup of steel, so I contacted someone that knows as much as anyone about welding wire, and here is his answer.

We did tests in our R&D Lab and ER70S-2 was best for easy grinding and sufficiently strong (the same alloy I recommend for welding 4130 to avoid cracking because of its low carbon!) Here is the chemistry of all 3 you asked about.
ER70S-2 carbon 0.04, manganese 1.01, silicon 0.50.
ER70S-3 carbon 0.08 manganese 1.10, silicon 0.50.
ER70S-6 carbon 0.09 manganese 1.60, silicon 0.90.
The main reason it grinds easier is the lower carbon, although ER70S-6 has higher manganese and silicon which also make it even harder to grind!

It was one of the first MIG wires ever sold, that is why the number 2! With AWS designations the last number does not have a meaning other than you have to look at the specification for that number. The 70 refers to the minimum tensile strength in psi, that will be archived. (i.e. minimum is 70,000 psi for an ER70)

The wire is sold today by ESAB as SpoolArc 65, and for marketing reasons it was also sold under the name Easy Grind to the automotive trade in smaller diameters and spools weights. (You might be interested that SpoolArc 65 was used to weld many of the Off-Shore Drill Rigs in the gulf coast by J. Ray McDermott!)
ESAB still sells it as Easy Grind under the AllState brand name (which they also own) Spoolarc 65 and Easy Grind are the same product!
There are other companies selling the alloy so look for ER70S-2 or ESAB Spoolarc 65 or AllState Easy Grind. Don't let a distributor sell you something else because they don't have it on the shelf!
 
This is the wire that was recommended to me by a forum member at FTE. He swears by it. It is NOT intended for structural welding, if I understand correct. It is best used for sheet metal welds with the ability to be planished without cracking.
 
I tried to post a picture but it was too small and I could not figure out how to enlarge it. The wire I am using is labeled "ESAB Spoolarc Easy Grind, Item 130PS43". Its .023. I think Rustover recommended a .023 gap for .023 wire. Other forum members (FTE) pretty much recommended the same gap, (gap equal to diameter of fill wire). When I was researching Tig welders last night, I came across a tip that said Tig welding allows you to join metal without a filler wire if the seam is tight. Any gaps need filler wire. That reminds me of my Henrob welder. I can melt two pieces of sheet metal together if the seam is tight. When using this method, the weld is recessed in the welded side of the metal and flush on the back side. I love the way a Henrob welder joins two pieces of sheet metal, but I have yet to master the heat warping. The other problem is getting perfect fitment on a patch panel with multiple sides and shapes.
 
Anyone have a good recommendation on a good quality TIG? Im partial to Miller but I have a Hypotherm Plasma Cutter so I can be convinced there are good alternatives to Miller. Im the proud owner of three 56 Ford F Series trucks and a patient and loving wife who is still supporting "our" love for these trucks. I have to be careful on my tool investments to keep my marriage and finish three trucks.
 
I learned on a Miller 330a bp, which is a really old welder, it did a great job with steel but I wanted something more for aluminum.. So you can get by with a older welder, I just sold it for $700.. The downside is that it is very hard to move.
 
Ok Chad, Im looking around but will probably go ahead and do this project with the Mig.
 
Yea take your time, a deal will come to you. You can get the job done with a mig welder with probably the same results, it will just take a little longer..
 
For some reason I assumed it would take longer with a mig than a tig. This is the project in that other post where we talked about filling the upper roof to cab flanges seam. This is the butt joint on the bottom of that same project.
 
rustover;n78202 said:
Thanks Outlaw. I just have a cheap 3/8 model. It has come in very handy for hard to reach areas. For example on the trunk pan between the inside frame rail and where the trunk pan turns down was a very tight space and the underside of the patch in this thread. You just have to be careful because it removes a lot of material fast. You get the hang of it and learn to throttle the trigger checking as you go.

http://www.ebay.com/itm/Air-Belt-Sander-3-8-in-/301254515594?hash=item46242b1b8a:g:XFAAAOSwRLZT0PRF

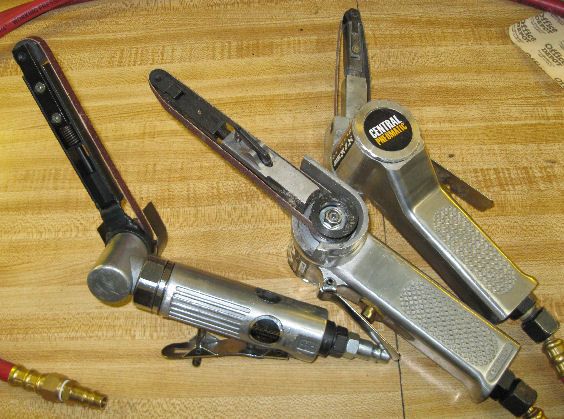
I bought a belt sander from Harbor Freight several years ago and it was terrible. Looked like a Cub Scout project (tacked-together strap steel belt holder attached to a die grinder). More recently they have been selling the same one you found on eBay. It's Item #60627 and they sell it for $24.99. With one of their 20% off coupons it's only $19.99 - so cheap I bought two. Here's the early model and the two newer ones:
Belt%20Sanders_zpsz8j6rqur.jpg


Here's a link:
http://www.harborfreight.com/38-in-belt-air-sander-60627.html
 
Thanks Bob. Are the belts easy to find or interchangeable with other belts?
 
Outlaw;n78367 said:
Thanks Bob. Are the belts easy to find or interchangeable with other belts?

It's a standard size but I don't see them at Lowe's or Home Depot. Harbor Freight and lots of other places sell them. I ordered them through Amazon -- just search for 3/8 x 13 inch sanding belts and you'll see a bunch of different brands, grits and prices. I haven't tried 3M or Dynabrade belts because they want as much for one belt as the other suppliers charge for 10.

There is a flaw in these belt sanders. The latching mechanism that holds the pressure rail compressed is easy to trip and the roller head can fly off. Happened to me when I was using the sander outside. I found the roller head right away but never did find the spring. Harbor Freight doesn't stock the spring so I ended up buying 12 of them from McMaster-Carr:
Item #: 9657K58
Steel Compression Spring
Music Wire, 1.75" Long,.187" OD, .028" Wire Diameter
Pack of 12
$7.26​
 
Back
Top