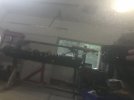
first time paint job for me on my first car that I bought. It’s taken me almost 7 years getting it to this stage and I’m stuck on what to do next. I painted it back is September 2020 with Moto base and universal clear. I put 4 coats of clear on my front fenders and other small parts but ran out of time, and nice enough weather to apply 4 coats of clear on the rest of the car (hood, doors etc) but manage to get 3 coats. Just wandering what’s the best course of action for colour sanding the body now. There’s definitely some orange peel that needs to get taken care of before buffing or possible flow coat? From reading the forum there are a many options but I can’t figured out what steps would be the best for me. So far no problems with Spi products I’ve been happy using them. Thanks for your time


You are using an out of date browser. It may not display this or other websites correctly.
You should upgrade or use an alternative browser.
You should upgrade or use an alternative browser.
82 Camaro build
- Thread starter Pete
- Start date
JimKueneman
Mopar Nut
If it were me I would wet sand it out with 800 and shoot 4 more coats (like in the perfect paint job). May want to experiment with your gun setup to (again there is an app note on the main site) to try to get a little less orange peel on the next 4 coats.
Thanks Jim. Yeah I thought my gun was setup correctly but apparently not. Definitely learning curve here in spraying this. I did manage to get some parts looking good. Thinking there’s too much peel and maybe not enough for a cut and buff after its flat on the 3 coats only sections.
does it matter what direction you sand the clear? Front to back or roof to floor?
also would one notice if some parts where flow coat vs non flow coated? If you know what I mean.
does it matter what direction you sand the clear? Front to back or roof to floor?
also would one notice if some parts where flow coat vs non flow coated? If you know what I mean.
JimKueneman
Mopar Nut
Thanks Jim. Yeah I thought my gun was setup correctly but apparently not. Definitely learning curve here in spraying this. I did manage to get some parts looking good. Thinking there’s too much peel and maybe not enough for a cut and buff after its flat on the 3 coats only sections.
does it matter what direction you sand the clear? Front to back or roof to floor?
also would one notice if some parts where flow coat vs non flow coated? If you know what I mean.
Never flow coated (just a hobbyist). Barry told me front to back with minimal "X".
sprint_9
Rookie
Id probably sand and reclear that as well. Id even be tempted to break out the 600 if your confident enough and stay off your edges, if not just use 800 like Jim mentioned. When wet sanding check your work often to make sure you have it flat with no more peel. When it is finally flat and you have everything else scuffed make sure you clean it very thoroughly, 2 or 3 good cleanings to remove any debris or sanding residue.
When it comes time to spray again pay close attention to your travel speed, overlap, and distance from the panel. You can have your gun set up correctly, but if you dont have a working combo of those 3 it will be tough, it is a fine balance. Typically you want distance from the panel to be around 5 inches give or take an inch, overlapping at least 50-60 percent, traveling at a nice even pace. I always had to try and calm myself down or the adrenaline would kick in and I would have a mess.
If your just learning the way of this, its a good idea and I would recommend to practice on a scrap hood/fender to work on your technique. I did just that after messing up on a piece and learned some things experimenting a little that really helped me when it came time to reclear.
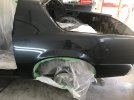
I got so pissed off at myself after getting wave bad in a bed, I took 320 dry and a fairly long block and went to town on it. Went through in one tiny spot less than 1/8" on an edge. It had 4 coats of universal. This is what it looked like after 3 more coats.
Attachments
Thanks guys it’s very helpful.
I’ve been thinking it over and I decided to spend more of the wife’s money and upgrade my spray gun. Can’t do proper work with decent tools.
looking at the iwata lph400 1.4mm silver cap is a good choice for the price.
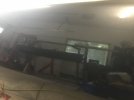
have started the wet sanding 800 process and so far so it’s going well but nerve racking at first.
I’ve been thinking it over and I decided to spend more of the wife’s money and upgrade my spray gun. Can’t do proper work with decent tools.
looking at the iwata lph400 1.4mm silver cap is a good choice for the price.
have started the wet sanding 800 process and so far so it’s going well but nerve racking at first.
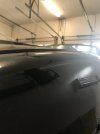
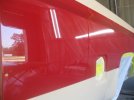
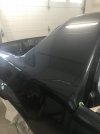
It’s been a long few weeks of prepping but finally recoated the uv clear with the iwata. Much better result for this rookie that I can live with but still ran into some issues like some runs, hopefully I can buff them out. It’s been an enjoyable journey on this and can’t wait get out on the road.
last pic is a spec my kids glitter, fffs, that stuff gets everywhere. Some how it landed on the 3rd coat so maybe sand out, we will see, if not it’s part of car now. Never ending battle that’s all it can say.
last pic is a spec my kids glitter, fffs, that stuff gets everywhere. Some how it landed on the 3rd coat so maybe sand out, we will see, if not it’s part of car now. Never ending battle that’s all it can say.
Attachments
-
 F3026B1D-A7A6-4E58-A30E-392F5936FA9D.jpeg77.1 KB · Views: 185
 -
 5D973FD5-8B52-48EA-8C81-6E47A6BD1486.jpeg57 KB · Views: 171
 -
 6293538A-412D-4B1F-B930-425485EB31E6.jpeg69.7 KB · Views: 178
 -
 2FB1DAB3-B7FF-4C7F-8EBA-3C4B6DCB9F0F.jpeg126.3 KB · Views: 172
 -
 48E3F4A3-563F-40DE-83A6-538CCA5908D7.jpeg77 KB · Views: 177
 -
 8BA93506-7A75-42CB-AEBA-FAEA2EBE441B.jpeg86.7 KB · Views: 173
Many thanks guys, it has been fun learning new skills.
I do plan on sanding the runs first before buffing. I was thinking of using the tape method with some 400 wet to knock the runs down. Following with 800, 1200, 1500, 2000 etc then buff.
Also any recommendations on what to use for sealing up parts that go through the rear quarter panel such as the bumper cover and spoiler to stop water leakage. Thinking the RV sealant/gasket maker but not sure.
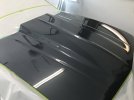
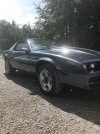
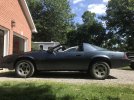
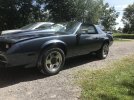
Finally coming together again. I managed to sand out my runs and gave it a buff. Still more to do like hood and front but it’s good for now. Just have to line up the front and back hatch for gaps and add the spoiler too. As much fun as it was I’m more than happy to be moving on to other things than paint work. Next up is weather stripping and interior work.
Attachments
")
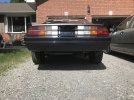
Any tips to make the hood lower to match the fender? This is my only issue with it so far for lining up. I have it as low as it can go in the front and is perfect by the windshield/fender corner. I’d say it’s a good 1/8” off. Passenger side is better but also high. Hoping to get it a little better than what it is if there is anything I can do. Thanks in advance.