68 Firebird 428

Sparky

Promoted Users
Hello all,

This is my first post, as I have been lurking for the past year learning all I can from your knowledgeable community. Without even using or buying any of SPI products, this forum has convinced me of their quality and ease of use, and the car I’m restoring will be wearing SPI products. This will be my first full car restoration.

I’m from central MA, am a electric lineman, and have a machine/ metal/ and auto repair shop that I like to stay busy in. I just built a paint booth last year to separate that work.

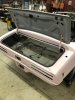
I bought this car a little over a year ago, partially restored. The previous owner started with this Pontiac factory colored “Pink Mist” 1968 Firebird 350, with 48k, and a solid body. Someone before him started to repaint the body, but that is all coming off, I’m just not a pink guy.

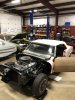
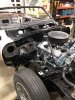
Previous owner, blasted the underside and painted it with a gloss black
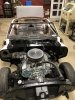
Sher-kem enamel. Installed 1968 428 GTO engine with Dave Crane worked heads, replaced the auto 2 speed with a Tremec 5 speed manual, and a Nova rear end with 4:11s. He didn’t change out any of the old rubber mounts and front end suspension parts, it even has the original riveted in ball joints.

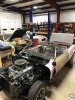
I need to address all these “oversights” and the many other hiding issues. The last 2 months I’ve removed the entire interior, rag top, glass, and trim. I want to strip the pink paint, epoxy it, body work, and paint it before I start buying bolt on parts.

So into the realm of auto body I go, I’ve been accumulating auto body tools and equipment for a while now.

Most of all, please feel free to make any suggestions to what I’m doing or not doing. I’m a novice, and really appreciate being a humble student and learning from all of you that know better.
 

Attachments

  • 3DEB425D-FDDA-4026-A614-708927803156.jpeg
    3DEB425D-FDDA-4026-A614-708927803156.jpeg
    166.3 KB · Views: 349
  • B23DC442-C006-4CE6-8667-65BBE932FE74.jpeg
    B23DC442-C006-4CE6-8667-65BBE932FE74.jpeg
    187.4 KB · Views: 370
  • 09435A4D-EB35-4B2C-ACE7-EA32F540267B.jpeg
    09435A4D-EB35-4B2C-ACE7-EA32F540267B.jpeg
    228.6 KB · Views: 361
  • 117A2082-F409-4289-97F3-E9F49EB18CFA.jpeg
    117A2082-F409-4289-97F3-E9F49EB18CFA.jpeg
    229.3 KB · Views: 363
  • 7D64C801-B9D5-4154-9D82-C7D5886266DB.jpeg
    7D64C801-B9D5-4154-9D82-C7D5886266DB.jpeg
    208.2 KB · Views: 354
  • BEF0B33D-EADF-4218-959C-9DF5E7B54193.jpeg
    BEF0B33D-EADF-4218-959C-9DF5E7B54193.jpeg
    218.8 KB · Views: 383
Thanks Texas!

Yeah I already found some repairs. I was cleaning the crud in the drivers doors out and noticed some old stud weld marks on the outer skin. I used Shine’s suggested heat and razor paint stripping method on the outside and found an old repair with a skim of old filler.
 

Attachments

  • image.jpg
    image.jpg
    224.9 KB · Views: 338
  • image.jpg
    image.jpg
    89.6 KB · Views: 338
Hi 68!

I’ve alway had an appreciation for all the car companies. I picked up two firebirds (67 & 68) last year that presented themselves to me, and prices were right. So down the GM F body path I go. The 67 needs a body off resto, and will be next.

I have a 68 Ford Galaxie 500 that is my current driver. Love the big cars too! This car is in outstanding shape, but I need to remove the original vinyl top, and fix the rust that started just above the drip rails and paint it. I see why people hate vinyl tops, and the manufacture only primed the roof metal, what were they thinking?
 
Merry Christmas & Happy Holidays,

Got some work in on the Bird. Finished repairing & welding up the unacceptable “cut and bend” job the previous owner did to get the transmission in. Cut out the circle, bent the metal down and welded it. Also welded in the old Auto shifter factory hole.
View media item 60
View media item 59
Worked on a dent in the drivers front fender. Previous owner said it happened when the car was transported to him. I still have a couple high & low spots to work.

View media item 62
View media item 61
 
Ok got a little closer on the fender with some hammer off dolly work, to raise the lows and lower the highs. I still have some minor low spots to work.
View media item 63
I was reading a technique to determine if a repo panel is covered in”E” coat or not, by simple rubbing a small spot with acetone. I did that to both of my inner fenders and the new repo coat did not rub off, but the original factory coated one did. So it looks like the Repo can just be scuffed, but I should strip the original, and the acetone stripped it very quickly, so I may do that first then scuff it up. Am I on the right track here?
View media item 68
Radiator support rubbed off as well
View media item 69
An upcoming challenge I have is the ram air hood that came with the car. The previous owner bought it used but OE, but when he sanded it, he found thick coat of filler over two welded- in hood pins someone installed. The welding job was a butchery, and warped the heck out of the surrounding metal. I’m not gonna fill that hackery in, I need to fix it. It looks like I need to remove the inner support to then work the metal, but maybe there is a better way. I will probably ask a local metal master, Fay Butler for help with this one. View media item 64
View media item 66
View media item 65
View media item 67
I have a question, being the spray booth I built in my shop is used so infrequently, I have found that it is a nice place to do dusty work that I can suck out with the exhaust fan. Obviously before I would do a base/clear I would wash, clean, vacuum, and blow out the booth. What are your thoughts or experiences with this practice? View media item 70
 
Just received my SPI order today! Great jobber a couple of towns over from me, delivered it right to my door.
View media item 82
Over the weekend I worked on the front fenders and hood. The hood had some old hood pins welded in by someone, and a major fill job over the heat distortion the welds created. I worked the metal with some hammer on and off dolly techniques I’ve been studying, and shrinking down the high spots. Most of the warped metal returned to normal, but there still is a little more work to do. I ordered a slapper to help work out the rest. Welded spots are slightly low now.
View media item 72
View media item 73
View media item 78
Last couple of years I’ve been picking up sheet metal tools at flea markets, and EBay.
A metal genius local to me, Fay Butler tuned up my hammers and slimmed down the handles in a way to reduce hand fatigue and vibration. I love quality tools!
View media item 75
View media item 74
I spent Sunday stripping the paint, filler, and primer off of the front fenders and hood.
The fenders were easy as someone in the past started to refinish them. The hood was a bear. What ever was on there was a gummy, hard to remove mess. I used the paint strip discs. Eventually it all came off, I just kept it moving to not overheat the metal.
View media item 77
View media item 76
View media item 71
I need to work the inside of the fenders and under the hood more, but I’m not sure how far I need to go, as I can not get every nook and cranny without a blaster.

How far do I need to go here?


View media item 81
View media item 80
View media item 79
 
Sparky, plenty of us to dirty work in the paint booth & clean it good before painting.
Haven't personally tried it yet, but last year started hearing about a lot of shops using carpet on floor for dust control. Sounds a little retarted at first hearing of it, but it makes good sense.
 
Watching this thread with plenty of appreciation, but when I see the question "How far do I need to go," I think that it's fair to point out that a little media blasting can go a long way in prepping hard or impossible to reach areas prior to epoxy. Even a hand held unit can be a godsend, even though it can be hell to use and leave a giant mess. It's hard to express how much difference it makes in the quality of the work and knowing that when you spray a jamb or hard to reach area, the finish is going to stick and make a permanent base for paint. I think that of those who make the transition to media blasting for the areas that need it, few ever look back.
 
Media blasting is the way to go on restorations IMHO.

I use a pressure pot type media blaster to (inside the paint booth) with crushed glass to quickly strip the car.
It is quicker than the tedious task of stripping paint and then having to DA everything to get it ready for primer.
Here's a section of the right quarter panel on my '68 GTX:


Quarter Panel Right Previous Repair.JPG


Quarter Panel Right Stripped.JPG

Took a bit more concentrated effort to remove the traces of filler.

Here's the engine compartment:
Engine Compartment Left.JPG


I use a blast cabinet for smaller items:
Upper Control Arm.JPG

Upper Control Arm Blasted.JPG


I have to vacuum, air blast and hose down everything in the booth before spraying any paint:
Engine Compartment Epoxy.JPG
 
Ok, first I want to thank all of you for giving me a good boot in the ass. :) Sometimes I just need to hear it spelled out.

I have a good MBA cabinet blaster for the smaller items, but I need a portable blaster for the bigger parts. Turns out my old man had an old TiP portable blaster. Picked it up and it looks promising.
View media item 84
I run aluminum oxide in my cabinet blaster, which has a reclaimer, so the media goes far as long as I do not exceed the recommended pressure. But that stuff is more expensive than the crushed glass “68” is using from northern tool, and I don’t have that store near me, and shipping kills the whole deal. I did find 50lb bags of medium or fine coal slag (black beauty) at tractor supply for $10 per 50lbs bag. That’s a good price around here. I’m thinking the fine might be better for the sheet metal and medium for frames and chassis.
View media item 83
So you guys suggest, and I listen and now I will be hopefully blasting this weekend.

Thank you!
 
Northern Tools did have a sale on the crushed glass media which is my preferred choice for a pressure blaster. It's over though now. Still regular price on the stuff is only 10.99 for 50/lbs. So if there is a Northern near you they should have it. Clean-Bite is the brand name.
 
Back
Top