1970 MGB

EPfiffner

Promoted Users
I've been hanging out here for a couple years reading voraciously and checking out others work.
I haven't had to ask many questions because I end up finding what I need if I read long enough.

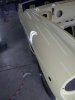
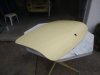
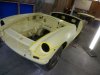
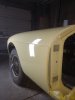
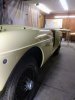
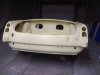
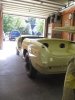
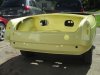
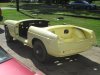
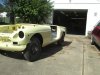
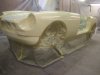
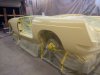
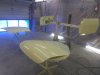
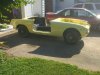
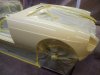
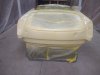
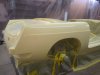
Here is my 70 MGB project, I just painted the shell this weekend, my birthday weekend.

Friday, my birthday, I used the @Jim C "piss coat" method for sealer, let it dry a couple hours, followed by 3 coats of activated Motobase from @Chad.S (thanks!) I actually bought a lot of my SPI from Chad is well, great price and service.

Overnight dry, then tack and 4 coats UV with slow activator.

I have an LPH400 since everyone on here gushes about them, and it made me look like a pro! (No, not quite!)

I have to share a couple "challenges" that I'm sure you can relate to: 2nd coat of clear, wearing a paint suit and even have the sleeves taped, water gushes out the sleeve all over the front fender..
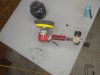
Just before the 4th coat of clear, I clean and reassemble the gun. Luckily I was smart enough to test it after assembly.
Pull the trigger, no air! Put on a blow gun, have air. Take the gun apart, everything looks good.
I take the regulator off the gun and hook directly to air, zero flow.
Luckily I had another regulator and was able to slap it together and get the last coat on pretty close to the half hour flash.

Oh and 1 thing I don't like about the Iwata is that damn air valve on the bottom. 2 or 3 times that stupid thing closed up on me mysteriously.

Thanks to everyone for sharing the knowledge, and helping me through my first paint job!
 

Attachments

  • IMG_20190825_063056488.jpg
    IMG_20190825_063056488.jpg
    98.5 KB · Views: 258
  • IMG_20190825_063025449.jpg
    IMG_20190825_063025449.jpg
    110.8 KB · Views: 256
  • IMG_20190811_134628549.jpg
    IMG_20190811_134628549.jpg
    107.9 KB · Views: 232
  • IMG_20190825_095310507.jpg
    IMG_20190825_095310507.jpg
    209.5 KB · Views: 231
  • IMG_20190825_062922501.jpg
    IMG_20190825_062922501.jpg
    105.2 KB · Views: 245
  • IMG_20190825_063000897.jpg
    IMG_20190825_063000897.jpg
    95.8 KB · Views: 249
  • IMG_20190825_062946601.jpg
    IMG_20190825_062946601.jpg
    102 KB · Views: 247
Last edited:
Looks great, Eric. I should be putting clear down on Wednesday. I had the same problem with sweat running out of my gloves, but luckily it went on the floor, not the car...but it was close!

I'll email you later today with pics.

Chris
 
Looks great, Eric. I should be putting clear down on Wednesday. I had the same problem with sweat running out of my gloves, but luckily it went on the floor, not the car...but it was close!

I'll email you later today with pics.

Chris
Thanks, cool! Can't wait to see! I've got the inside connection, pre-video. Man we were both busy!
 
Time to cut and buff. I read and read on here and it's a little overwhelming at first.

I went to my local jobber and they recommended the Mirka Abralon so I picked up a 2000, 3000, and 4000 disc and interface pad.

All I have is an old school bodywork DA sander, but he said that would work. I put a regulator on it and set to around 40psi.

I started on the trunk lid with 2000 wet 3m paper by hand just to nib, then used the DA Abralon wet at 2000, 3000, 4000. I then buffed with CG v32 and orange pad.

All I have is an ancient 1500 rpm rotary B&D buffer, it's a beast.

Turned out pigtail city, so I went back to the 3000 Abralon and went over it forever, 4000 again and hit with v32.

I can still see a couple scratches in the LED lights but outside it looks good.

I ordered some eagle pink Tolex and green Bufflex.
I'm going to hard block 1500 wet, then 2000 wet, and then try the eagle film.

I did the passenger fender and the top of the cowl in 1500, then guide coat with 2000 so I should be ready to try the DA.

The sweat drip mark that I had in the fender sanded out very easily with the 1500 so that was a big relief. I forgot to get a pic of it post-sanding.
 

Attachments

  • IMG_20190902_125331654.jpg
    IMG_20190902_125331654.jpg
    105.4 KB · Views: 225
  • IMG_20190901_090124394.jpg
    IMG_20190901_090124394.jpg
    86.2 KB · Views: 238
  • IMG_20190902_124947098.jpg
    IMG_20190902_124947098.jpg
    97.4 KB · Views: 243
  • IMG_20190901_140701769.jpg
    IMG_20190901_140701769.jpg
    99.3 KB · Views: 246
I find that cleaning the discs frequently keeps them from leaving pigtails. I'll sand a little, run the sander against my jeans to clean the disc, sand, and repeat. Check the disc often; when it has little dots of paint on it that don't wipe or rub off, change the disc. Also light pressure, let the disc do the work.

I worked really hard on the cab and front clip of my 51 Ford truck, sanding, buffing, finding pigtails, working them out, etc. On the bed and rear fenders I had few pigtails because I adjusted my methods.
 
Hey that's a good trick using your jeans! I have a theory that the jump from 2000 to 3000 with the Abralon discs is too much also.
The work I did yesterday I was more careful using filtered water in a spray bottle.
 
Hey that's a good trick using your jeans! I have a theory that the jump from 2000 to 3000 with the Abralon discs is too much also.
The work I did yesterday I was more careful using filtered water in a spray bottle.
Couple of other pointers:
  • Run your DA slow. Don't cut the feed pressure; keep that at 80 PSI and experiment with the speed control to find the sweet spot-not so fast that it gums up, not so slow that it takes forever.
  • Light to moderate pressure!! Heavy pressure on the DA will give pigtails!!
  • Wet sanding-I use a spray bottle with filtered water and a short squirt of Dawn dish soap. I keep the surface wet; wash it down with the spray frequently. You still have to rinse and check the disc often, as it will still clog.
  • The jump from 2000 to 3000 is fine. If there are scratches after the 2000, they will still be there after the 3000. By 2000, you are just polishing and refining, not really removing scratches. When you find them, you have to go back a grit or work the area longer with the finer grit. I think it works best to go back a grit.
  • The finer the grit, the more passes I take. In other words, if I cut it down with 5 passes of 1000, I'll take 15 passes of 1500, 30 passes with 2000, 30 or more passes with 3000. (Just round figures here for illustration).
  • I use a mix of wet hand blocking and dry DA for 1000, 1500, and 2000. I use a 6" hard DA pad and cut the RPMs in about half.
  • I use a hard block up to and including 2000. Then I DA with an interface pad. I don't use the interface pad until 2000.
  • After 3000 DA wet, I use a white wool pad on my rotary buffer, Chemical Guys V32, and buff until I have the entire surface at an even sheen. This also lets me see scratches and pigtails that I either work with the buffer or go back a grit.
  • I have found that using the rotary is a great deal faster at this stage than using my Flex. I use CG V32 with a Hexlogic yellow pad on the rotary, then on the Flex to polish. Then V32 HL Orange pad rotary and Flex; V34 HL Green pad rotary and Flex; then V36 HL White pad Flex only. V38 HL Black for final polish on the Flex.
I read a lot of posts here on cutting and buffing, yet it still takes the actual experience to find what works.

Some of the more experienced guys here may not agree with my system, which is fine-I am still learning, so I am open to corrections and suggestions.

John
 
I read some posts by @'68 Coronet R/T and picked up a twisted wool pad and some Meg M100 for my first cut, this works well for me for the first cut.

I received my eagle yellow 1500 discs, pink Tolex, and green Bufflex and so far that system seems great, just a learning curve on how much to sand at each stage.

On the front fenders I had to buff way too much so I need to keep refining my sanding process. I still need to buff up to the feature line shown on the front fender. There's a stainless trim strip that hides the seam shown.

Of course I burned through to the sealer on the rear of the car. I knew better than to be sanding in such a tight area. Lesson learned, even after I read post after post warning about this.

It's going to have to be a q-tip touch up, I read how to fix it right but I'm not willing to go through all of that. I'll do better on the next project, that's what learning is.
 

Attachments

  • IMG_20190908_090510575.jpg
    IMG_20190908_090510575.jpg
    118.7 KB · Views: 237
  • IMG_20190909_062445706.jpg
    IMG_20190909_062445706.jpg
    80.9 KB · Views: 228
  • IMG_20190909_062536404.jpg
    IMG_20190909_062536404.jpg
    118 KB · Views: 245
  • IMG_20190910_062024848.jpg
    IMG_20190910_062024848.jpg
    57.7 KB · Views: 217
  • IMG_20190910_062043544.jpg
    IMG_20190910_062043544.jpg
    87.1 KB · Views: 250
I've been having good results with the eagle abrasives method, I've got the body tub cut and buffed other than the door jambs.

I was able to touch up my burn through with qtips, I dabbed in some base, then mixed some clear with syringes and dabbed that on, wetsanded, then dabbed on another coat. It's noticeable to me, but I can live with it, the rear bumper, taillight, etc all kind of hides the area.
 

Attachments

  • IMG_2086.jpg
    IMG_2086.jpg
    105 KB · Views: 243
  • IMG_2084-4.jpg
    IMG_2084-4.jpg
    125.4 KB · Views: 232
  • IMG_2085.jpg
    IMG_2085.jpg
    148.4 KB · Views: 218
  • IMG_2079.jpg
    IMG_2079.jpg
    165.9 KB · Views: 217
Thanks. It seems like this forum is mostly muscle cars, which I love too.
My dad bought this car used in 1973.
When I was a couple years old, when he got home from work I'd tell him "for cruise! For cruise!". He would prop me up on Sears/Montgomery Ward catalogs, we'd put on our sun visors, and cruise around!
Great memories, so I'm bringing this car back so we can enjoy it together once again.
 
Dropped out the rear axle, sandblasted it, the backing plates, and a bunch of related parts. New leaf springs so I scuffed up the ecoat.
Gotta love the new SPI boxes and labels!
After sandblasting and prior to epoxy, I replaced the spider gear shims, the pinion seal, and the axle seals.
It's been 20's - 40's here so I split my garage in half with plastic, covered the roll up door and one of the man doors with plastic, and was able to maintain the metal temp at 65 for 24hrs with my oil burner furnace and a 220V electric heater for supplemental.

IMG_2104.jpg
IMG_2125.jpg
IMG_2124.jpg
IMG_2123.jpg
IMG_2117.jpg
IMG_2127.jpg
IMG_2129.jpg
 
Milestone, Eric. Next phase, upward and onward! Cars is going to be very nice, especially with those wires on there!!
Thanks Chris.
I got the axle reinstalled with poly bushings, put the backing plates and hubs on, took the car out in the snow and turned it around so the front was facing my work area in the garage, and started knocking apart the front suspension for similar treatment.
IMG_2135.jpg
IMG_2137.jpg
IMG_2138.jpg
IMG_2140.jpg
 
On to the front suspension. Degreased, sandblasted, and then black epoxy. IMG_20200126_120140232_BURST000_COVER_TOP.jpgIMG_20200126_120117298_BURST000_COVER_TOP.jpgIMG_20200126_150130676.jpgIMG_20200126_150219934.jpgIMG_20200126_150156416.jpg

Changing oil in the Armstrong lever shocks, these are quite interesting pieces of engineering.
IMG_20200201_145105941.jpgIMG_20200208_085908901.jpg

Freshly refurbished rack and pinion.
IMG_20200202_153012289.jpg

Working on brake lines, I bought a cunifer kit, preflared and cut to length. I can make my own, but well, I was being lazy.
IMG_20200215_085603998.jpg
 
Routing of the brake line from the rear and across the bulkhead.
IMG_20200216_090435677.jpg

The line is attached to the bulkhead with steel clips. One was rusted to pieces so I made a new one.
IMG_20200216_102720638.jpg

Next, wiring harness repairs. These attach at the starter, I unraveled some tape and found this mess.
IMG_20200225_155326756.jpg

I solder spliced in new wires, and crimp/soldered on new eyelets
IMG_20200307_184222390.jpgIMG_20200307_193232888.jpgIMG_20200308_092329857.jpg

Harness back in to the car.
IMG_20200315_161213746.jpg

Cleaned, polished, refurbished the original lighting and started reinstalling.
IMG_20200322_154103938.jpgIMG_20200322_154132816.jpg
 
Back
Top