You are using an out of date browser. It may not display this or other websites correctly.
You should upgrade or use an alternative browser.
You should upgrade or use an alternative browser.
1960 IMPALA CONVERTIBLE BIG PROJECT
- Thread starter RosharonRooster
- Start date
RosharonRooster
Promoted Users
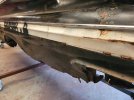
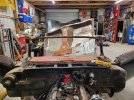
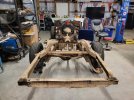
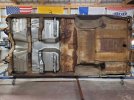
Yesterday went well. We got the full floor pan. It took a little persuasion but wasn't too bad. Once in place is actually lined up really well. I went around the perimeter with a fancy air punch that I bought just for the job. Nice little tool. My buddy welded it in for me across the toe board is a full weld. The other 3 sides are spot welded every 2 inches or so. We spot welded a couple braces but it really sucks welded upside down. We took it off the chassis and test fit it on another frame I had bought about 3 yrs ago. I believe believe frame came off a 59 el Camino. The body fit on it just fine.. then we got it on my rotisserie. Going to finish welding the floor braces, and start on the quarter patch panels next . I'm going to sell the original chassis and do some custom work on my elco chassis with the funds from original convertible chassis Was a long day but no issues to report and no one got hurt. This is our first time replacing a floor pan
Attachments
RosharonRooster
Promoted Users
Pm sentHow much do you think the old frame is worth? I’ve got a complete rolling frame left over from my 59 El Camino.
Don
RosharonRooster
Promoted Users
Going to fully wrap/reinforce the hardtop frame. It's a common thing in the lowriding world. The factory convertible frame already has partial reinforcement so its difficult and more work to try and clean those up and re work. The purists out there want a untouched frame where as I am going full custom on this car.Why would you lose the convertible chassis?
")
RosharonRooster
Promoted Users
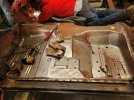
Weekend update. Got all the braces welded up. Fixed a rear body mount. There are a few soft spots but overall it's pretty solid under neath. We have about 2 more Saturdays of minor patch work on the bottom then start on the quarters.
Attachments
RosharonRooster
Promoted Users
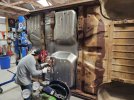
The rockers are ok. A few small patches here and there. (1x1 inch) but I dont think it calls for full rocker replacement. Yes I have a mobile sandblaster that comes out. I plan to blast under near. Inside the cab of the car. The dash firewall and door jams. And inside the trunk. Then straight to epoxyWill you blast the bottom when you're all done? Are those rockers ok?
'68 Coronet R/T
Oldtimer
The car seems to be in great shape.
That floor pan work reminds me of a '65 Buick Special Convertible I did. Only it had sat outside with a ripped top for a decade or so.
I have never done a custom before, so I will be watching your progress.
That floor pan work reminds me of a '65 Buick Special Convertible I did. Only it had sat outside with a ripped top for a decade or so.
I have never done a custom before, so I will be watching your progress.
RosharonRooster
Promoted Users
Happy new year everyone. Been plugging away on this jalopy. We just about finished up on the floors. There was a couple soft spots in the rear floor pan. But we determined it would been too much work to install the complete rear pan patches that I have. Mainly because the rear pan, goes under the front pan. Also the pans I have don't go all the way to the back. There is also alot of work involved to remove the section that the top pistons bolt to. Just alot of work. And I didn't see any sense cutting out good floor to replace with good floor. So, patch it was...disclaimer - we are far from professional, just some back yard hacks.
Attachments
RosharonRooster
Promoted Users
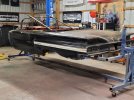
I can't wait til I can get the mobile blaster out here to blast the floors and get them in epoxy. It will look so much nicer. We went around the entire floor with hammers, picks and screw drivers, and there are no more soft spots so it should clean up nice, epoxy then raptor liner. ...on to the quarter panels...
RosharonRooster
Promoted Users
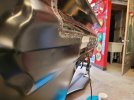
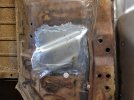
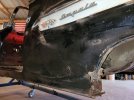
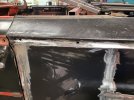
So , another disclaimer. We aren't sheet metal work experts. But thats why evercoat rage is in business lol. So yesterday my buddy came over and we decided it was time to start cutting. We started with the worst looking panel. This area wasn't that rusty. A lil down low, but man it was just smashed from numerous angles. I dont understand how this happens. It's like someone ran into a fire hydrant. Here are some before pictures
Attachments
RosharonRooster
Promoted Users
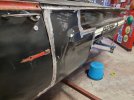
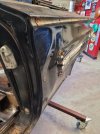
We assess what we thought was good metal vs bad. And were we should cut. We agreed that we shouldn't overlap it into the door jam and start messing with that. And we also wanted to put as many seams behind moldings. So we cut along the top , but left the factory mounting tabs for the stainless and also along the side. , behind stainless molding.
Attachments
RosharonRooster
Promoted Users
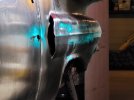
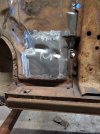
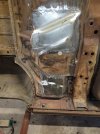
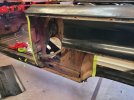
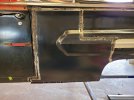
Inside its pretty solid and stout. The quarter panel goes on top of a factory rocker reinforcement for convertibles. We Learned that the hard way. The reinforcement is about 1/8 or so and it's very stout. We pry it down to put the new panel in and plug weld from the bottom, like it was originally. The only problem with that was that we couldn't pry it back up to to plug weld. So, after an hour of messing with it. We decided to just cut it off, put it where it needed and weld it back. Grind it smooth and can't tell it happened. I was happy to get it plug welded back. Even though it's on the bottom of the car, and will be covered with molding. I just feel better about it. Here is the patch welded in. Still needs some grinding and finishing. But its in. And will need a little filler. I'm surprised it's 18ga like the factory. It's solid. Just needs a couple hours of Clean up. But there's no pinholes. I'm happy. My buddy saved me a bunch of money. Fed him breakfast, and lunch, then we had beers
Attachments

RosharonRooster
Promoted Users
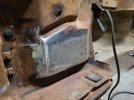
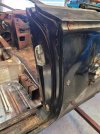
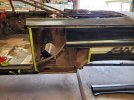
You might notice on a couple areas the cuts are a little off and the gap is a little wide. There's a reason for that. It's because of the crease or body line that goes down the side of the car. We cut the panel and didn't think about that body line. When it came time to line it up. That body line crease was off. ..and thats a big deal. So when we went to correct it, it resulted in our original cuts being off. So we had to cut some little slits to fill in the gap but once we grinded it smooth. Can't tell. Here is the body line I'm referring to. It's pretty straight now